Unquoted Service Paths

Fixing Unquoted Service Paths in Windows.
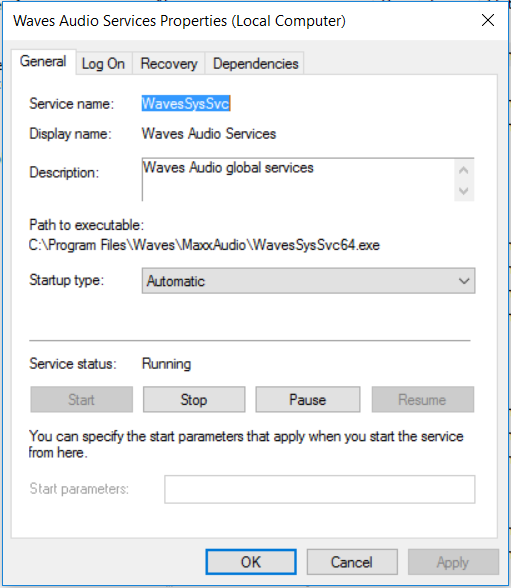
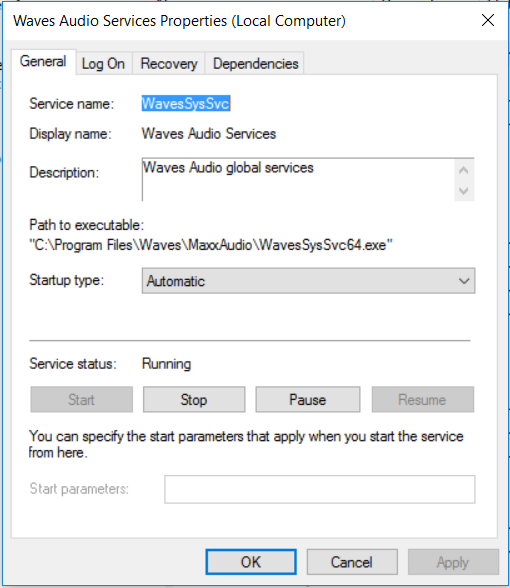
This is just a short write up on unquoted service paths, what they are, why they are bad and how we can fix them. A vulnerabilty scanner will often find these on an ‘Authenticated’ type of scan. However we can search for them via WMI (Windows Managment Interface) query or by manually looking through the services one by one. So what is an unquoted service path? It is the path/file location of the service-exe for a given service that isn’t wrapped in quotes, like in the picture.

OK, so what? Why are these bad?

The problem with unquoted service paths is that as windows starts up or as the service is started Windows needs to locate the service-exe for that service. (I keep saying ‘service-exe’, well we’ll come on to that in a sec!). It looks for the service-exe in the path specified in the ‘Path to executable:’ field of the service. If the path is quoted and contains white space in the path windows knows to go directly to the location. If the path is unquoted and contains white space, Windows will essentially query the different locations in the path until the service-exe is found.

Where the service path contains white space and is unquoted, an attacker can use this to escalate privileges from a standard user account. For example if the service is running as SYSTEM, an attacker can create a service-exe to say create an account and drop it in the local administrators group. The attacker would also need to have ntfs permissions as the standard user in the location in the path so ‘C:\’ might not be viable however further down the path might be. The attacker then restarts the service and the new service-exe will be executed by the service running as SYSTEM.

The service-exe I keep refereing to is special type of executable file that is used by services, its not any old exe you can’t just drop cmd.exe in the path unfortunatly…

If I can’t do an Authenticated Vulnerability Scan how can I find them..?

We can use two methods, we can either use WMI query or manually open up each service and check each one, then check the ntfs permissions of each location. We can use the follwoing WMI command from Common Exploits; this will filter out the automatic service and also look for unquoted service paths:

wmic service get name,displayname,pathname,startmode |findstr /i "auto" |findstr /i /v "c:\windows\\" |findstr /i /v """

Running the above wmi query will display something like the the following if present:

WMI Query of Unquoted Service Path

As we can see large mainstream manufactures still implment unquoted service paths!

I’ve found one, how do I fix it?

This is relatively straight forward however this should be tested before being rolled out into production (goes without saying). We need to add the quotes to our service path so windows know where to go for the service-exe directly immediatly, rather than searching each directory. We can do this through the registry.

Fire up the registry and navigate to the service as below:
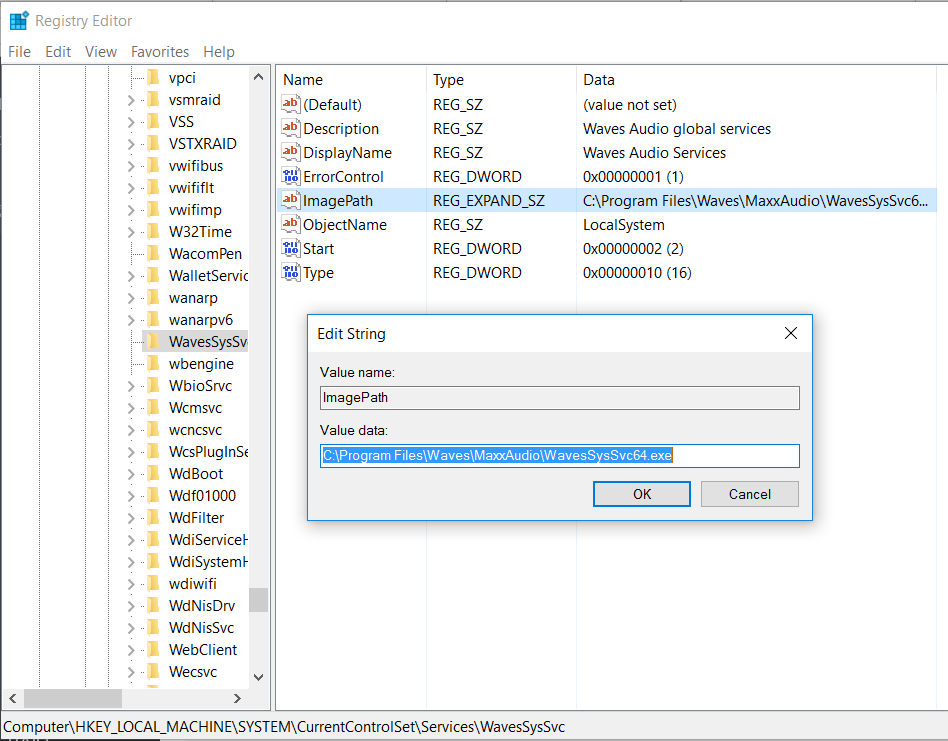
Registry Unquoted Service Path imagepath

Open up the ImagePath string and simple add the quotes as below:
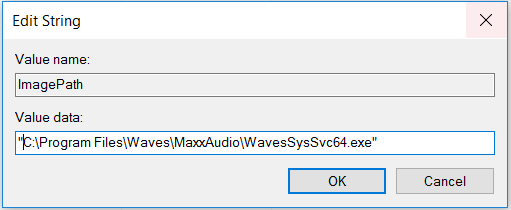
quotes

Restart the service and ensure the service starts properly. We can also open up the service and also re run the WMI query  to ensure our affected service now has quotes. This will ensure any attackers should they manage to compromise the machine as a standard user, stop them being able to escalte privileges in this manner!Unquoted Service Path Corrected
Hopefully this post will help you resolve the uquoted service path issue.

Running MBSA on a remote machine.

Running MBSA on remote machine that is in a workgroup or different domain.

I thought I would share my findings on using MBSA (Microsoft Baseline Security Analyser) for targeting remote machines that are not part of the same domain or in a workgroup. This really is a great tool for enumerating OS patch levels.

We have two scenarios to run through; the first, running MBSA on remote machine that is in a different domain from the machine that it is installed on. The second, running MBSA on a machine that is in a workgroup. Ok no problem. Here is what we do.

First Scenario

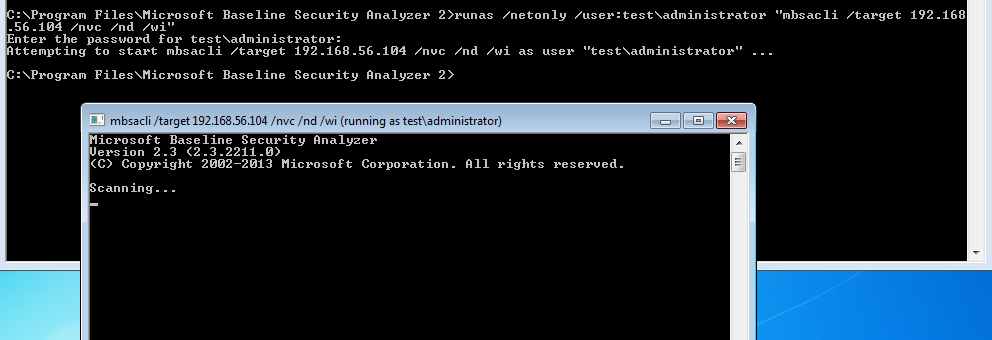
In the first scenario our target machine is a Windows Server 2012 R2 machine that is in a different domain to our MBSA host (Windows 7 Pro 64bit). Fire up a cmd prompt with admin privileges from the machine that you are running MBSA from, and run the following syntax:

runas /netonly /user:test\administrator "mbsacli.exe /target 192.168.56.104 /nvc /nd /wi"

A second command prompt will pop up and run, running the syntax as above:

MBSA remote1

If you wait a short while the MBSA command prompt will disappear when finished, from here you can open up MBSA and view the report:

mbsa remote2

In this example the target machine was in my virtualbox lab, in a domain called ‘Test’. The machine I ran MBSA from was a Windows 7 Pro machine in a workgroup (no relationship) other than IP connectivity. The cli syntax I used here was used to speed up the check, clearly only use this if you have the latest scan catalogue:

/wi – Show all updates even if not approved by wsus.
/nvc – Do not check for a new version of MBSA.
/nd – Do not download any files from MS update site when scanning.

Additional options:

/target <Target-IP>

/listfile C:\tmp\targets.txt

/catalog C:\tmp\wsusscn2.cab

Add: ‘>C:\tmp\MBSADC1.txt’ to the end of the syntax for a handy output to a text file.

As an example you might use:

runas /netonly /user:test\administrator "mbsacli /catalog C:\tmp\wsusscn2.cab /target 192.168.56.104 /nvc /nd /wi"

The Second Scenario

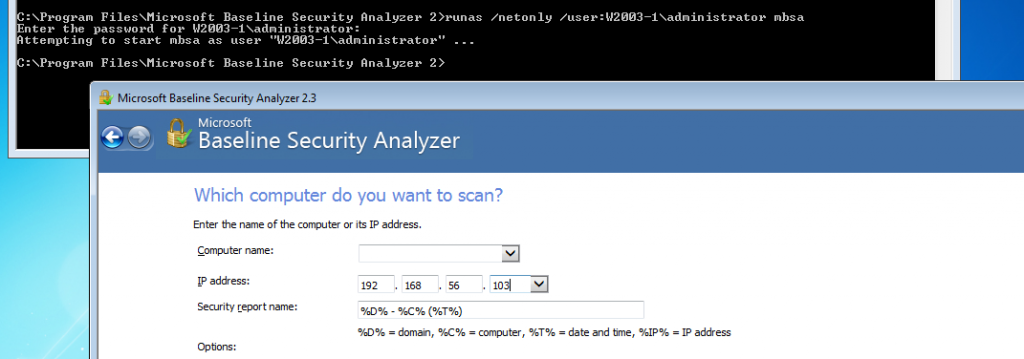
The second scenarios is a Windows Server 2003 machine that is in workgroup. The syntax is actually the same however your specifying the local machine name rather than the domain name. I have mixed this one up a little here by not using the cli, by just specifying MBSA the command simple fires up MBSA GUI as the account specified. The only thing to remember here is to add the IP address into the GUI.

runas /netonly /user:test\administrator mbsa

mbsa remote3

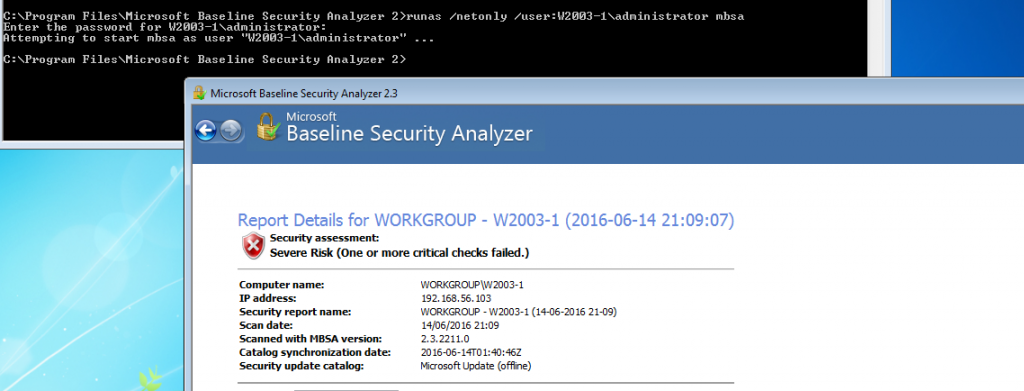
And again after the scan has finished the results can be view in the GUI.

mbsa remote4

I haven’t successfully managed to do this from a Windows 10 client yet, various forums would suggest it isn’t supposed to work with 10 however if you know please feel free to drop me an email or comment.


Windows Client/Server Hardening Part 2: Securing Remote Desktop with Certificates.

Securing Remote Desktop with Certificates from your Internal CA.

Implementing Remote Desktop with Certificates

In this post I’m going to be following on from Part 1 located here, talking about further hardening the Windows Remote Desktop Protocol (RDP) with a certificate based system. The certificate is generated and signed by an internal Active Directory Certificate Authority (CA). The issue here being that you have no way of verifying the server or PC that you are trying to connect to via RDP. The machine that you are supposedly connecting to usually presents you with a certificate that is signed by itself, funnily enough known as a ‘self signed certificate’.

The Attack…

The play by an attacker here being that should they have exploited a vulnerability and been able to access your internal network (not for this discussion, however..), they could essentially respond to ARP request by modifying responses sent by an attackers machine. This is done by flooding the network with bad ARP responses, known as ARP poising, the whole attack is known as a Man In The Middle (MITM). There are many ways of carrying out a MITM attack, this just one of them. Once a MITM attack is in play and your arp cache is then poisoned you would essentially be connecting to an attackers machine. The attacker can then sniff the network traffic and all sorts of other rather bad things can happen, like stealing credentials.

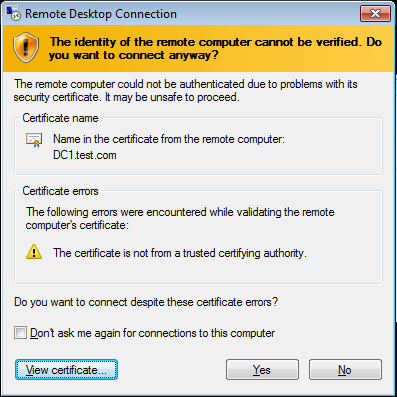
A typical self signed certificate presented through RDP looks like the picture above, and clearly states the certificate is not from a trusted certificate authority. If your PC can trust the certificate that is presented by the machine you are connecting too, through the use of a bonafide signed certificate from your internal CA you would know whether or not the machine you are connecting to is genuine. More importantly, through the use of Group Policy you can specify that you are not able to connect to it unless you trust it. Thus preventing any bad MITM rdp sessions.

How do we fix it…

Carlos Perez has written up an excellent ‘how to’ guide from start to finish on how to setup this up. He walks through the certificate templates required for the RDP service. Also setting up group policy to deploy the certificate. This is a great guide so I’m not going to re-regurgitate his excellent work going through all the various screen shots, you can view it here at http://www.darkoperator.com/blog/2015/3/26/rdp-tls-certificate-deployment-using-gpo .

Monitoring Domain Admins with PowerShell! Free and Easy

Free Active Directory Monitoring with PowerShell, keep an eye on those high privilege level groups!

Keeping an eye on privileged Active Directory groups is Important. We can do this by Monitoring Domain Admins with PowerShell. Groups such as ‘Domain Admins’ (DA) and ‘Enterprise Admins’ (EA) in Active Directory (AD) is vitally important within your IT shop. You need to be aware of any changes happening to high privilege level groups. Especially ones that have the level of access that DA and EA groups have. This of course also extends further than just administering AD privilege groups. In addition to these you may also want to monitor your high privilege level application groups. Such as Lync and SCCM. The worst case scenario is you find a username you not aware of has been dropped in your DA group. As soon as this happens you want to know and investigate immediately. You don’t need any fancy tools to monitor active directory groups. You just need a few lines of PowerShell coupled with the Send-MailMessage feature. Very quickly you have some powerful alerting.

Solution:

I’ve just pulled the below script  together in a few minutes which very simple pulls the DA group and emails the contents to the desired location in the script.

$EmailBody = "The Domain Admin group has the following members verify these are correct:
              $currentmembers "

$currentmembers = (Get-ADGroupMember -Identity "Domain Admins").name | out-file -filepath C:\temp\currentmembers.txt

$Email = @{ 
            'From' = 'Active Directory Administrator <admin@test.lab>' 
            'To' = 'adam@test.lab'
            'Subject' = 'Current Domain Admin Members' 
            'SmtpServer' = 'my.smtpserver' 
            'Body' = $EmailBody 
        } 
        Send-MailMessage @Email

This is just a simple script to query the contents of a group and mail it. What you would ideally want is a comparison of a before and after state. In addition some intelligence within the script. This would be to either; email you if any changes have been made including the additions. O alternatively do nothing if no changes have been made. Then schedule the script to run every 5 minutes with Task Scheduler. This allows you to have pretty good overview of your high privilege accounts.  Such a script thankfully already exists over at TechNet https://gallery.technet.microsoft.com/scriptcenter/Detect-Changes-to-AD-Group-012c3ffa

Alternative tools do exist such as SolarWinds LEM and ChangeAuditor. However using PowerShell is free after all and requires very little effort to implement! As a bonus you’ll boost your PowerShell skills.

Cisco AAA Authentication with RADIUS against Active Directory 2012 NPS

AAA and RADIUS through the Network Policy Server (NPS) role in Windows Server 2012 R2

I thought I would cover a quick post to demonstrate setting up Active Directory authentication for a Cisco router or switch IOS login. This will be using AAA and RADIUS through the Network Policy Server (NPS) role in Windows Server 2012 R2 to authenticate users in Active Directory on Cisco IOS devices.

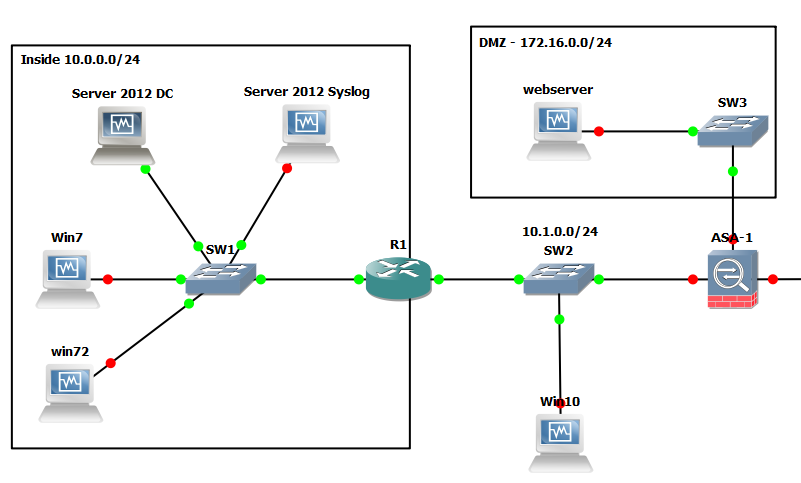
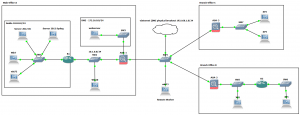
As with all my labs a picture paints a thousand words so here is the GNS3 Network topology we will be using, this is also being used for 802.1x which will be covered in later post:

Cisco AAA Authentication with RADIUS against Active Directory GNS3 Topology

So here is quick run down on the gear we will be using just for this lab:

R1: Cisco IOS (C7200-ADVENTERPRISEk9-M), Version 15.2(4)S4

Server 2012 DC: Windows Server 2012 R2 ( Active Directory Domain Services and Network Policy Server role.

Just to demonstrate a lab as simple as the below could also be used to test this:

radius lab

Active Directory Configuration:

I will be assuming that AD and the NPS role have already been installed. Prior to jumping into the NPS configuration you will need to create an AD group for the users that will be logging into the Cisco equipment, add a couple of test users to this group. In my case I have simply created a group called ‘Radius’ and have added the user ‘Adam’.

Open the NPS console.

Right click on the NPS(Local) tree node and select ‘Register server in Active Directory’:

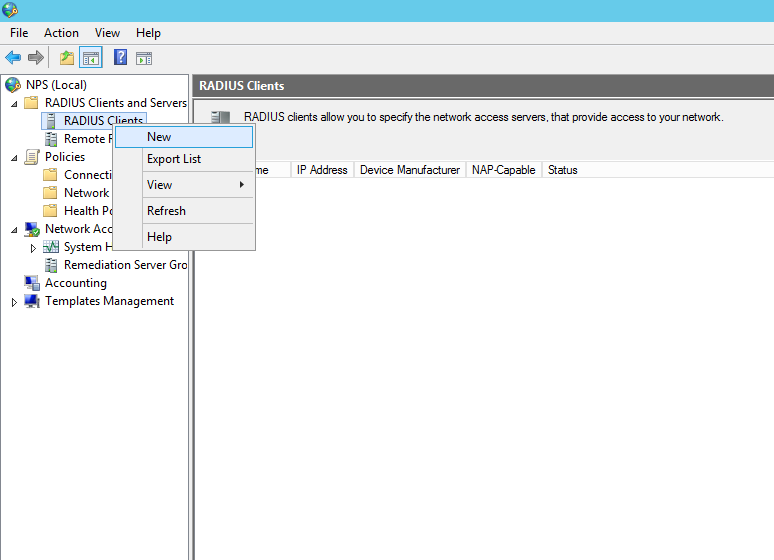
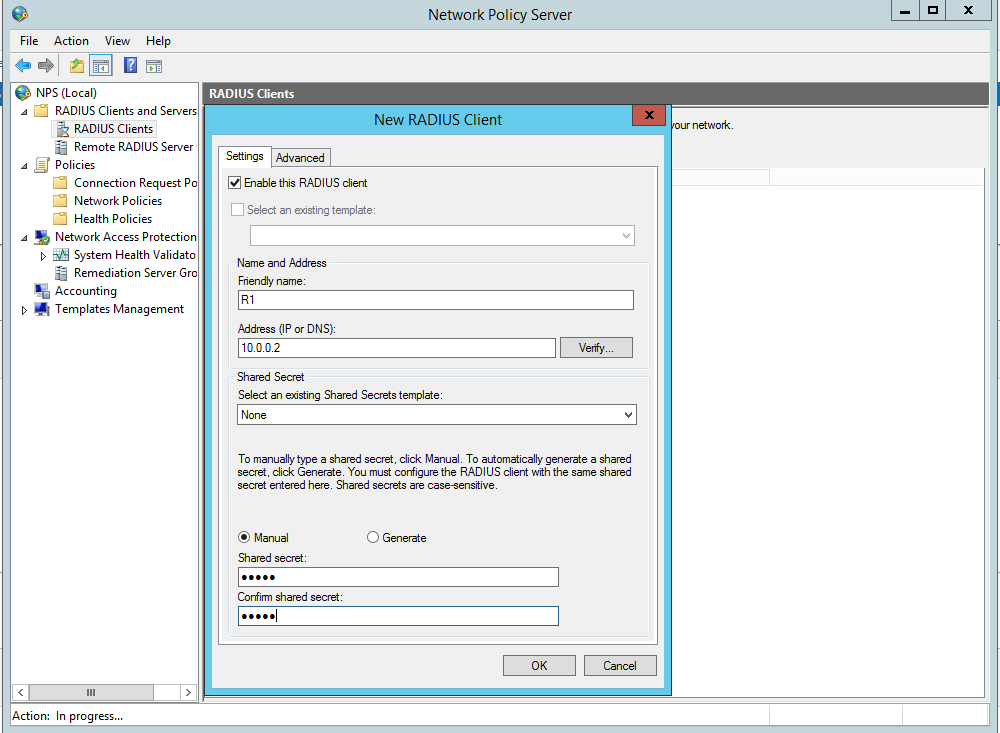
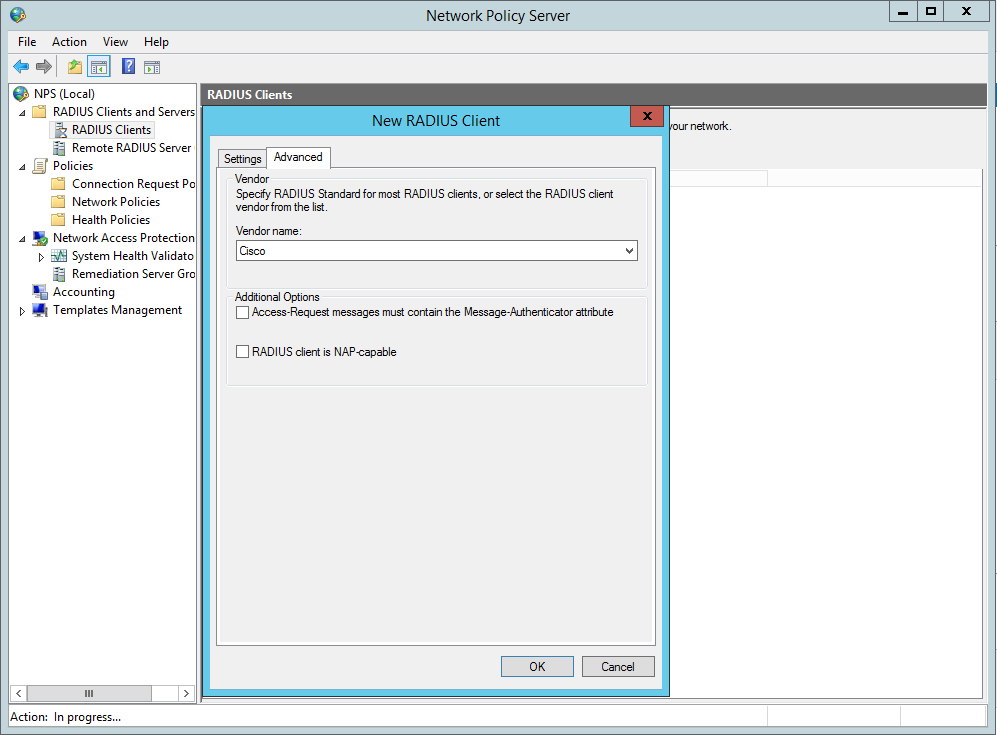
Now create the Radius clients, in our this case this is R1:

Radius Clients, New

New Radius Client Settings

New Radius Client Advanced Screen


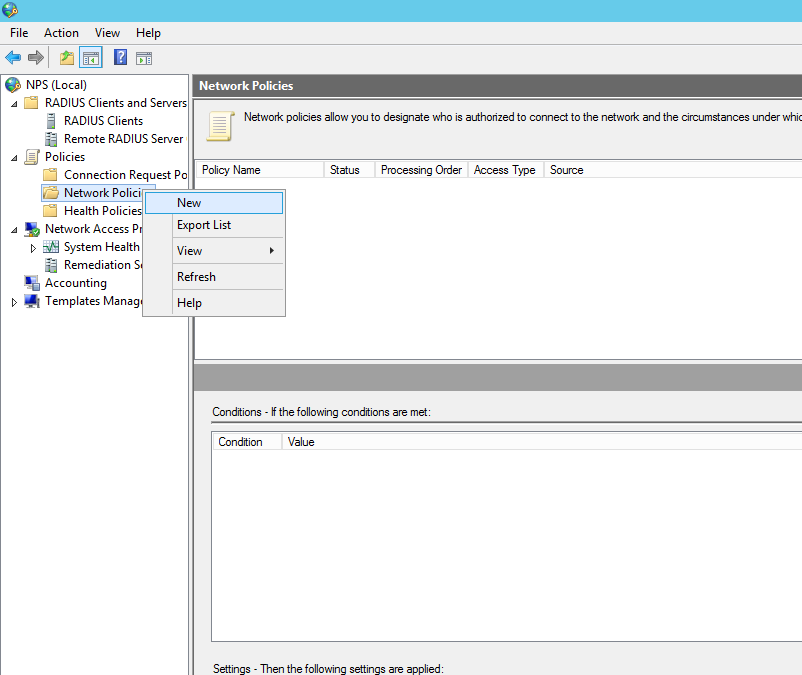
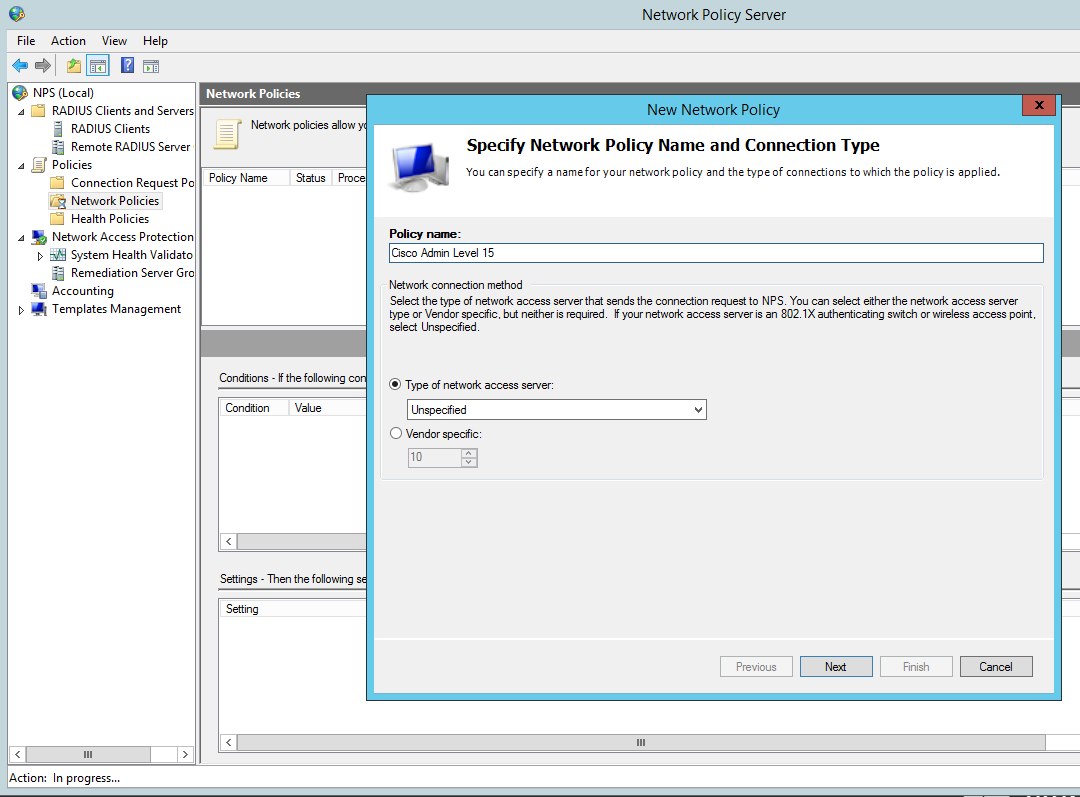
Now we need to configure the Network policy:

New Network Policy

New Network Policy name

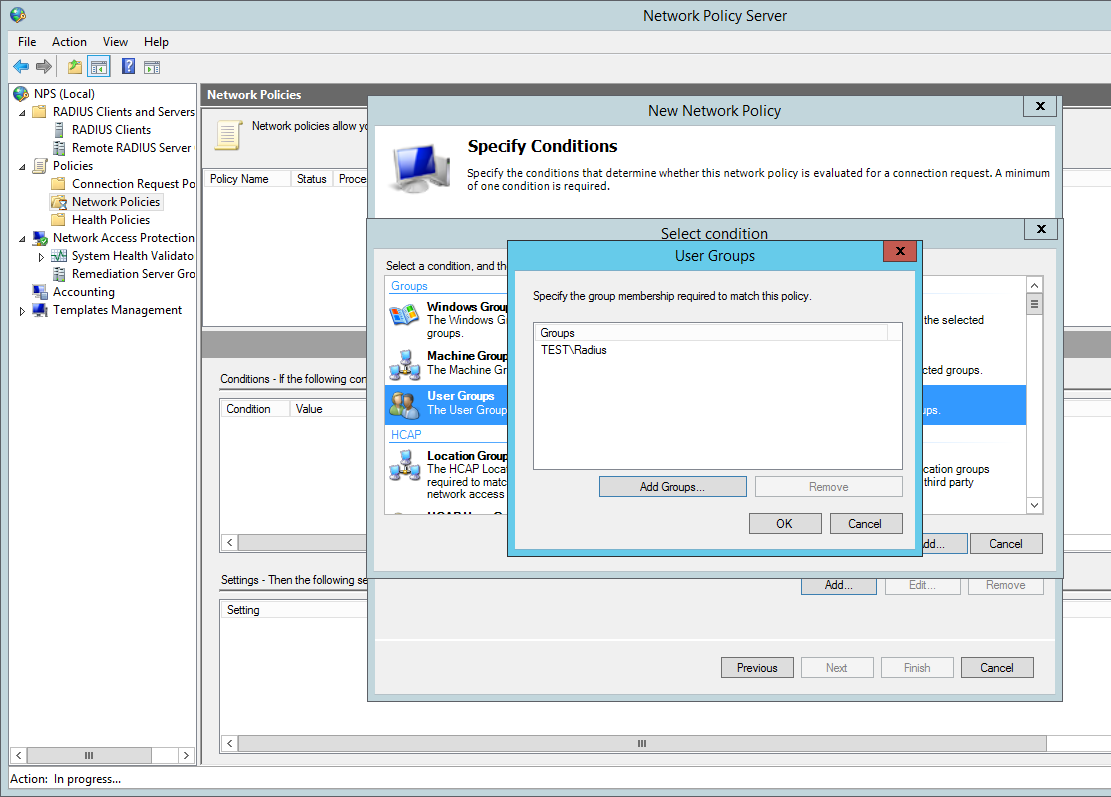
Add our ‘Radius’ AD group. You can tighten the control here by specifying further conditions such as the ‘friendly name’ (R1)  or the local IPV4 address of the radius client, in a production environment you would want to lock this down further for now we are just going to add the the user group to authenticate:

New Network Policy - Add

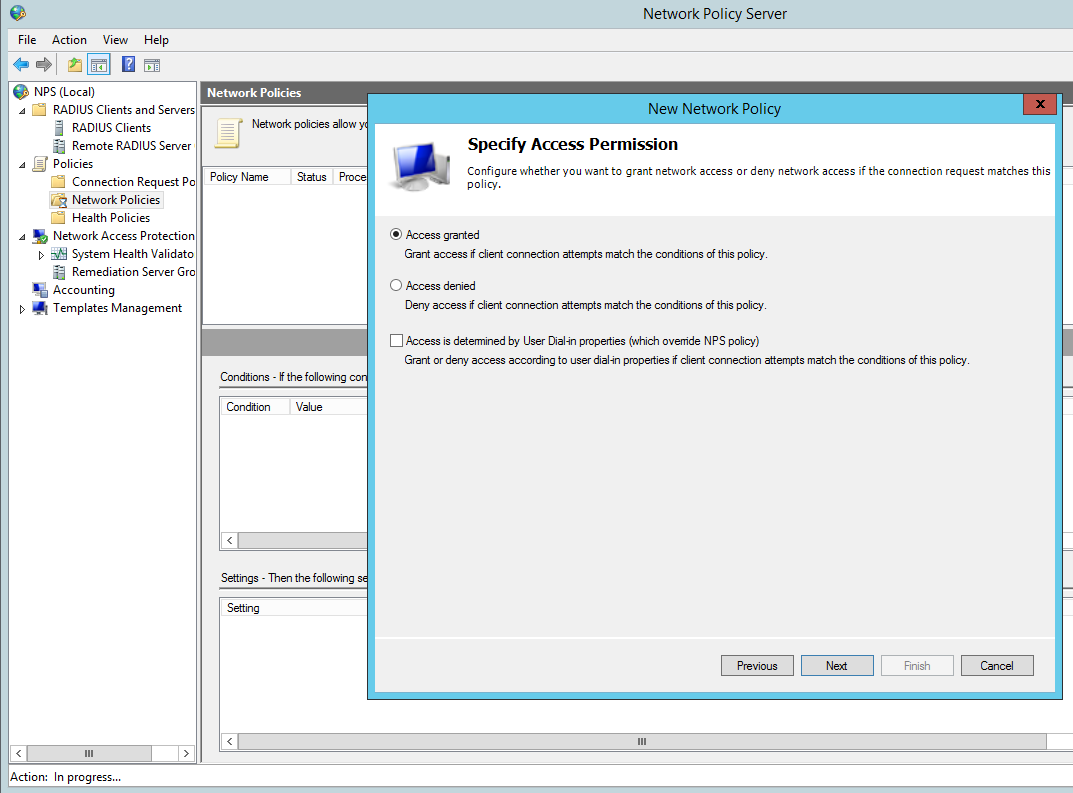
Grant Access for this group:

New Network Policy Access Granted

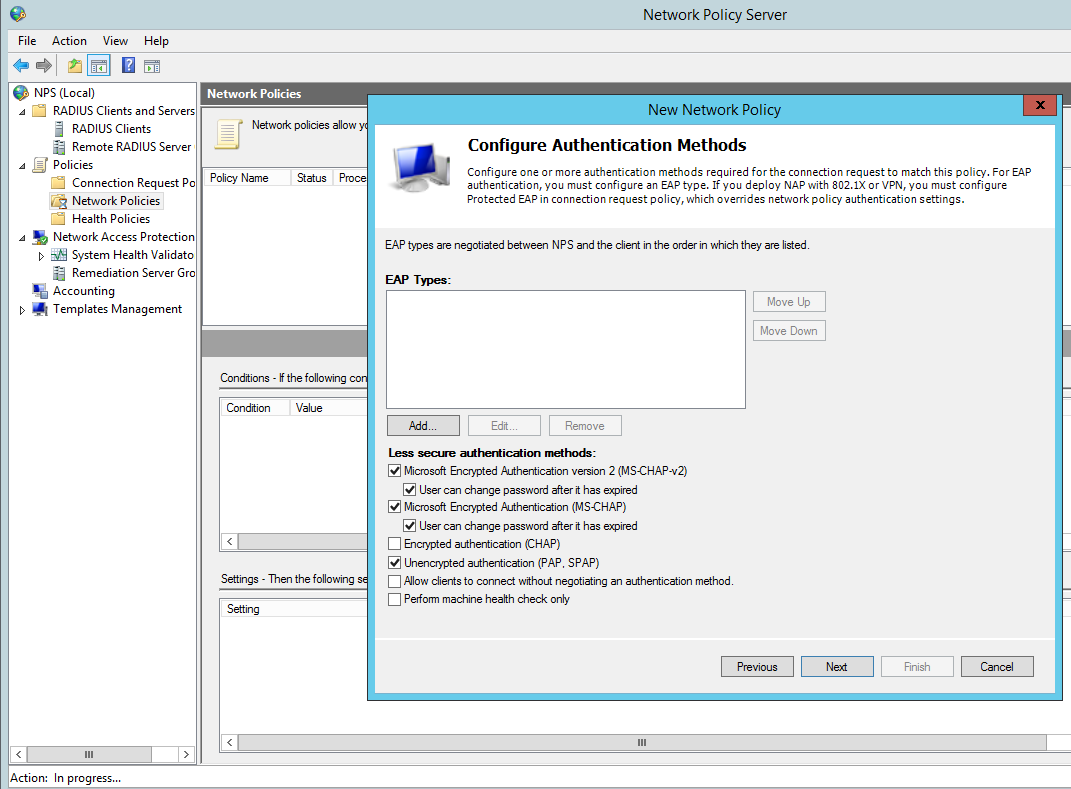
Configure the appropriate authentication methods:

New Network Policy - Configure Authentication Methods

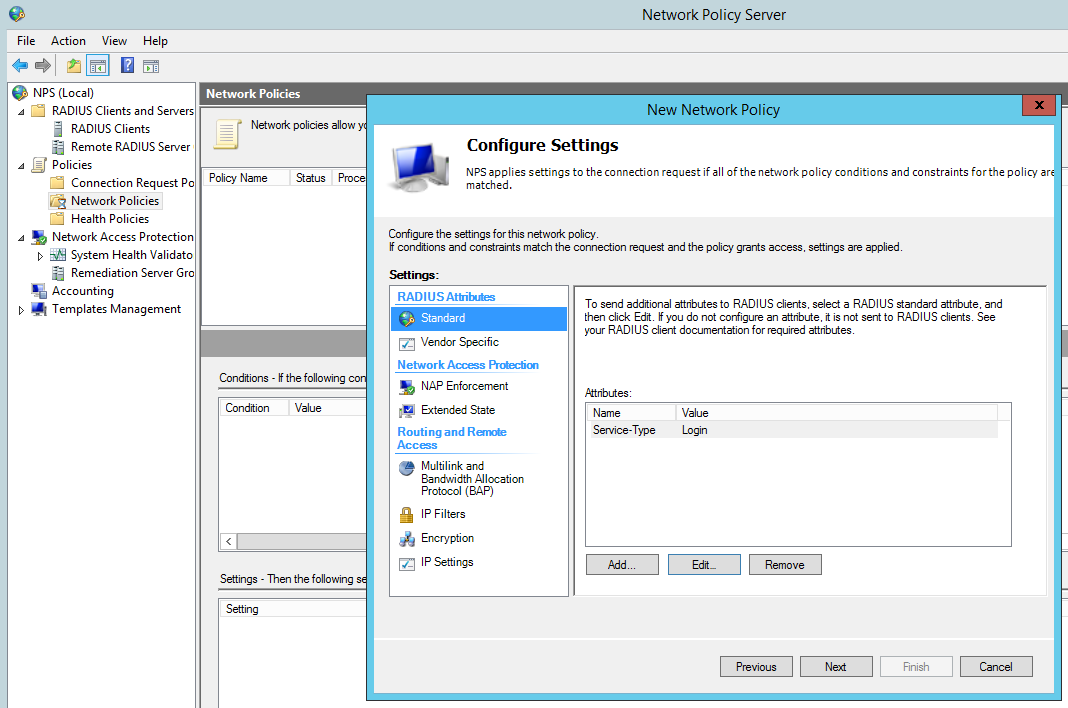
Change the Standard Radius Attributes by removing ‘Framed-Protocol – PPP’. Edit the ‘Service-Type’ value to ‘Login’:

New Network Policy - Standard Radius Attributes

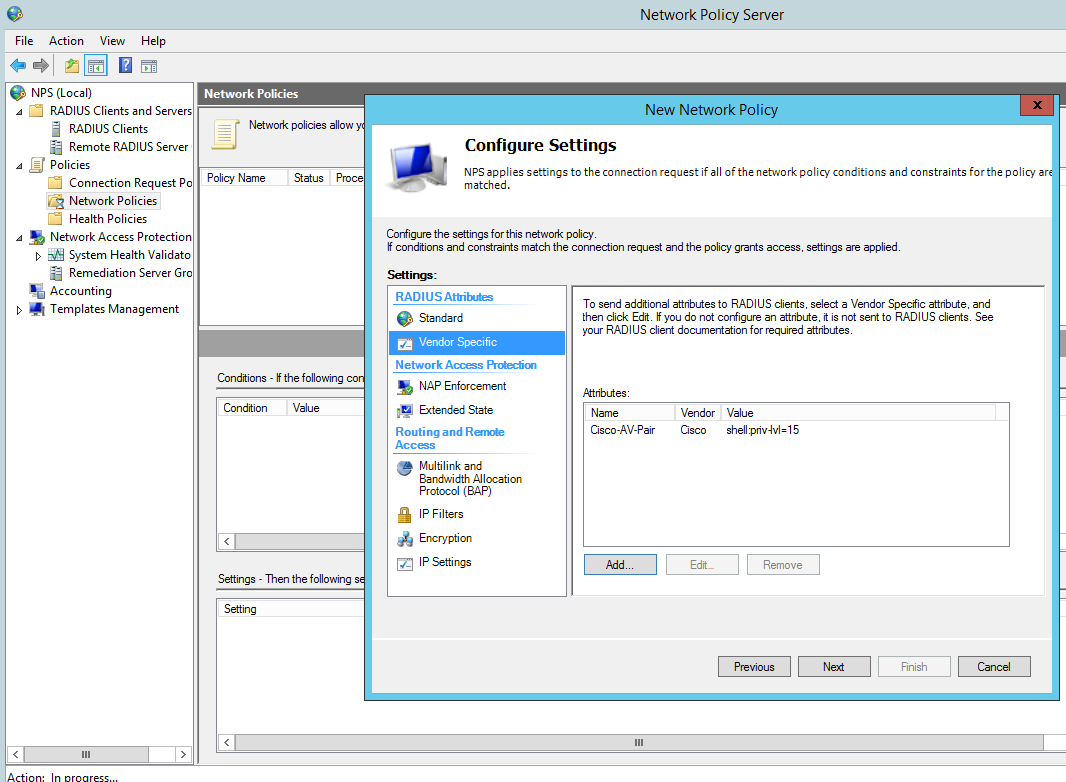
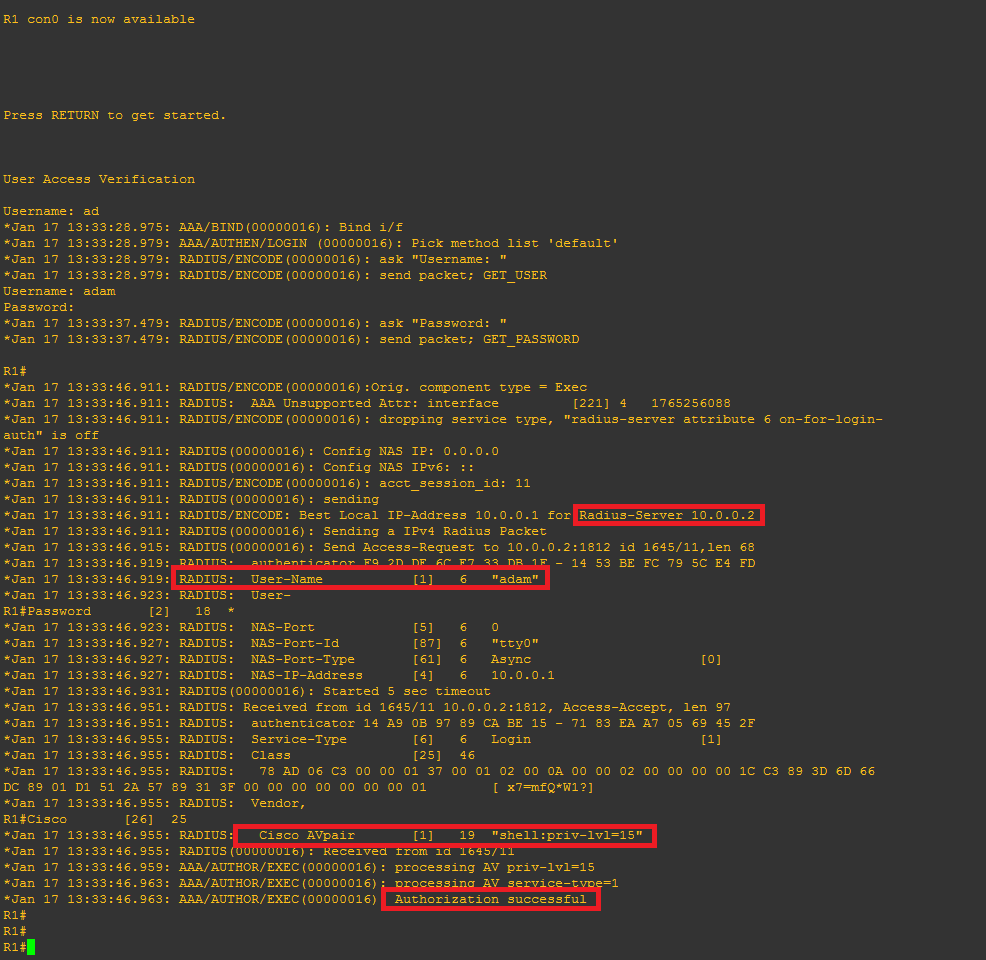
Add a Vendor specific attribute, this allows the radius server to pass the privilege level though the cisco router which we shall see later in the debugging. The value needs to read ‘shell:priv-lvl=15′.

You can create several policies for the different privilege levels. For example you could create a group in AD called ‘Cisco Users Priv 1’, associate this group to a policy and in the below option use the value ‘shell:priv-lvl=1′. When that user logs in the policy will match that user and the NPS use the matched policy passing privilege level 1 through to the router or switch.

New Network Policy - Vendor Specific Radius Attributes

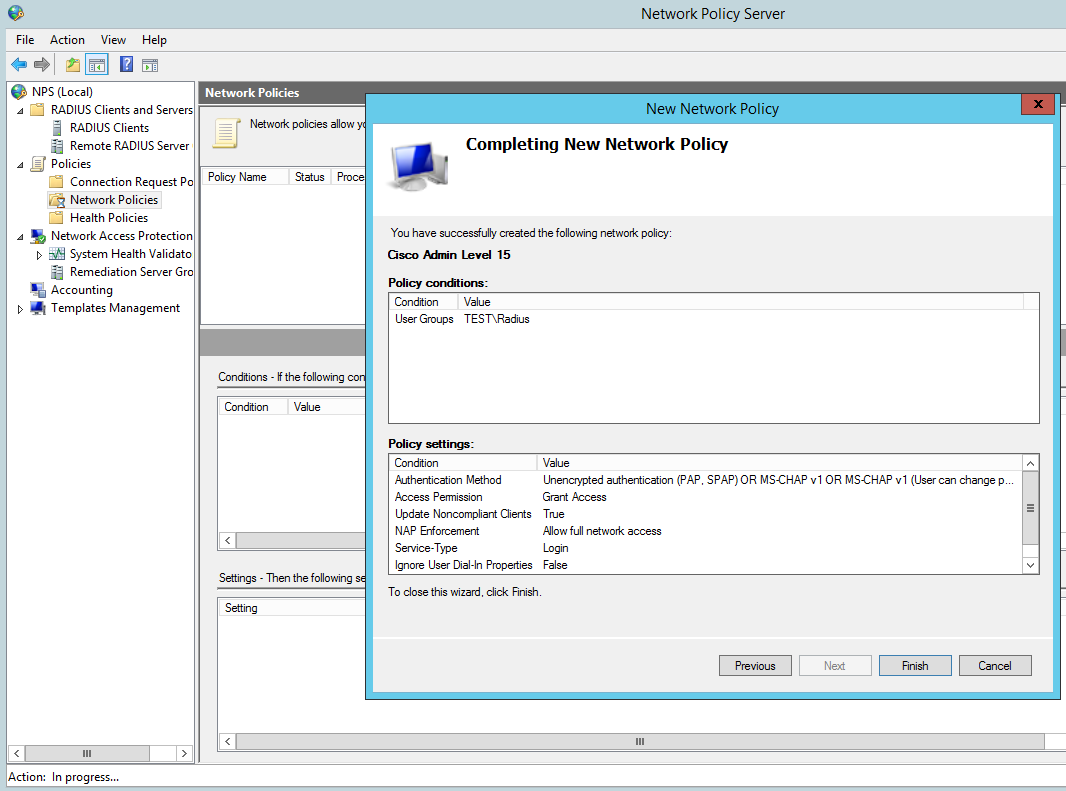
Then Finish:

New Network Policy - Finish

Cisco IOS configuration

Create a a user with privilege level 15, we wil use this as our fall back should the router not be able to contact the radius server it will use the local AAA database.

R1(config)#username Admin privilege 15 secret cisco12345

Enable AAA:

R1(config)#aaa new-model

Now we will setup the main parts to the radius configuration, tell the switch we would like to use radius and the group RAD_SERVERS:

R1(config)#aaa group server radius RAD_SERVERS

Specify the radius server that we would like to use in our case 10.0.0.2 is our NPS, the auth and acc ports and also the secure key we used:

R1(config-sg-radius)#server-private 10.0.0.2 auth-port 1812 acct-port 1813 key cisco
R1(config-sg-radius)#exit

Specify that for  the default login  for authentication an authorization that we want to use the group called RAD_SERVERS that we have just created and if that fails we use the local database. This is particularly important so we do not lock ourselves out on the router:

R1(config)#aaa authentication login default group RAD_SERVERS local
R1(config)#aaa authorization exec default group RAD_SERVERS local if-authenticated

All together this looks like the below:

R1(config)#aaa group server radius RAD_SERVERS
R1(config-sg-radius)#server-private 10.0.0.2 auth-port 1812 acct-port 1813 key cisco
R1(config-sg-radius)#exit
R1(config)#aaa authentication login default group RAD_SERVERS local
R1(config)#aaa authorization exec default group RAD_SERVERS local if-authenticated
R1(config)#aaa authorization console

We can test simply by logging out and back in.

Troubleshooting

It obviously goes without saying you need to test the authentication to the Radius server, exit right out of the console and log back in using your AD credentials.

If all has been configured correctly you should be able to login. its also worth testing the fall back option configured for local AAA authentication. We can do this just simply stopping the NPS service then try the local credentials, again all being configured correctly you should be able to login.

There are a few useful debugging commands we can use  to monitor and troubleshoot the authentication these being:

R1#debug aaa authentication
AAA Authentication debugging is on
R1#debug aaa authorization
AAA Authorization debugging is on
R1#debug radius
Radius protocol debugging is on
Radius protocol brief debugging is off
Radius protocol verbose debugging is off
Radius packet hex dump debugging is off
Radius packet protocol debugging is on
Radius elog debugging debugging is off
Radius packet retransmission debugging is off
Radius server fail-over debugging is off
Radius elog debugging debugging is off
R1#

This time when we login we can see the debug information for an attempted login, it should look similar to this, note the highlighted area’s:

radterm

I hope this has been informative.

CCNA Security – Implementing Cisco Network Security Lab

I thought I would share with you the Lab I have been mostly working with for CCNA  Security (CCNAS) – Implementing Cisco Network Security (210-260) exam that I have recently took and passed. I have also used several smaller lab setups for specific testing however this is the main lab to piece everything together.

CCNAS - Implementing Cisco Network Security Lab
CCNAS – Implementing Cisco Network Security Lab

The lab has been built to accommodate the many elements on the exam and covers off most of the practical procedures that you need to be comfortable with. Using GNS3 and VirtualBox we are able to lab most of the practical exercises bar the L2 switching portions which I achieved through physical equipment (Catalyst 3750, 3550 x2 and 2950 switches). The exam does cover many topics in theory that you must know, these aren’t covered here, however can be found on the Cisco website.

The lab contains several client machines for managing the routers and ASA firewalls from putty, cisco configuration professional and ASDM as well as testing PAT through the ASA with a breakout to the internet. There is an Active Directory Domain Controller with the Network Access Protection role installed for use with AAA/radius and NTP. A separate syslog server. A DMZ with web server for testing NAT and outside firewall rules. There is also an ASA 5520 at each of the three sites for testing VPN site-to-site Ipsec connections, clients at all sites for testing end to end connectivity. There is also an outside remote client for testing the Anyconnect and client-less vpn options which takes advantage of the AAA radius service.

Using this lab we are able to address the following practical elements for the CCNAS exam:

2.0 Secure Access

2.1   Secure management

  • 2.1.b Configure secure network management
  • 2.1.c Configure and verify secure access through SNMP v3 using an ACL
  • 2.1.d Configure and verify security for NTP
  • 2.1.e Use SCP for file transfer

2.2 AAA concepts

  • 2.2.b Configure administrative access on a Cisco router and ASA using RADIUS
  • 2.2.c Verify connectivity on a Cisco router and ASA to a RADIUS server
3.0 VPN

3.2 Remote access VPN

  • 3.2.a Implement basic clientless SSL VPN using ASDM
  • 3.2.b Verify clientless connection
  • 3.2.c Implement basic AnyConnect SSL VPN using ASDM
  • 3.2.d Verify AnyConnect connection
  • 3.2.e Identify endpoint posture assessment

3.3 Site-to-site VPN

  • 3.3.a Implement an IPsec site-to-site VPN with pre-shared key authentication on Cisco routers and ASA firewalls
  • 3.3.b Verify an IPsec site-to-site VPN
4.0 Secure Routing and Switching

4.1 Security on Cisco routers

  • 4.1.a Configure multiple privilege levels
  • 4.1.b Configure Cisco IOS role-based CLI access
  • 4.1.c Implement Cisco IOS resilient configuration

4.2 Securing routing protocols

  • 4.2.a Implement routing update authentication on OSPF
5.0 Cisco Firewall Technologies

5.3 Implement NAT on Cisco ASA 9.x

  • 5.3.a Static
  • 5.3.b Dynamic
  • 5.3.c PAT
  • 5.3.d Policy NAT
  • 5.3 e Verify NAT operations

5.4 Implement zone-based firewall

  • 5.4.a Zone to zone
  • 5.4.b Self zone

5.5 Firewall features on the Cisco Adaptive Security Appliance (ASA) 9.x

  • 5.5.a Configure ASA access management
  • 5.5.b Configure security access policies
  • 5.5.c Configure Cisco ASA interface security levels
  • 5.5.d Configure default Cisco Modular Policy Framework (MPF)

Well what next, CCNP Security of course.

SMB Signing : Windows Client Server Hardening Part 2

Server Message Block SMB Signing is a security mechanism used in windows for digitally signing data at the packet level. Digitally signing the traffic enables the client and server to verify the origination and authenticity of the data received.

SMB signing can either be set through Group Policy Objects (GPO) or in the registry. Whilst this does increase security for clients and servers it does have a performance hit requiring extra computational power to deal with the hashing involved. This should be taken into consideration when looking into enabling this option, further more this should be tested out thoroughly before changing in a production environment. Domain Controllers (DC) digital sign there communications by default, this is set in the ‘Domain Controllers’ GPO however member servers and clients do not have this set (other than communication to the DC).

This Post will go through the different options to enable SMB signing for both Windows server and workstation.

SMB Signing through the Registry

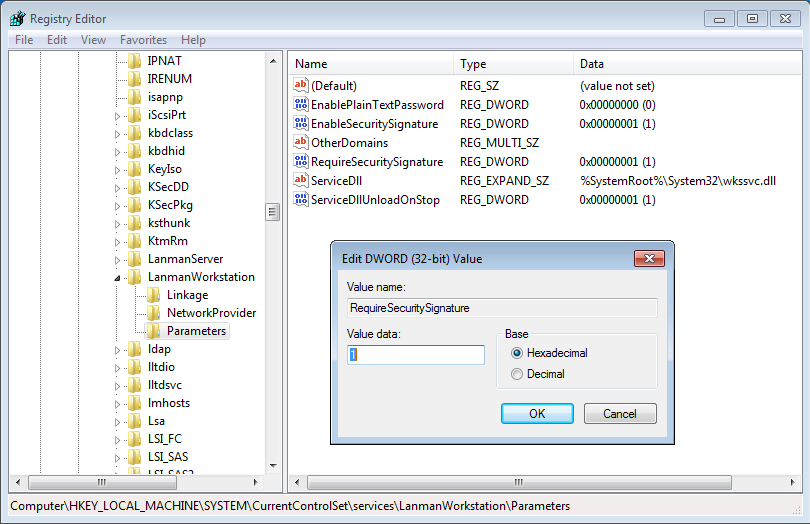
To enable this in the registry we need to create the following client registry key and amend the value data to 1 (ie to switch on):

HKEY_LOCAL_MACHINE\System\CurrentControlSet\Services\LanmanWorkStation\Parameters\RequireSecuritySignature

SMB Signing
SMB Signing

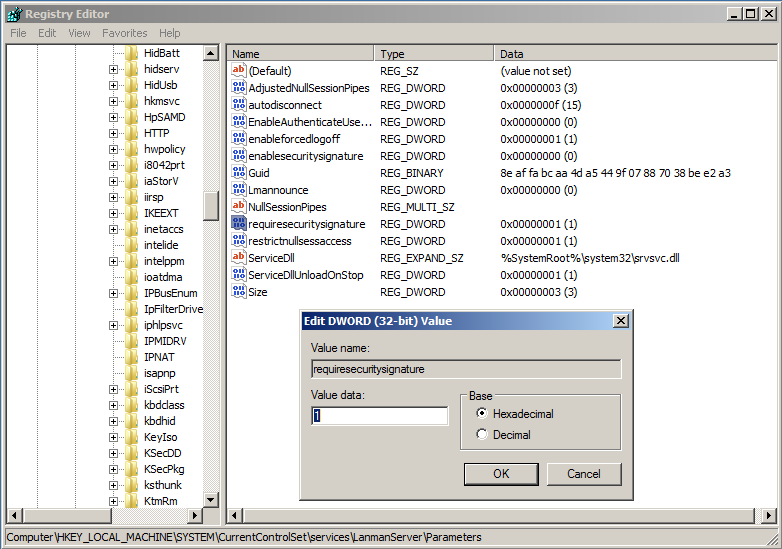
Server registry key is:

HKEY_LOCAL_MACHINE\System\CurrentControlSet\Services\LanmanServer\Parameters\RequireSecuritySignature

SMB Signing
SMB Signing

SMB Signing through Group Policy

In order to set via a group policy object you will need to create a new policy and change the below settings for the client:

SMB Signing GPO Setting

And for the server:

SMB Signing GPO Setting

It clearly goes without saying you should first test these methods for yourself in a safe test environment first before diving into your main production domain environment.

Windows Client/Server Hardening Part 1: Remote Desktop

We can harden the Windows Client/Server Remote Desktop Protocol (RDP) in several ways using either local settings or preferable through Group Policy. As a minimum we should harden RDP in the following ways:

  • Using Network Level Authentication (NLA).
  • Setting Terminal Services Encryption Level to High.
  • Force the use of TLS 1.0 protocol as a transport layer for the service.
  • Setting the local security policy of the either the server or client to use only FIPS-140 compliant cryptography.

This post will we go through how we can accomplish these tasks.

Network Level Authentication (NLA)

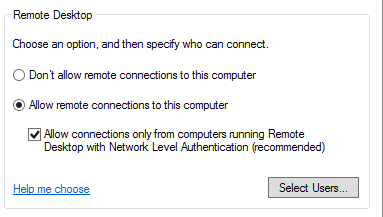
Network level authentication allows the client to authenticate earlier in the remote connection process rather than the normal process.  This option is most commonly seen in the Remote Desktop settings in the system properties as below:

RDP - NLA
Remote Desktop Settings – Network Level Authentication

However it is far easier to set this via Group Policy and distribute to all your Servers as below:

RDP- NLA GPO
Remote Desktop Services – Network Level Authentication GPO

This can be applied to both Servers and workstations from Windows Vista and above.

Setting Terminal Services Encryption Level to High

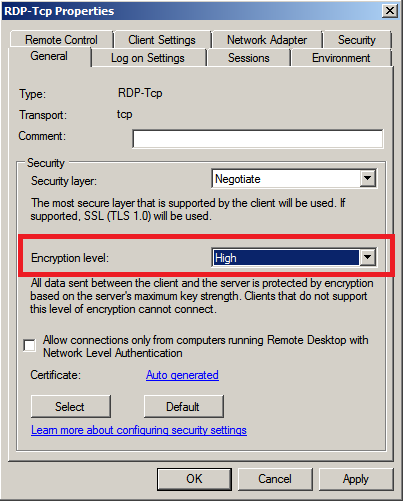
Setting the Encryption level to High encrypts data sent from client to server and server to clients using 128 bit encryption. Like with the above example we can set the Terminal Services Encryption level to High either locally on the server or via Group Policy. In a domain environment the GPO is the way to go. With windows server 2008 this could be set locally through the GUI by navigating from the start menu–>Administrative Tools–>Remote Desktop Services–>Remote Desktop Session Host Configuration, then double clicking on the ‘RDP-TCP’ connection in the middle of the screen. The Encryption level can be found on the General tab as below:

Remote Desktop Services - Encryption Level 'High'
Remote Desktop Services – Encryption Level ‘High’

Unfortunately Microsoft removed the  ‘RD Session Host Configuration’ options as standard with Server 2012 R2. Rather than adding in the whole RDS role to apply this option in the GUI you can apply it via GPO which will in turn apply to both 2008 and 2012 as below:

RDP - Encryption Level High GPO
Remote Desktop Services – Encryption Level High GPO

Force the use of TLS 1.0 protocol as a transport layer for the service

Forcing the use of TLS 1.0 mitigates the risks associated with SSL 3.0 protocol. Like with the previous option this can only be set in the GUI locally on Windows Server 2008. With this being said, and from a management perspective GPO is our preferred option, in order to apply this setting to both Windows Server 2008 and 2012.

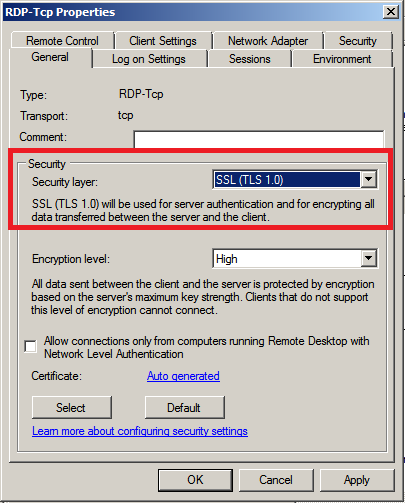
This option is set in Windows Server 2008 locally by navigating from the start menu–>Administrative Tools–>Remote Desktop Services–>Remote Desktop Session Host Configuration, then double clicking on the ‘RDP-TCP’ connection in the middle of the screen as below:

RDP - TLS 1.0
Remote Desktop Services – Security Layer TLS 1.0

The GPO is located here:

RDP - TLS 1.0 GPO
Remote Desktop Services – Security Layer TLS 1.0 GPO

Setting the local security policy of the either the server or client to use only FIPS-140 compliant cryptography

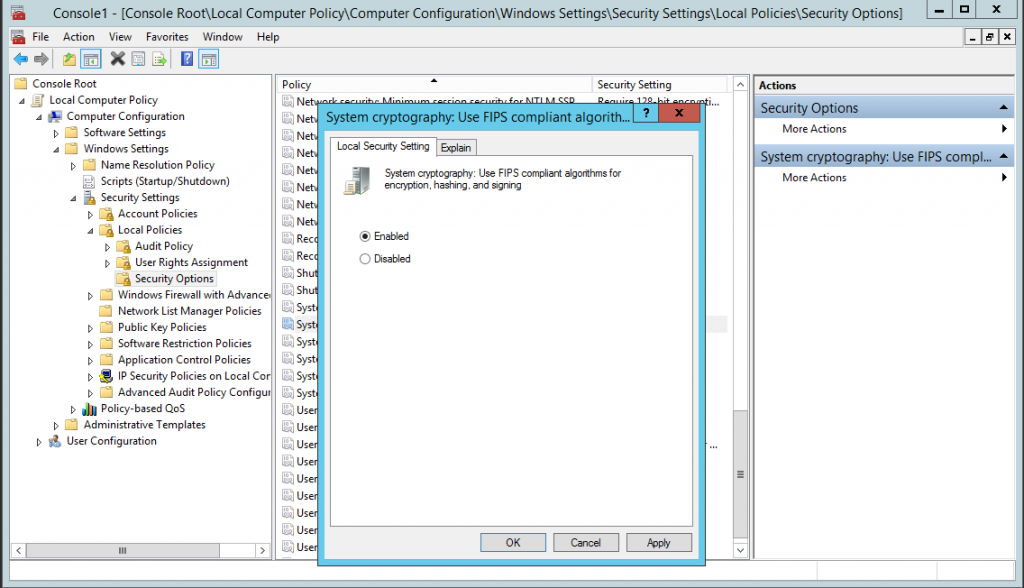
This hardening technique can be accomplished by enabling the ‘System Cryptography’ through the Local computer policy editor or through GPO via the domain. It will force the use of FIPS-140 compliant cryptography for either the client or server across the system. This is windows system setting rather than an RDP setting, however by setting this you will be forcing the use of FIPS-140 compliant cryptography for Remote Desktop settings. If this setting is enabled only the FIPS-140 approved cryptographic algorithms are used: 3DES and AES for encryption, RSA or ECC public key for TLS key exchange and SHA256, SHA284 and SHA512 for TLS hashing. In the case of Remote Desktop it will only use 3DES.

Adding through the local computer policy can be achieved by opening a Microsoft Managment Console (MMC) adding a snap in; Group Policy Object Editor. As below:

RDP - FIPS-140
Remote Desktop Services – FIPS-140 ‘Enabled’

Setting via GPO can be achieved as below:

RDP - FIPS-140 GPO
Remote Desktop Services – FIPS-140 GPO

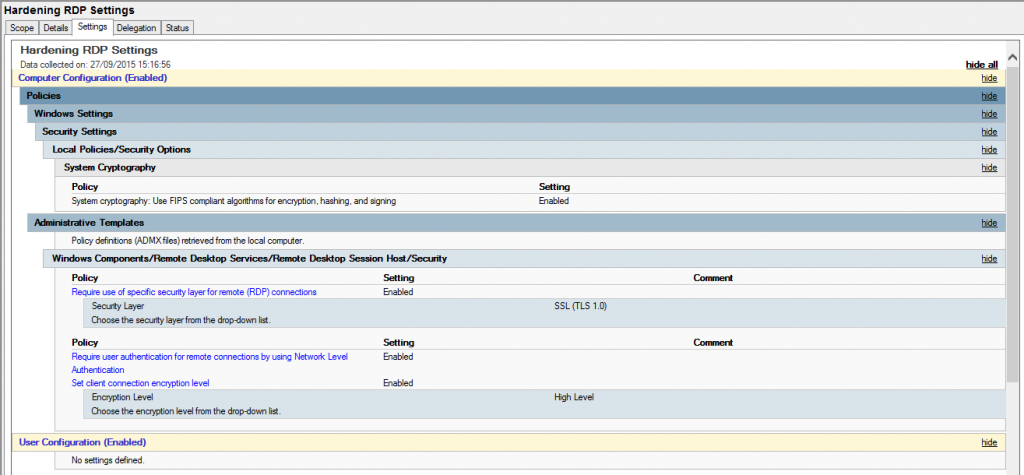
Hardening RDP – GPO Settings

Putting all these settings together in one GPO would look something like this:

Hardening RDP - GPO settings
Hardening RDP – GPO settings

It clearly goes without saying you should first test these methods out for yourself in a safe test environment first before diving into your main production domain or web servers. Adding higher grade encryption to your communications across the domain may have extra computation costs in terms of performance on your network.

Patch Management

Having good Patch managment is essential, and being able to keep on top of your microsoft patching is paramount to good security. It is all too easy to get caught behind in keeping systems upto date, since almost all software needs patching these days. Clawing your way back from out of date patches on servers can be a nightmare however automating patch managment if setup correctly with correctly configured maintenance windows makes life easier. Using products like WSUS, or better still SCCM 2012 R2 and having well built resiliant system architecture, can remove the pain from this task. Having a robust patching policy, and management buy in from the business is also essential. This enables the IT team to bring servers down at an appropriate time for that inevitable reboot is just  as important and can make the process run far more effectively. Does this bring into question whether this is an IT issue, a resourcing issue or a business strategy issue? Getting down time approval from a section of the business can be tricky without managment buy in, however, not letting the IT team take down that all important business critical system for patching is in itself a risk. A risk assement needs to be carried out by the business as to whether they delay remediating that zero day vulnerabilty vs letting the IT team patch the server and losing potential revenue whilst the server is down vs patching the system which subsequntly causes a system failure. All businesses should be asking themselves ‘what are my vulnerabilities?’. Subsequently what is the impact vs likelihood of this resulting in my overall risk? Of course this will be a case by case decision, with multiple factors, ie what is the patch fixing, the system archetecture etc. This needs to be weighed up against the consenquenses of not applying a patch ie can you afford to be hacked…

What are your thoughts?

SSL/TLS cipher suite selection and breakdown.

How do I know which cipher suites to select for my web server?

This is a common issue, sysadmins have their web servers up or vpn servers configured. However they are often using older SSL protocols and older cipher suites that are now vulnerable to attack in certain scenarios. We need to understand what a cipher suite is actually doing in order to select the correct ones.

For SSL/TLS connections a cipher suite is selected based on a number of tasks that it has to perform, the client uses a preferred cipher suite list and the server will normally honor this unless it also has a preferred list, set by the sysadmin.

Initial Key Exchange, the Asymmetric Encryption: This will most commonly be RSA, however the following are options; RSA ( Ron Rivest, Adi Shamir, and Leonard Adleman), DH (Diffie-Hellman) or  ECDH (Elliptic Curve Diffie-Hellman).
RSA key length should be 2048 bit minimum. ECDH and others should be an equal strength, note the ECDH key length will be significantly lower due to the way the algorithm works! The Asymmetric Encryption is only being used in the initial key exchange and for the session symmetric encryption key. The Asymmetric encryption method could be used for the data transfer however the computational power needed is far higher than the symmetric Encryption due to the key size.

Session data, the Symmetric Encryption: The most commonly used three ciphers we see in use being RC4, 3DES and AES, careful selection of ciphers is required here:

  • RC4 (Rivest Cipher 4) although used almost everywhere is now considered weak, and being phased out by Microsoft. This should be avoided.
  • 3Des (Triple Data Encryption Standard) uses DES and encrypts three times hence the ‘triple’. The original DES uses a weak key length and is considered weak.
  • AES (Advanced Encryption Standard) 128 bit block size using 128, 192 and 256 bit keys to encrypt data, is all good.

Many other options are available that are not so common include Blowfish, Twofish, Serpent etc. I won’t be going into the different ciphers here or the difference between Block (3DES+ AES) and Stream (RC4) on this page, I’ll save this for another blog.

Digital Signature – The digital signature is used to verify the server.

Integrity check – Here SHA-2 or SHA 256 (Secure Hash Algorithm) should be used. MD5 and SHA1 are being phased out due to weaknesses. SHA1 will still be seen on certificates however Google Chrome will now show a warning for this since October 2014. Microsoft has a deprecation policy indicating SHA1 issued certificates should not be used after 1/1/2017.

With all that being said, lets look at a typical cipher suite. Below is what you might commonly see in the likes of Firefox if you click on the padlock in the address bar and then click on more information.

Cipher suite in use in Firefox

Lets look at the cipher suite below for an example. We’ll break down the individual blocks to see what it actually all means.

TLS_ECDHE_ECDSA_WITH_AES_128_GCM_SHA256

TLS – The protocol in use
ECDHE – Elliptic Curve Diffie-Hellman key-exchange using ephemeral keys. More on ephemeral keys later, however this is what is going to give you that all important ‘Perfect Forward Secrecy’. Marked with the E at the front or behind for Ephemeral.
ECDSA – Elliptic Curve Digital Signature Algorithm, used to create the digital signature for authentication.
AES_128 – Advanced Encryption Standard 128 bit key size, used for the session encryption method for data.
GCM – Galois/Counter Mode an operation for block ciphers designed to provide both data authenticity (integrity) and confidentiality. GCMAC – provides authentication only.
SHA256 – Secure hashing Algorithm 256bit used for message integrity.

With the above knowledge and knowing the current vulnerabilities in SSL and TLS we can now make an informed decision and build the cipher suites we would like to use in Windows and Linux.