Secure up your SSH service
This is Part two of Securing SSH in the Server Hardening Series. In this post we will continue to walk through the remaining hardening options for SSH.
In Part 1 of Securing SSH located here we discussed:
- Disabling SSH Protocol 1 and using 2.
- Limiting the users who can login.
- Disable root login and unsing only a standard user account.
- Run SSH on a different port.
In Part 2 of Securing SSH we will now cover the remaining techniques:
- Use Public Private keys for Authentication
- Filtering SSH with iptables
- Setting strong Cryptographic Algorithms
Use Public Private keys for Authentication
As we know passwords can be subject to brute force attacks and given enough time simple passwords can be broken. Using SSH public private key pairs for authentication is a more secure method. Its a more secure method of logging in than using a password due to the computational power and time needed to decipher the public private key pair through brute force. The private key is used on the machine from which you are logging in from and the public key is used on the server or machine which you are establishing an SSH session with. In addition to using the key pair you can use a passphrase to secure the key pair. Should the key pair become compromised you have a an additional fallback and time in which to remove the public key from server it is being used on.
First we need to create the key pair, you can create either an RSA (Rivest-Shamir-Adleman) or DSA (Digital Signature Algorithm) key pair. The default key size in Ubuntu is currently 2048 however you can specify the -b parameter for a high keysize for example ‘-b 4096’. In this example we are creating a keypair for the root login, you should ideally do this for a standard user however this is just to demonstrate the procedure.
In this example we are creating the key pair on the same test ubtunu 14.04 server as the one which we are going to be using the keys to actually access. In reality there are a number of ways and platforms from which to create the key pair, whether that’s on the server or client OS.
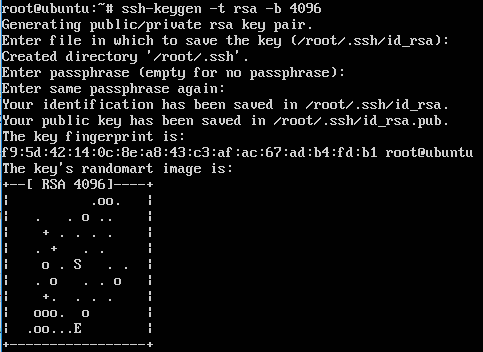
ssh-keygen -t rsa -b 4096
After the above command you will be prompted with some further questions, what and where the keys will be stored. Press enter and move on to accept the default files name, you can specify your own file name, the files will be created in the current working directory.
You will next be prompted to enter a passphrase, you have the option to enter one here. Doing so adds a layer of complexity for anyone that has already obtained the key pair and thus further hardens your configuration. If you enter a passphrase you will need to enter it in every time you ssh to the server.
The whole process will look like this:

If we now look in the ssh folder in the home user directory for root (or where ever you chose to save the files) we will see our key pair. The private key is called id_rsa and the public key is id_rsa.pub:

At this point it would be wise to backup both sets of keys. You will need to copy off the private key for you to use from your local machine that you will be ssh’ing in from, we could do this in many ways either using winscp from a windows operating system alternatively we can view the private key and use copy and paste the contents from an existing session. Remember the folder is hidden, with the period in front of the folder name (.ssh) if your looking for it in winscp ;-).
We will need to move the public key into the ‘authorized_keys’ file on the server you are going to be using the keys for (the same server in our case), and restart SSH. The .pub file should be copied over to the correct profile you will be ssh’ing into.
cd .ssh
cat id_rsa.pub >> authorized_keys
service ssh restart
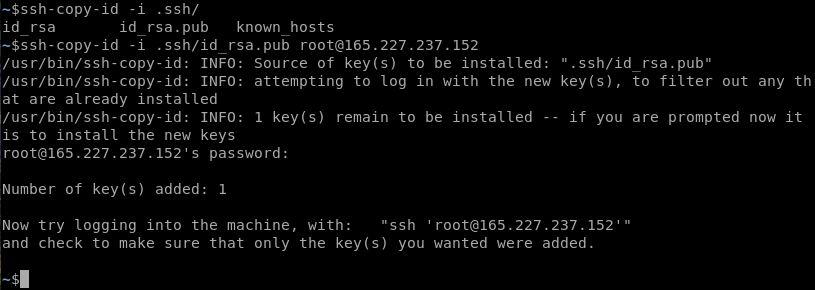
If I had created the key pair on my client machine I could use the ssh-copy-id command in order to get the public key onto the server like below:
ssh-copy-id -i .ssh/id_rsa.pub root@165.227.237.152
At this point you are ready to test the rsa key authentication method. I would strongly recommend you test this at this stage whilst you still have regular username and password ssh authentication enabled, in case you have made a mistake and can’t get back in. If you going to be testing from putty or winscp you will need to use puttygen to convert your private key file into a format that putty can read which is a ppk file. This is a straight forward task.
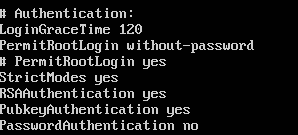
Once tested and you are ready to start using your key pair you will want to remove the ability for ‘root’ (and other user in this example) to login with a username and password. Only do this after you have successfully used your key pair and are comfortable with the process. In the ‘sshd_config’ amend the ‘PermitRootLogin’ to read ‘PermitRootLogin without-password’ and add a line that reads ‘PasswordAuthentication no’ like below.
Restart ssh service one final time. This will deny access via username and password.
Filtering SSH with iptables
I demonstrated the use of iptables in one of my previous posts here, so won’t be going into this again.
Setting strong cryptographic algorithms
In this particular section of the post we are going to look at how we can customize the cryptographic algorithms that SSH can use and further optimize these so we are only using the most secure ones available. To dig a little bit deeper here there are two specific issues we are going address. The first being the type of encryption mode that is being used, and the second being the use of weak MAC algorithms.
At the time of writing (as this will change) your average vulnerability scanner will detect ssh on port 22 and will try to negotiate a session with the service. In doing so it will detect the cryptographic properties that the server would like to use, in your typical out of the box setup CBC (Cipher Block Chaining) encryption mode and MD5 or 96-bit MAC (Message Authentication Code) algorithms will be configured, both of which are considered weak. The use of CBC encryption mode for SSH is currently scored as CVSS Base Score 2.6 equating generally speaking as a Low risk. We can correct this by disabling CBC encryption mode, and enabling a different type of mode such as CTR or GCM. The use of weak MAC is also scored with a CVSS Base Score of 2.6 equating again generally speaking as a Low risk. This can be correct by removing the use of MD5 and 96 bit MACs.
Amend or appending the following lines to the /etc/ssh/sshd_conf file will resolve this issue, there are other variations that you could use however this will rectify the issue:
Ciphers aes128-ctr,aes192-ctr,aes256-ctr,arcfour256,arcfour128
MACs hmac-sha1,umac-64@openssh.com,hmac-ripemd160
I hope this has been informative.


