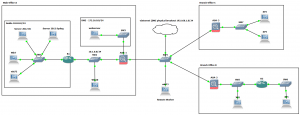
I thought I would share with you the Lab I have been mostly working with for CCNA Security (CCNAS) – Implementing Cisco Network Security (210-260) exam that I have recently took and passed. I have also used several smaller lab setups for specific testing however this is the main lab to piece everything together.

The lab has been built to accommodate the many elements on the exam and covers off most of the practical procedures that you need to be comfortable with. Using GNS3 and VirtualBox we are able to lab most of the practical exercises bar the L2 switching portions which I achieved through physical equipment (Catalyst 3750, 3550 x2 and 2950 switches). The exam does cover many topics in theory that you must know, these aren’t covered here, however can be found on the Cisco website.
The lab contains several client machines for managing the routers and ASA firewalls from putty, cisco configuration professional and ASDM as well as testing PAT through the ASA with a breakout to the internet. There is an Active Directory Domain Controller with the Network Access Protection role installed for use with AAA/radius and NTP. A separate syslog server. A DMZ with web server for testing NAT and outside firewall rules. There is also an ASA 5520 at each of the three sites for testing VPN site-to-site Ipsec connections, clients at all sites for testing end to end connectivity. There is also an outside remote client for testing the Anyconnect and client-less vpn options which takes advantage of the AAA radius service.
Using this lab we are able to address the following practical elements for the CCNAS exam:
2.0 Secure Access
2.1 Secure management
- 2.1.b Configure secure network management
- 2.1.c Configure and verify secure access through SNMP v3 using an ACL
- 2.1.d Configure and verify security for NTP
- 2.1.e Use SCP for file transfer
2.2 AAA concepts
- 2.2.b Configure administrative access on a Cisco router and ASA using RADIUS
- 2.2.c Verify connectivity on a Cisco router and ASA to a RADIUS server
3.0 VPN
3.2 Remote access VPN
- 3.2.a Implement basic clientless SSL VPN using ASDM
- 3.2.b Verify clientless connection
- 3.2.c Implement basic AnyConnect SSL VPN using ASDM
- 3.2.d Verify AnyConnect connection
- 3.2.e Identify endpoint posture assessment
3.3 Site-to-site VPN
- 3.3.a Implement an IPsec site-to-site VPN with pre-shared key authentication on Cisco routers and ASA firewalls
- 3.3.b Verify an IPsec site-to-site VPN
4.0 Secure Routing and Switching
4.1 Security on Cisco routers
- 4.1.a Configure multiple privilege levels
- 4.1.b Configure Cisco IOS role-based CLI access
- 4.1.c Implement Cisco IOS resilient configuration
4.2 Securing routing protocols
- 4.2.a Implement routing update authentication on OSPF
5.0 Cisco Firewall Technologies
5.3 Implement NAT on Cisco ASA 9.x
- 5.3.a Static
- 5.3.b Dynamic
- 5.3.c PAT
- 5.3.d Policy NAT
- 5.3 e Verify NAT operations
5.4 Implement zone-based firewall
- 5.4.a Zone to zone
- 5.4.b Self zone
5.5 Firewall features on the Cisco Adaptive Security Appliance (ASA) 9.x
- 5.5.a Configure ASA access management
- 5.5.b Configure security access policies
- 5.5.c Configure Cisco ASA interface security levels
- 5.5.d Configure default Cisco Modular Policy Framework (MPF)
Well what next, CCNP Security of course.

 Check out the Linux Firewall mini setup guide which demonstrates the use of iptables in Linux. Here I demonstrate a few basic commands and rules and explained how we can allow and deny specific traffic on your Linux server. The scenario is for typical web server allowing only HTTP, HTTPS and SSH. Host based firewalls are often overlooked relying solely on perimeter defenses however are an important aspect of protecting your endpoint whether that is on a server or workstation. Iptables in built into Linux is a pretty capable command line based stateful firewall. Once you have the hang on the syntax it is fairly straightforward to implement and customize to your own requirements.