SSH ProxyCommand & ProxyJump

SSH ProxyCommand and ProxyJump to the rescue for jumping through multiple SSH hosts. I was asked by a fellow team member how we access RDP through two Linux hosts recently. I had to think for a moment, and remembered good old ProxyCommand and ProxyJump. So I thought I would post this up as a note to self and anybody else who might find this useful.

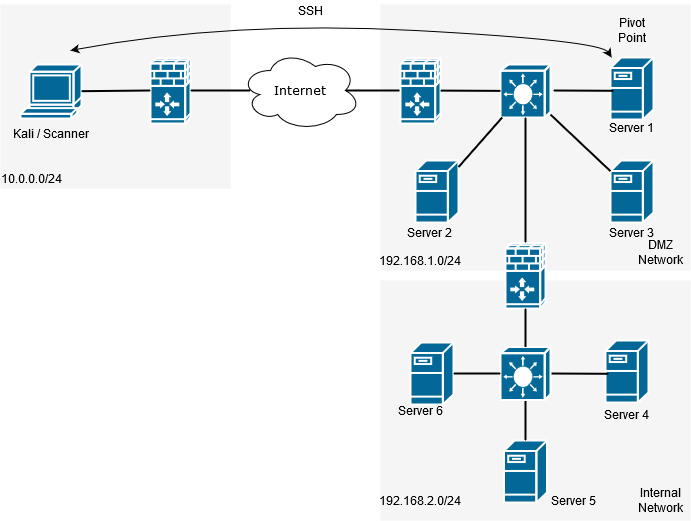
In this scenario imagine we are on the outside of a NAT firewall (this could be across the internet of internal network), we need access to a windows host several networks deep with only Linux/ssh hosts to jump across. Similar to the below:

How do we achieve it? Well, we can actually do this several ways with different commands. One way is to SSH to each host in turn and do a local port forward. That seems a bit long winded. Another approach would be to formulate a set of SSH commands in the /etc/ssh_config file, again a bit long winded. Alternatively, a one liner more suited in this situation would see multiple SSH commands nested together with local port forwarding. There are actually also (not surprisingly) several ways we can achieve a one liner using the likes of ProxyCommand, ProxyCommand with nc and newer versions of openssh ProxyJump.

With ProxyCommand this is what our command would look like:

ssh -o "ProxyCommand=ssh -W %h:%p -o 'ProxyCommand=ssh -W %%h:%%p -L 3389:127.0.0.1:3389 root@10.0.0.46' -L 3389:127.0.0.1:3389 root@192.168.2.100" -L 3389:192.168.3.202:3389 root@192.168.3.100 -vv

This will prompt you at each host for the password, unless you use SSH key pair with no password.

There are a couple of key elements in this one liner that we will go through:

-o : This is used to specify the option you want to use, in this case proxycommand.

-W : This is important, as this redirects the std input/output back to your host securely. Two additional options after the -W are %h which is our kali host and %p is our ssh port. This is specified in each proxycommand, note in the second command the %% this is essential to escape the characters. Note -W is not to be confused with lower case -w which is for a completely different task.

-L : This is our regular local port forward, in this case at each jump host we forwarding back 3389.

Another more neat and simpler way to do this is to use the ProxyJump command which is shortened to -J.

ssh -J root@10.0.0.46,root@192.168.2.100 -L 3389:192.168.3.202:3389 root@192.168.3.100

With ProxyJump we are setting our jump hosts in line one after the other comma separated and just setting the local port forward on our final host. This tunnels the port right through from your local box through to the destination server.

All that is left to do now is to use rdesktop or xfreerdp to 127.0.0.1 on 3389 using either proxycommand or proxyjump.

Pretty cool huh.

Networking Pivoting via SSH – Scanning with Nessus Professional behind a Firewall or NAT.

In this post I’m going to be covering the process to scan a network behind a Firewall or NAT using Networking Pivoting via SSH without being limited to proxychains, specific ports and protocols. Essentially this will use SSH tunneling, virtual tap adapters, some routing and masquarding in IPtables. The beauty of this method is the prerequisites are very low, for the most part no additional packages or standalone tools are required, we can use what is shipped with most Linux builds.

There are many use cases for this, scanning an internal network without being on prem, cloud environments, various pentesting scenarios, which can often be the stumbling point once a shell has been landed. Traditionally this type of task would have been done with the use of proxy chains, through some form of shell access via a netcat listener, Metasploit or SSH dynamic port forward, which I have previous walked through here. However this is an extremely slow method and rely’s on being able to tunnel through a single port with proxy chains, I have never had any luck scanning with more complex tools like Nessus in this way. Full SYN scans (-sT) with nmap great, Nessus not so much.

Lets take the following scenario and set the pivot up:

Networking Pivoting via SSH

We can use tunctl or ip tuntap, the difference being that ip tuntap is part of the iptools suite and therefore general supported on most Linux operating systems. Tunctl can usually be downloaded from your repo of choice ie with Ubuntu its part of the apt repository. In this example we will be working with Kali as the scanning system and a Ubuntu server as the pivot point, which has SSH accessible. (It is worth mentioning at this point it doesn’t matter which end the SSH connection is initiated from).

First we need to create a virtual tunnel and therefore need to create two virtual interfaces at both ends of the tunnel. For this we are going to use a tap interface. For reference a tap interface operates at layer 2 and a tun interface operates at layer 3.

Using tunctl: First we will need to install tunctl with apt install uml-utilities

# apt install uml-utilities

Create the virtual tap interface with the following command:

# tunctl -t tap0

Using ip tuntap: First verify your ip tools version installed supports tuntap, type ‘ip’ you will see if the command is available:

# ip

Create the virtual tap interface with the following command:

# ip tuntap add dev tap0 mod tap

Once this is setup assign it an ip address and raise the interface, assign a different address for each end of the tunnel:

So on the scanner:

# ip a a 10.100.100.100/24 dev tap0 && ip link set tap0 up

On the pivot server:

# ip a a 10.100.100.101/24 dev tap0 && ip link set tap0 up

On each end of the tunnel we will also need to make sure our SSH config will allow us to tunnel. Lets modify our /etc/ssh/sshd_config file by adding ‘ PermitTunnel=yes ‘ to the end and restart the service. More about this option can be found in SSH man page here.

Now for the magic, lets bring the tunnel up by establishing an SSH session, this will need to be done with a privileged account:

ssh -o Tunnel=ethernet -w 0:0 root@11.1.1.11

Lets cover off these options:

  • -o = allows us to specify options
  • Tunnel=ethernet = is our option for the tunnel
  • -w 0:0 = specifies the next available interface for the tunnel, and corresponds to each side of the tunnel.

Next lets take a moment to verify our tunnel is up with a couple of quick checks:

First verify the link is up with ethtool:

# ethtool tap0

You will notice the link is up, try this without the connection you will find the link is down.

Second verify you can ping the other end of the tunnel:

# ping 10.100.100.101

Again disconnect your SSH connection and watch icmp response drop.

Next in order to get our traffic to our destination servers/subnet we are going to need some routes adding to Kali to tell the system where to send the traffic, ie the other end of the tunnel, so, something similar to this where 192.168.1.0/24 being the network you are targeting:

# ip route add 192.168.1.0/24 via 10.100.100.101

# ip route add 192.168.2.0/24 via 10.100.100.101

Finally we need to setup some iptables rules and turn our pivot point into a router by enabling IPv4 forwarding:

# echo 1 > /proc/sys/net/ipv4/ip_forward

# iptables -t nat -A POSTROUTING -o eth0 -j MASQUERADE

# iptables -t nat -A POSTROUTING -o tap0 -j MASQUERADE

# iptables -A INPUT -i eth0 -m state –state RELATED,ESTABLISHED -j ACCEPT

# iptables -A INPUT -i tap0 -m state –state RELATED,ESTABLISHED -j ACCEPT

# iptables -A FORWARD -j ACCEPT

At this point the pivot should be up and running, test this by doing some basic checks with a known host on your target network.

Happy pivoting testers!

Tunnel snmp-check and other UDP traffic over SSH

Today I will be walking you through how to tunnel snmp-check and other UDP traffic over SSH.

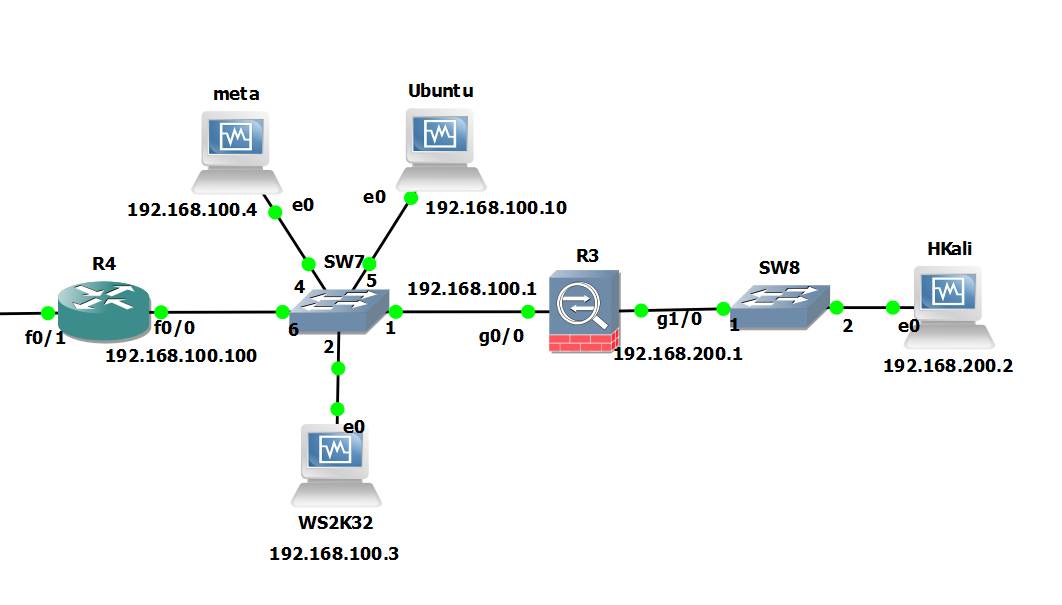
In this example we are tunnelling UDP over SSH to circumvent firewall rules on the outside. Our firewall rules are only allowing access into the other side of the firewall to TCP port 22 on a Ubuntu server. We don’t have access to any other TCP or UDP ports. The only method of communication into the environment is via SSH to our Ubuntu server. We will use this server as jump/pivot point for other traffic. Imagine we have earlier identified through cdpsnarf using SSH dynamic port forwarding and proxychains another router, we want to enumerate this further. Our next goal in this case is to try and enumerate SNMP UDP port 161 on target router with a public community string. This example could also be applied to all sorts of UDP traffic such as DNS for example were we want to tunnel our local DNS requests to a server behind a firewall. Zone transfer maybe?tunnel snmp-check and other UDP over SSH

Attack machine: Kali Linux 192.168.200.2
Pivot Server: Ubuntu 192.168.100.10
Target: GNS3 Cisco Router 192.168.100.100

We are going to do this by sending our local UDP traffic through netcat (handling UDP) into a fifo process back into netcat (handling TCP), through the ssh tunnel then in reverse the other end. Yes I know bit of a brain teaser! You can read more about fifo files here, they are similar to pipe in linux. In essence we are sort of writing the output to a file (without actually writing anything) then sending it on its merry way through netcat via TCP then down the tunnel. Its best we see this in the flesh with an example.

We begin on the Attack machine by running up the ssh connection, here we are forwarding TCP port 6666 on localhost to TCP 6666 on the remote pivot server:

root@kali:~# ssh -L 6666:localhost:6666 user@192.168.100.10

Then on the Pivot Server we create a fifo file for netcat to talk too:

root@ubuntu:/home/user# mkfifo /tmp/fifo
root@ubuntu:/home/user# nc -l -p 6666 < /tmp/fifo | nc -u 192.168.100.100 161 > /tmp/fifo

On the Attack machine we do similar:

root@kali:~# mkfifo /tmp/fifo
root@kali:~# nc -l -u -p 161 < /tmp/fifo | nc localhost 6666 > /tmp/fifo

In second terminal on the attack machine:

Run up ‘netstat -au’ to verify snmp is listening on the local machine.

UDP netstat connections

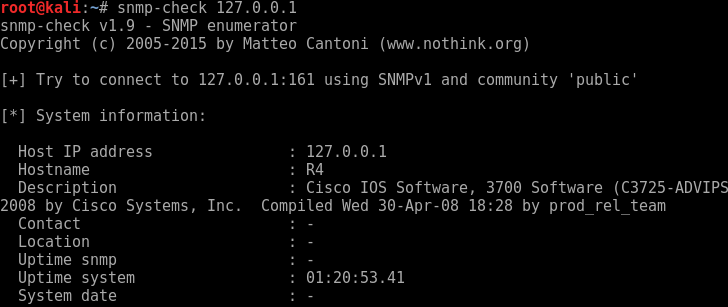
We can then simple run snmp-check to localhost.

snmp-check 127.0.0.1

snmp-check over SSH


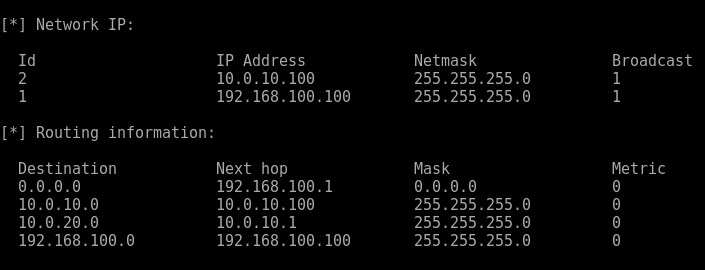
Looking further down the information we discover the following:
snmp-check over SSH another netowrk


Another network interface, is this possibly the internal network and route to DA..? Maybe in the next post…

Bingo UDP and snmp-check over an SSH tunnel, awesome!

Server Hardening: Securing SSH part 2

Secure up your SSH service

This is Part two of Securing SSH in the Server Hardening Series. In this post we will continue to walk through the remaining hardening options for SSH.

In Part 1 of Securing SSH located here we discussed:

  • Disabling SSH Protocol 1 and using 2.
  • Limiting the users who can login.
  • Disable root login and unsing only a standard user account.
  • Run SSH on a different port.

In Part 2 of Securing SSH we will now cover the remaining techniques:

  • Use Public Private keys for Authentication
  • Filtering SSH with iptables
  • Setting strong Cryptographic Algorithms

Use Public Private keys for Authentication

As we know passwords can be subject to brute force attacks and given enough time simple passwords can be broken. Using SSH public private key pairs for authentication is a more secure method. Its a more secure method of logging in than using a password due to the computational power and time needed to decipher the public private key pair through brute force. The private key is used on the machine from which you are logging in from and the public key is used on the server or machine which you are establishing an SSH session with. In addition to using the key pair you can use a passphrase to secure the key pair. Should the key pair become compromised you have a an additional fallback and time in which to remove the public key from server it is being used on.

First we need to create the key pair, you can create either an RSA (Rivest-Shamir-Adleman) or DSA (Digital Signature Algorithm) key pair. The default key size in Ubuntu is currently 2048 however you can specify the -b parameter for a high keysize for example ‘-b 4096’. In this example we are creating a keypair for the root login, you should ideally do this for a standard user however this is just to demonstrate the procedure.

In this example we are creating the key pair on the same test ubtunu 14.04  server as the one which we are going to be using the keys to actually access. In reality there are a number of ways and platforms from which to create the key pair, whether that’s on the server or client OS.

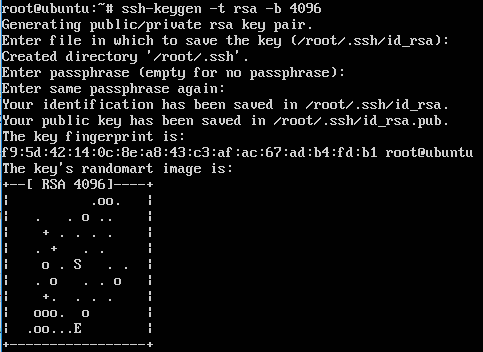
ssh-keygen -t rsa -b 4096

After the above command you will be prompted with some further questions, what and where the keys will be stored. Press enter and move on to accept the default files name, you can specify your own file name, the files will be created in the current working directory.

ssh file name

You will next be prompted to enter a passphrase, you have the option to enter one here. Doing so adds a layer of complexity for anyone that has already obtained the key pair and thus further hardens your configuration. If you enter a passphrase you will need to enter it in every time you ssh to the server.

The whole process will look like this:

SSH Key Generation using RSA 4096 key

If we now look in the ssh folder in the home user directory for root (or where ever you chose to save the files) we will see our key pair. The private key is called id_rsa and the public key is id_rsa.pub:

SSH Key files
SSH Key files

At this point it would be wise to backup both sets of keys. You will need to copy off the private key for you to use from your local machine that you will be ssh’ing in from, we could do this in many ways either using winscp from a windows operating system alternatively we can view the private key and use copy and paste the contents from an existing session. Remember the folder is hidden, with the period in front of the folder name (.ssh) if your looking for it in winscp ;-).

We will need to move the public key into the ‘authorized_keys’ file on the server you are going to be using the keys for (the same server in our case), and restart SSH. The .pub file should be copied over to the correct profile you will be ssh’ing into.

cd .ssh
cat id_rsa.pub >> authorized_keys
service ssh restart

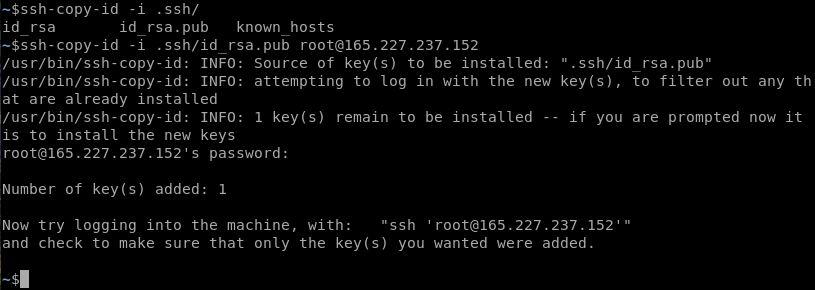
If I had created the key pair on my client machine I could use the ssh-copy-id command in order to get the public key onto the server like below:

ssh-copy-id -i .ssh/id_rsa.pub root@165.227.237.152

At this point you are ready to test the rsa key authentication method. I would strongly recommend you test this at this stage whilst you still have regular username and password ssh authentication enabled, in case you have made a mistake and can’t get back in. If you going to be testing from putty or winscp you will need to use puttygen to convert your private key file into a format that putty can read which is a ppk file. This is a straight forward task.

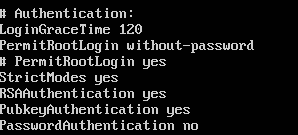
Once tested and you are ready to start using your key pair you will want to remove the ability for ‘root’ (and other user in this example) to login with a username and password. Only do this after you have successfully used your key pair and are comfortable with the process. In the ‘sshd_config’ amend the ‘PermitRootLogin’ to read ‘PermitRootLogin without-password’ and add a line that reads ‘PasswordAuthentication no’ like below.

sshd_config

Restart ssh service one final time. This will deny access via username and password.

Filtering SSH with iptables

I demonstrated the use of iptables in one of my previous posts here, so won’t be going into this again.

Setting strong cryptographic algorithms

In this particular section of the post we are going to look at how we can customize the cryptographic algorithms that SSH can use and further optimize these so we are only using the most secure ones available. To dig a little bit deeper here there are two specific issues we are going address. The first being the type of encryption mode that is being used, and the second being the use of weak MAC algorithms.

At the time of writing (as this will change) your average vulnerability scanner will detect ssh on port 22 and will try to negotiate a session with the service. In doing so it will detect the cryptographic properties that the server would like to use, in your typical out of the box setup CBC (Cipher Block Chaining) encryption mode and MD5 or 96-bit MAC (Message Authentication Code) algorithms will be configured, both of which are considered weak. The use of CBC encryption mode for SSH is currently scored as CVSS Base Score 2.6 equating generally speaking as a Low risk. We can correct this by disabling CBC encryption mode, and enabling  a different type of mode such as CTR or GCM. The use of weak MAC is also scored with a CVSS Base Score of 2.6 equating again generally speaking as a Low risk. This can be correct by removing the use of MD5 and 96 bit MACs.

Amend or appending the following lines to the /etc/ssh/sshd_conf file will resolve this issue, there are other variations that you could use however this will rectify the issue:

Ciphers aes128-ctr,aes192-ctr,aes256-ctr,arcfour256,arcfour128
MACs hmac-sha1,umac-64@openssh.com,hmac-ripemd160

I hope this has been informative.

Server Hardening: Securing SSH Part 1

This will be the first of two posts in the server hardening Series where we will discuss the Secure Shell (SSH) service.  I will cover the options available to us for hardening SSH. SSH is a cryptographic network protocol used for remote management over an insecure (or less secure) communication channel. Whether this is a web server, an appliance or a firewall, out on the internet or in your local subnet. For example most remote Linux based servers have SSH enabled in order for administrators to remotely manage them rather than being directly in front of the server/appliance with a monitor at the console. According to arstechnica (2015) Microsoft is also to introduce native support for SSH in 2015 – so watch this space.

There are a number of hardening techniques that we can undertake to further secure the SSH service from an out of the box typical install. These include:

  • Disabling SSH Protocol 1 and using Protocol 2. (Part 1)
  • Limit the the users who can login. (Part 1)
  • Disable root login and use a standard user account. (Part 1)
  • Run SSH on a different port to 22. (Part 1)
  • Use Public Private keys for Authentication. (Part 2)
  • Filter SSH with iptables (demonstrated in one of my previous posts here) (Part 2)
  • Setting strong cryptographic algorithms (Part 2)

I will be demonstrating these tasks on Ubtuntu 14.04. however the options and configurations will be very similar across the different Linux distributions.

Disabling SSH Protocol 1 and using Protocol 2

Disabling SSH Protocol 1 is done in the following file ‘/etc/ssh/sshd_config’, so using your favorite text editor nano, vi, leafpad etc (mines nano) open up the ‘sshd_config’ file and find the protocol line and ensure it has a the ‘2’ parameter next to it like the below:

# Protocol 1
Protocol 2

Limit the the users who can login

Locate the authentication section again in the file ‘/etc/ssh/sshd_config’, and add in the line ‘AllowUsers Adam Mark’ and any other usernames as needed. This should be used in conjunction with disabling the root login. This will only let ‘Adam’ and ‘Mark’ login for example.

AllowUsers Adam Mark

Disable root login and use a standard user account

Locate the authentication section and specifically the ‘PermitRootLogin yes’ and either comment the line out with a # and add a new line in or change the parameter to ‘no’.

# Authentication:
LoginGraceTime 120
# PermitRootLogin yes
PermintRootLogin no

Run SSH on a different port to 22

This can clearly be achieved in a number of different ways depending on how your infrastructure is configured. For example you could change the port on your SSH Service in the sshd_config file or adjust port forwarding/translation rules on your firewall or router. The main goal of this exercise is to obfuscate the SSH service to a potential attacker, we must be clear here this doesn’t protect the port in any way however does distract from the fact port 22 is not open for business. I say again this will not protect you against an attacker with enough intent, an attacker with enough experience will have scanned all 65k ports and verified all services on all open ports. Never the less if somebody has only scanned the top 1k ports its still an option, but should not be relied upon. I’m not going to get into the debate of ‘security by obscurity’ in this post. From the following file ‘/etc/ssh/sshd_config’, locate the ‘port 22’ line and change the number parameter to the unused port of your choice

# I have changed the default SSH port from 22 to 3333
Port 3333

I have added a comment in the line above as a reminder here to allow the next person to see what I have done for any troubleshooting purpose. You never know when you will move on and the next person needs to administer the box, this is useful to them. 😉

In most cases the SSH service will need to be restarted in order for the changes to take effect. From a terminal: (I always add a ‘-v’, optional for verbose)

Service ssh restart -v

As always I would suggest you try these out first in a test environment making one change at a time before changing your corporate machines.